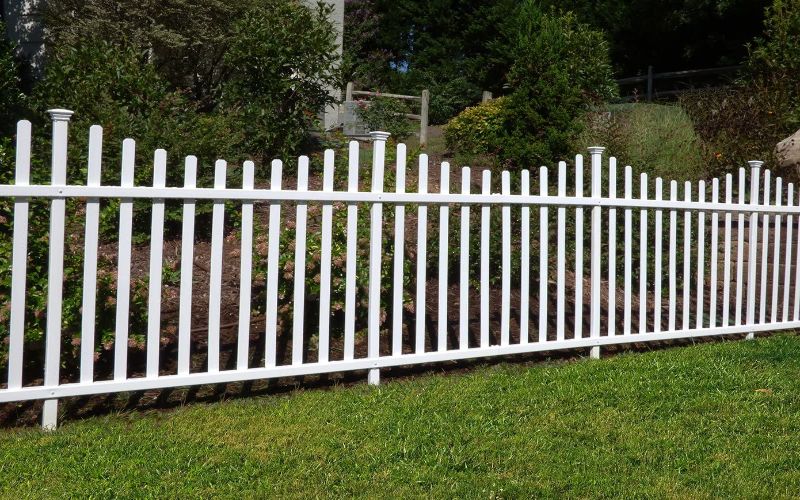
Can you paint a vinyl fence? And for what reasons? In this post, I’ll focus on the whys of painting a vinyl fence. Stay with me!
The use of vinyl fences dates back to the early 1980s. It was introduced as an alternative to wood since it’s more durable.
What you’ll love most about vinyl is its resistance to common wood enemies such as fungus, dry rot, termites, and fire.
With this type of fence, you’ll require little to no maintenance. Even so, regular cleaning will see it maintain its beauty.
Apart from cleaning, can you paint a vinyl fence?
Yes, you can, though most paints won’t adhere properly. The reason is that the vinyl fence has a non-porous material.
Epoxy-based acrylic paints are the perfect paints to use on vinyl fences.
Latex or oil-based paints do not expand or contract, making them unsuitable for surfaces that can undergo contraction and expansion like vinyl.
Also, ensure you choose the appropriate primer and paint for the best results. It should be specifically designed for vinyl products.
Let’s learn more about paintwork on vinyl fences.
What Kind of Paint Do You Use On a Vinyl Fence?
 Epoxy-based acrylic paints make the best choice for vinyl fences and such products.
Paints like latex and their oil based counterparts shouldn’t be used on Vinyl because they don’t expand or contract.
Vinyl expands and contracts depending on the prevailing weather conditions.
The contraction and expansion of vinyl will lead to chipping or cracking of latex or oil paints when used on vinyl fences.
Also, as you look to paint your vinyl fence, ensure that you prime it before painting.
Go for a primer designed for vinyl that will also deter the growth of mold and mildew.
Note: Before painting your vinyl fence, ensure you thoroughly clean it and allow it to dry before priming it.
Can You Paint a White Vinyl Privacy Fence?
Yes, you can since the white color might become boring over time.
However, it’s not a must you do the painting if the white color looks nice to you or blends with the surrounding.
Tip: Ensure you choose the right paint (epoxy-based exterior paint).
Before painting, the surface must be free from dirt and debris.
How Do You Paint a New Vinyl Fence?
Painting is fun, and you’ll love it most on your new vinyl fence if you follow the below procedures:
Step 1: Choose the Correct Materials
It will be nice to know that vinyl fences don’t take regular oil or latex-based paints. Therefore, remember to go for epoxy-based paint.
Also, remember to choose the right paint tools for the job. What if you use the wrong roller or brush?
If so, you’ll have to bear with the uneven application that will cause messy drips on the final project.
Therefore, ensure you keenly read the instructions or consult with your local DIY store for the ideal rollers or brushes.
Step 2: Prepare the Fence.
Even though the fence is new, there are chances of a layer of grime and dirt that will prevent the epoxy-based paint’s proper adhesion.
For this reason, you’ll need a bucket of warm soapy water to do the cleaning. Finish off by rinsing thoroughly with a garden hose.
Yes! You can let the fence dry with the natural heat.
However, taking some time to dry it off with a clean towel will ensure no remaining residue, preventing the proper adhesion.
Afterward, let it completely dry before priming.
Step 3: Priming
You need to know proper priming to ensure your topcoat is free from cracks and premature bubbling.
Note: All primers are not suitable for use on vinyl fences.
Thus, it would help if you chose the ideal exterior primer specially designed for vinyl products. It should also be mold and mildew-resistant.
For the application process, you need to wear safety latex gloves.
Apply the primer using a paintbrush for the hard to reach areas and a roller for the larger areas.
Alternatively, a paint sprayer will do the same work half the time as a roller.
It also provides a more even finish and is easy for tricky angles.
After priming, let the surface dry before painting.
Tip: Always wear safety glasses and a dust mask when using a spray painter.
Step 4: Do the Painting
Here, you’ll need the same painting skills as you did with the primer. Suppose you decide to use the same spray painter.
Ensure you thoroughly clean it, then let it dry before filling it with paint.
Tip: This will prevent the primer and water from mixing with your topcoat paint.
If you’ll prefer using brushes and rollers, ensure you make an even application.
Again, instead of cleaning them between applying coats of paint, you can consider wrapping them with plastic cling wrap.
Note: It’s good to let the paint dry between coats.
Step 5: Apply the Sealant.
After completely dries the paint, it’s time to protect your vinyl fence with a high gloss sealant.
Choosing the correct product will protect your fence from most natural inhibiting factors. Thus, it will not fade or crack quickly.
Afterward, allow the sealer to completely dry, and you’ll be ready to enjoy the maintenance-free benefits of your vinyl fencing.
Here’s How to Paint Vinyl Fence:
Is There a Spray Paint for Vinyl?
 Yes, there is. But since vinyl is plastic, choosing any spray paint that adheres to plastic will work for the project.
I recommend fabric spray paint even though it’s quite expensive.
Using this paint for your vinyl assures durability with protection from mother nature.
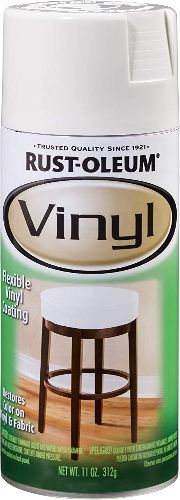
The best spray paint for Vinyl is the Rust-Oleum 1911830 Vinyl White Specialty Spray Paint.
This spray paint restores color and gloss.
The Vinyl White Specialty Spray Paint restores color on Vinyl and fabrics.
It is made with solid vinyl paint resins making it flexible with fast drying features.
The formula is durable, with a permanent color on any vinyl surface.
You can use the formula on the car and boat seats, dashboards, upholstery, luggage, furniture, sports equipment, and White rosol.
Buy Rustoleum Here
Do Vinyl Fences Crack?
Yes, they crack under certain circumstances, such as heatwaves, poor maintenance, hard freezes, and simple accidents.
Extreme hot and cold temperatures may also cause your vinyl to crack even though it’s flexible.
But, how can you prevent the cracking?
-
Regular Washing
Cleaning is always the basic maintenance practice. And the best thing about vinyl fencing is that it’s easy to clean.
Mostly you’ll only need to hose down unless you deal with stubborn dirt. In such cases, the basic household detergent is all you need.
Regular cleaning is a good remedy for your fencing since it will let you notice if there is a beginning of any slight crack.
-
Treat It With Care
Carefully treating your fencing is also a reliable way of preventing cracks.
For instance, you should restrict people, especially kids, from playing with your fence.
If you have plantations around, ensure you call a qualified gardener to do the job.
Suppose you decide to do the trimming. Please be careful when using the weed trimmer.
It would help if you remembered not to lean heavy objects against your fence. What if you accidentally do so for a prolonged time?
The weight will create unnecessary bowing on your fence, leading to unneeded stress and strain, resulting in cracking.
-
Fence Stability
It doesn’t matter how professionally you install your fencing. Over time, it might lose stability. Mostly it can be due to high winds, among other factors.
For this reason, it will be good to consistently check on your fence’s stability over timed intervals annually.
If the fence maintains stability, it will prevent crack formation due to minimal movements.
-
Post Cap Inspections
The post caps of your fence might loosen over time. If you notice this, please repair it as soon as you can. Consider using PVC glue for the job.
Proper maintenance of the post caps will secure the whole fencing structure and prevent bugs and moisture from entering.
Pro Tip: If you notice even the slightest crack on your vinyl fencing, deal with it immediately to prevent further damage.
Should a Vinyl Fence Touch the Ground?
You can’t compare the strength and durability of vinyl fencing and that of wood.
Even so, it’s still necessary to set it deep into the ground for better performance.
Doing this will prevent it from dispositioning in the future.
Note: It’s only the post that goes underground.
So, what are the common mistakes people make when installing a vinyl fence?
-
Not Digging Post Holes Deep Enough
As stated above, digging deep post holes for your vinyl fencing is important for a strong and durable structure.
The reason is that the soil might loosen up in varying weather conditions.
For instance, soil loses moisture during dry weather, which might affect its movement, so ensure that the hole is deep enough.
Experts recommend that the fence posts be at least two feet into the ground and compacted with concrete.
For the case with vinyl fencing of about 6 feet or taller, it’s good that the fence post is at least 3 feet into the ground.
Note: Most people mistake a 3-foot deep hole with setting a post 3 feet deep.
Thus, I suggest using a 10″ auger bit to dig your post hole up to the 3-foot mark.
-
Failing to Account for the Sloped or Graded Ground
Never neglect any ground slope during vinyl fence installation. There are two best ways of dealing with them (step and rack method).
The step method mainly works when using complete fence panels for the installation. It leaves the fence looking like a set of steps.
Fill the remaining spaces underneath using railroad tiles, planters, bricks, or cement walls to enhance the structural integrity of your fence.
Customary panels that follow the slope of your ground can also be useful.
Note: The step method does not work with prebuilt fences.
In the case of rack fencing, you’ll have to use custom-made panels, thus rendering it quite expensive.
-
Trying to Do It All Yourself
Vinyl fence installation requires at least two or more people. It even becomes more demanding when hanging gates and panels from fence posts.
Tip: The fence might be lighter than wood, but an extra hand will do an excellent job.
-
Not Installing Gates Properly
You shouldn’t forget to install the gates properly during the installation because gates don’t go anywhere. You must have the concepts from the beginning.
Note: Leave at least 1″ on each gate side for hardware and motion clearance.
The gate’s opening should be about 2″ wider than the gate.
The gate should also be free from the ground but not leave too much space while opening.
Aiming for at least 1″ from the ground would be wise.
What if your ground is uneven? Here, you’ll have to mount the gate above the highest level.
-
Not Setting Fence Panels Square
Setting the panels square will ensure the fence is always stable. The unique way of doing this is by using the 3-4-5 triangular method.
Which Is Better PVC or Vinyl Fence?
These two materials are suitable for fencing due to their durability and resistance to most inhibiting factors.
However, they technically have the same class of composition. PVC is mainly a polyvinyl chloride and a polymer of vinyl chloride.
So, what makes these two materials different? Let’s find out to know which one is best.
PVC
- It has a high strength-to-weight ratio.
- Low production costs.
- Long life span (20 – 30 years).
- UV resistant and maintains their color.
- Low maintenance.
- Stylish solution.
- Pest free.
- Strong material.
Vinyl
- They use PVC as the main ingredient but may contain much more formulation.
- It’s durable (20 – 30 years).
- It requires much less maintenance.
- Fast installation with either modern or classic timber look.
The above differences show that both materials have the most similar characterization.
PVC is more pocket-friendly than vinyl. Therefore, choosing the best between these two fencing types, you’ll want to consider your budget.
How Do You Spray Paint a Vinyl Fence?
Here are the necessary steps for spray painting your vinyl fence.
Step 1: Surface Preparation
It’s always the first step before painting or priming any surface, and spray painting vinyl is not exceptional.
You can clean with soapy water and then rinse using a hose.
Step 2: Fill the Sprayer With Paint
Choosing the appropriate paint for your project is the basic key consideration. Afterward, fill the sprayer can and get ready for the job.
Step 3: Priming the Surface
When it comes to priming, go for an epoxy-based primer. It slows the growth of mildew and mold.
Step 4: Spray Paint
The good thing about sprayer paint for this task is that it is easy to use and keeps the paint even.
It also helps you paint the hard to reach areas with no hassles.
Pro tip: Ensure the sprayer’s tip is at least 11″ away from the fence for proper adhesion.
Also, remember to spray vertically for the pickets and horizontally on the rails.
Note: Overlapping each paint streak by half will result in a beautiful finish.
Step 5: Let the Surface Dry
When you have done spray painting on the whole surface, allow it to dry.
Can You Paint a Vinyl Coated Chain Link Fence?
Yes, you can, since it’s the quickest and cheapest way to enhance its appearance.
Even though chain links are relatively easy to paint, you need a professional for a vinyl-coated chain link fence.
The choice of unique color can be complicated, but using black, brown, or dark green will blend the fencing with ease into the background.
Here are the steps involved:
Step 1: Cleaning the Surface
As a rule of thumb, ensure you thoroughly clean before painting. If you notice any rust, use a wire brush to take it off.
Step 2: Priming
Apply the rust-inhibiting metal primer before painting. Ensure there are no plants around the fence.
Also, cover the ground to keep it safe from the paint drips.
Step 3: Painting
After priming, use a renowned quality exterior enamel paint for the painting. A 1″ to 1½” nap roller will do the job best to cover the chain mesh.
On the other hand, a paintbrush will be suitable for the hardware and the paint posts.
Alternatively, you can choose to spray paint, although it might be difficult to control the overspray.
How Much Does a 100-foot Vinyl Fence Cost?
The price of a vinyl fence per foot varies. For instance, a 6-foot vinyl fence will have an average cost per linear foot ranging from $15 to $40.
However, the height of vinyl fences ranges from 4 to 6 feet unless you choose to have more privacy or beauty.
According to the current prices, the cost of a vinyl fence per linear foot rages between $15 to $40 with an average of $28.
Thus 100-foot vinyl fence will cost an average of $2,800. But the price can be anywhere between $1,500 – $4,000.
Here are other prices you need to consider:
Apart from the feet, buyers should also check the prices per panel. A typical 6-foot vinyl fence with white panels will cost between $100 and $230.
However, the prices vary depending on the color. Let’s see how.
Color Price
Wood colored $200 – $350
Black panels $280 – $500
Finally, don’t forget to consider the price of the posts that divides the panels. Depending on the seller, it always ranges from $10 – $200.
Do Vinyl Fence Posts Need Concrete?
Yes, they do. The reason is that the posts are an essential part of the fence since they provide stability.
With strong and secure posts, the fence will withstand most natural elements such as strong winds, regular wear and tear, and gravity.
Thus, installing them with concrete is the best way out. Below are some of the reasons.
- Soil is never uniform.
- Allows consistency for all the posts.
- It provides the strength needed to overcome natural elements.
- Minimizes post movements.
Can Vinyl Break Easily?
No, it can’t if you do the installation properly. It should withstand normal conditions such as bad weather.
However, there can be a risk of breakage if you apply brutal force.
What Do You Put Under a Gap for a Vinyl Fence?
Suppose you have gaps under your vinyl fence. Use the below options to fill them up.
-
Wood Pickets
Consider using horizontal pieces of wood. Placing the woods parallel to the ground will prevent further digging.
Note: Ensure you take the correct measurements of the depth that needs filling and the length of your fence.
Afterward, cut the planks according to the measurements taken and attach them using a drill.
Don’t forget to backfill any dirt you removed before installing the new planks.
-
Concrete Blocks
Even though the concrete blocks might not be the most attractive option, you’ll get the best results using a heavy-duty digger.
It would help if you started by excavating the needed area and leveling it by removing the surrounding dirt.
The next step is tamping the dirt down, adding the concrete blocks, and proceeding with the tamping.
Continue with the same process replacing all gaps with the blocks before filling the remaining spaces with dirt.
-
Stones
River rocks between 1” – 3” in diameter will be best to replace the gaps under your vinyl fencing. You can also use decorative stones for the same purpose.
The filling process is as easy as placing the correct amount of rocks to fill the gaps and using a bow rake to distribute.
Tip: Ensure you press them appropriately for a perfect fit.
How do You Clean Vinyl Lattice?
I suggest using mild detergent and very warm water. The ideal scrubbing material is a soft cloth dipped in soapy water.
Use a soft brush for the vinyl lattice sheet to avoid any damage.
Can You Cut Vinyl Lattice with Tin Snips?
Absolutely! You can either cut vinyl lattice or fence like you do for wood. It would help if you had a circular saw with a vinyl cutting blade to accomplish this.
What if you don’t have a vinyl cutting blade? Well, worry not since you can use other fine-toothed blades.
Note: Ensure you carefully ease the blade or saw through the lattice to avoid damaging it.
Will Black Vinyl Fence Fade?
No, it won’t fade since most are guaranteed not to buckle, chalk, or fade under scorching sunlight.
Thus, you’ll enjoy the strong black color for the life of your fence.
Do Vinyl Fences Warp?
These products do not absorb water. Therefore, they don’t warp. The fences have strengthening modifiers that add strength, flex, and resistance to UV radiation.
However, it will be forced to bend if you wrongly do the installation or mal-treat the fencing.
It might also become disjointed, resulting in falling out of alignment.
Can Vinyl Fence Melt?
No, they can’t unless under extreme temperatures of about 900 degrees Fahrenheit and above.
Besides, they don’t ignite with ease.
What’s More About Vinyl Fences?
- It’s Non-toxic.
- Self extinguishable.
- There are two main types (virgin and recycled vinyl).
- It was first invented in 1913.
- They are easy to maintain.
- It can last more than 20 years.
- There are three effective ways of cleaning, including,
- warm water and quality washcloth,
- Dish soap or fence cleaner
- Add some bleach or mineral spirits to the cleaning water.
- A cloth or towel for easy cleaning.
- It’s a great choice for any climate.
- The product is pest-resistant.
- It’s environmentally friendly even though it’s artificial.
Can You Paint a Vinyl Fence Black?
Yes, you can since a black paneled vinyl fence can be quite expensive. The painting procedure is the same as that of any other color.
Ensure you choose the correct paint since most of them don’t adhere well to vinyl.
Note: Painting your vinyl fence black comes with some drawbacks.
First, it will no longer be low maintenance. You’ll need to repaint the fence every couple of years to maintain its beauty.
Besides, it might void the product’s warranty since the paint could damage the vinyl’s surface.
How Do You Paint Vinyl Lattice?
Below are the steps you need to paint your vinyl lattice.
Step 1: Proper Surface Preparation
Soapy water is the best option for cleaning purposes, especially for stubborn dirt and stains.
After surface preparation, rinse the vinyl lattice with a hose and let it dry.
Step 2: Choose the Correct Paint.
100% acrylic (latex) exterior house paint is suitable for this material. A good example is Behr’s.
You’ll love most about this paint most because it can easily bond to the lattice without a primer.
Step 3: Priming
Priming the lattice will ensure that the paint adheres with ease. However, ensure you choose the correct primer for the task.
Afterward, allow the surface to dry before painting.
Step 3: Painting
You’ll choose to use a paintbrush, roller, or sprayer in this step. When using a paintbrush or a roller for the job, ensure you work with small portions simultaneously.
Note: Overloading the brush or roller may cause drips and runs.
I recommend spray painting since it allows you to cover all areas, including corners and other confined areas.
Final Thoughts
Up to this point, you’ve seen how the vinyl fence is easy to deal with. It requires little to no maintenance as long as you install it properly.
The best thing about this product is its durability. It comes in different colors that vary in price depending on the color.
Even though it comes with a solid color, the remaining question is
Can You Paint a Vinyl Fence?
Yes, you can, but you must choose the right paint for the job. You’ll realize that most paints have no good adhesion on vinyl fences.
Therefore, you’ll need a suitable primer before painting.
Thanks for taking your precious time on this article. Suppose you have any questions, observations, or clarifications, please drop them in the comment section below.