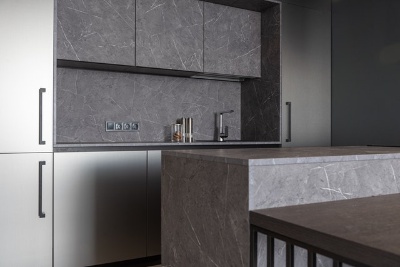
Cabinets created using Formica are a thing of beauty yet we still want to make them more attractive. But how? Can you paint Formica cabinets? Can you stain them? Let’s explore…
As we all know, cabinets are structures illustriously known to complement the room’s décor. Even so, the look and finish on these units get outdated with time, and you would want yours at its best all the time.
The beauty of these structures is credited to various ways of preserving them. Some of the preservation methods include staining and applying poly finishes. Our main question however is can you paint Formica cabinets?
Instead of replacing your Formica cabinets, consider painting them so yes. You can paint Formica cabinets. Painting Formica offers your structure a fresher look more like a new one helping to spice up your space in the process.
When painting a Formica cabinet start by removing the cabinets’ doors and hardware follows by cleaning the cabinets, sanding the surface you look to paint, remove the sanding dust using a vacuum cleaner or shop vac.
After dust removal, you should prepare the cabinet frames by sanding and cleaning the sides and edges. Ensure that you tape all the sides that you do not wish to come into contact with paint such as phases meeting walls and ceilings.
Follow the previous step by applying 2-3 thick coats of primer, even as you apply the primer, ensure that the surface is compatible with the primer.
Allow your primer enough time as recommended by the manufacturer to dry then apply 2 coats of paint over the dried primer, primer helps in improving the adhesion between the surface of Formica and the paint. The number of coats you apply will depend on the quality of your paint.
Finally, allow your painted structure to dry undisturbed, you can speed up the drying time if it’s necessary then attach back the hardware.
Painting Formica cabinets and countertops is a great way to enhance your room’s beautiful look. It also saves you money since the cost of replacing them might surpass your budget.
Note: These structures have slippery surfaces. Hence, you must stay keen with your arrangements and use the recommended paint to obtain the best results.
What Kind of Paint Do You Use On Formica Cabinets?
Epoxy and water-based paints are the most preferred paint that works well with Formica cabinets. These paints are known to dry up quickly. Besides, they are more durable than other typical options.
Ideally, water-based paint makes a perfect choice for cabinets that endure immense wear and tear. The reason being they give off fewer VOCs when applied.
Volatile Organic Compounds are not safe in the kitchen environment where there’s a lot of interaction with foodstuffs and other varieties of consumables.
It is therefore very important that you stay away from paints that emit volatile organic compounds, especially in the kitchen environment.
How to Paint Formica Countertops and Cabinets
Formica cabinets come in handy when enriching your room’s look. However, these units are relatively slippery than rustic wood, and they don’t accept paint easily.
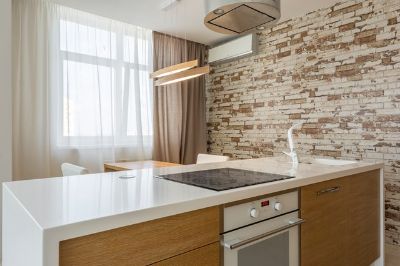
For this reason, painting over them is a daunting task, primarily if you lack prior experience. Luckily, I’m here to make things a little easier through these detailed steps for the perfect painting of Formica countertops.
Tools You Will Need.
- Paintbrushes and rollers.
- Your desired paint.
- Primer is meant for smooth surfaces.
- Paint trays.
- Damp cloth.
- Painter’s tape.
- Sanding block.
- Dust mask.
- Philips screwdriver.
Step 1: Prepare Your Space
Always ensure that you safeguard the surrounding areas when planning to paint Formica cabinets. By doing so, it helps protect the paint from splattering on the nearby surfaces.
To achieve this, use drop cloths supported by painter’s tape to cover close fixtures. After that, withdraw the knobs from doors and drawer fronts.
However, ensure that you mark all the cabinet doors and drawers as it makes it easy to put them back in their correct position once you are done.
Step 2: Clean All the Grease and Dirt from the Formica Cabinets
This step involves cleaning the cabinets using a degreasing cleaner soaked sponge. Again, remember to clean from top to bottom.
Next, rinse off with a clean rag soaked in water to get rid of the remaining specks of grease. Follow with a clean, dry rag to clean the surface.
Cleaning the surface of your Formica cabinet is a key step that you must not skip if you are looking for a perfect finish with guaranteed durability. Most greases have oil components that can be a bad thing for the adhesion of paint which is why I’m stressing about cleaning the surfaces before your next step.
Even as you clean the surface off grease, ensure that you don’t leave behind dust and dirt particles as they too can be detrimental to the performance of the paint.
Step 3: Sanding
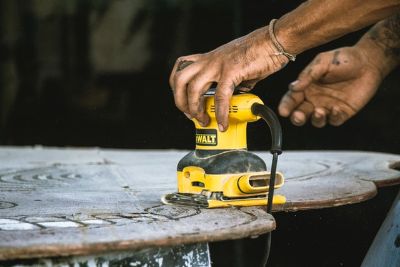
Now that you are done tidying up the cabinets, ensure you sand them to enhance better paint adherence to the surface.
First, wear a dust mask, gloves, and goggles. These items serve to protect your face, lungs, and eyes from dust. You then use a sanding block to scuff up the smooth surface.
Sand enough for better results, not disregarding the edges and corners of the Formica. However, please don’t do it roughly to avoid over scrubbing the surface.
Finish off by wiping away the dust with a rag. Give the cabinets ample time to dry.
Step 4: Mend any Dings.
Before mending any imperfections:
- Vacuum the remaining dust and proceed to fix the scratches, cracks, and holes.
- Use a putty knife to smear the epoxy putty on the potential openings and cracks.
- Give the putty a few minutes to adhere to the surface, then lightly sand it to form an even surface.
There are different types of products that you can use to fill cracks and holes present on the surface of your Formica. Formica repair products are already premixed; hence you only need to fill the hole or crack in your countertop using the paste.
For some products, you may be forced to clean the countertop using a solvent; the most important thing is to follow all label directions to ensure that you are safe and applying the products in the best way possible.
So, with the help of your putty knife or wooden craft stick, press to fill the paste into the hole until it fills to level the top without overfilling the hole or cracks.
Step 5: Wipe off the Dust Before Proceeding.
Although it seems tiresome, repeat vacuuming the Formica cabinets to wipe off the sanding dust. You then proceed with wiping the surface using a dry rag.
That will allow the paint to adhere to the surface, given that this dust act as a barrier.
Step 6: Apply a Coat of Primer.
Consider opening the windows and mounting a fan to offer better ventilation. That’s because the primer formula you apply has an unbearable smell not fit to inhale.
You then pour a sensible amount of primer on the surface. Next, using a paint roller, spread the first coat of prime on the Formica, not excluding the front and side edges of the doors.
Allow it to dry before adding a second coat if necessary. Don’t forget that leaving the primer to dry up completely means the Formica will be ready for use shortly after painting.
Step 7: Paint the Formica Cabinets.
In this step, you now have the freedom to choose your desired paint for the job. Perhaps you want a paint that generally dries faster, and water-based paint is the ideal option.
Stir your paint so that it is uniform. You then pour the paint into a clean paint tray. Start with a painting brush to smoothly spread the paint on the entire Formica surface.
Since a paintbrush leaves out unwanted strokes on the surface, continue balancing the paint with a roller in long gentle strokes.
Once you are done painting, leave the paint to dry as it adheres to the surface. You can add an extra coat depending on your Formica paint color.
But if you primed your Formica cabinets properly, there is no need to add an extra coat of paint.
Step 8: Remove the Tape.
You can remove the protective painter’s tape when the paint is about to dry. Doing this keeps the edges and sides of the Formica clean, plus it deters the paint from gluing on the cabinets.
Step 9: Give the Paint Time to Dry, Depending On the Manufacturer’s Instructions.
Now that you have finished your job, allow the paint to adhere to the cabinets until it’s safe to touch. This duration can vary from hours to days.
It would help if you were patient before adding a protective sealant.
Note: If you seal the paint and it has not fully dried, it might form bubbles on the surface. That is due to the moisture underneath striving to escape.
Step 10: Add a Topcoat of Sealer
After you make certain that the paint is completely dry, add a protective sealant. A clear gloss acrylic sealer over acrylic paint is a better pick in this case. This protective sealer is essential in protecting the surface from daily demands.
Step 11: Reassemble the Hardware.
Even if it has been challenging, you must get it right. The next step is to reinstall cabinet doors and handles to their exact spots if you had withdrawn them.
Finally, clean up your workspace, and you are done. What follows is to maintain a high level of cleanliness daily. But as a general rule, never scrub the Formica cabinets. As an alternative, use a damp sponge or cloth to clean your cabinets.
Here’s how to paint Formica countertops:
How Can I Paint Formica Cabinets Without Sanding?
If you intend to upgrade your kitchen’s look, painting the cabinets is the best DIY option. Essentially, you can make painting much easier by skipping the sanding process. Here is how you can paint Formica cabinets without sanding.
Why would you want to skip sanding anyways? Easy to understand, sanding is time-consuming and can be tiring especially if you are looking to sand a vast surface. Normally there are chemical applications that will directly replace sanders to make your work a lot easier.
-
Acquire a Painting Kit
To begin, you have to get yourself a painting kit that matches your needs. Ideally, go for the paint that contains a deglosser to stave off the older coats on your cabinets.
Paints with deglosser allow you to skip the sanding process. It is very important that you have some patience to land the right painting products that will save you the need to go back to the market after a short duration.
-
Clean the Cabinets
Considering that Formica cabinets can anchor all manners of dirt that prevent any paint from sticking, I suggest that you clean them thoroughly.
Use soap and clean water to wipe the drawer fronts, cabinet doors, and other surfaces, including the greasy spots. In most cases, cleaning Formica is quite simple as strong cleaning chemicals are not called into action.
In the cases of hard stains, you can use the following methods:
Method One: Apply Acetone, Rubbing Alcohol, or Ethanol-Once you have applied any of the aforementioned solutions, use a sponge or cotton to wipe the surface in a circular motion. If the sponge or cotton does not prove effective then you could try using a nylon bristle brush. Rinse all the cleaner from the surface and allow it to dry thoroughly.
Method Two: Using Baking Soda for Removing Tough Stains- Another method of removing tough stains is the use of baking soda. Put some baking soda paste and water on the area with a tough stain to remove them. Give it time, then wipe up the dried paste using a clean, damp non-abrasive cloth before rinsing with clean water.
Note: The baking soda-water paste is slightly abrasive, so you should not rub the paste on the surface.
-
Remove the Cabinet Doors and Drawer Front.
Next, remove the doors and drawer fronts to be painted using a screwdriver. However, number each of these units to avoid confusion when returning them to their initial spots.
-
Paint the Back and Front
This step involves laying the cabinet doors out and starting by painting the backside of the Formica. Take a paint roller to distribute long and smooth strokes of paint all over the surface.
Next, insert thumbtacks into all corners of the door, then turn them up. It allows the backside to dry as you continue painting the front part.
-
Paint the Molding
Here, you will have to employ a small paintbrush to spread the paint in the detailed areas of the cabinet.
-
Paint the Shelves and Spray Paint the Hardware
I bet you want your cabinet to look uniform, so consider painting the shelves and allow them to dry. If deemed necessary, add another coat, but after the previous one is fully dry.
You then follow with spray painting the cabinet hardware. And as usual, allow them to dry as per the instructions.
-
Reinstall the Hardware
Finally, finish painting the wall units primarily where the closed cabinet doors meet. And after that, use a screwdriver to rejoin the knobs and hinges to the cabinet doors. Put the cabinets back in place, insert the shelves, and you will have finished your task.
Can You Reface Formica Cabinets?
You can reface Formica cabinets by putting in a fresh layer of Formica laminate over the previous one. It is the best way to give your kitchen a decent look without breaking the bank.
However, sometimes you have to wipe out the old Formica. Here are the conditions that will prompt you to remove the previous laminate: bubbled segments, loose panels, and the rest.
Tools You Will Require
- Sandpaper.
- Trowel.
- Jigsaw.
- A measuring tape.
- Laminate sealer.
- Household degreaser.
- Screwdriver.
- Glue solvent.
- Putty knife.
- Heat gun.
- Cement adhesive.
Step 1
Begin by peeling off all the hardware from the Formica cabinets. Then lay them on an even surface and clean them using TSP. After the surfaces are dry, scrape with 150 grit sandpaper and later wipe off the dust with a tack towel.
Here, it is recommended that you observe all the Formica panels for defects or bubbles that tend to emerge.
Step 2
Suppose you had removed the entire laminate and sanded all areas well, including the Formica edges. Doing this helps to thwart residual adhesive. But if you had not peeled off the actual laminate, scrape the Formica surface with sandpaper.
Mind you; this helps to bring about a rough surface to where the cement adhesive will attach to.
Step 3
After sanding all the visible areas of the Formica, follow with spraying a household degreaser on the surface. Continue to wipe the surface with a clean cloth.
Indeed this aids in eliminating potential grime, grease, and dust from the surface. At this point, the surface is almost ready for refacing.
Step 4
Ensure that you adhere to the instructions provided before continuing with this step. Check the instructions to certify the amount of water needed to mix the cement.
Don’t forget to use a trowel to apply a narrow covering over the newly readied surface.
Step 5
What follows is to fix the new Formica face on the cement, squeezing it to the intersections. Use a jigsaw to cut the laminate precisely.
In case of any imperfections, forge the excess Formica with a utility knife focusing on the edges. Also, remove the excess contact cement with a recommended solvent.
Step 6
You then spray a laminate sealer on the finished Formica cabinets to develop a moisture impediment. Finish by reinstalling the cabinet doors.
Hint: You must store the new Formica in the room you intend to mount It. The time should exceed 48 hours to allow the laminate to adjust to compression and expansion to lessen bubbling.
Is there a Difference Between Laminate and Formica?

There is a minor difference between laminate and Formica. Laminates were invented to replace the overly expensive stone materials and woods. Nowadays, you will find various brands manufacturing laminates.
Formica is commonly known to assist in home renovation applications. Formica remains the brand name ratified by the founders of laminate. But, these two products’ traits create a world of a difference if compared.
This list outlines the prime features that make Formica stand out:
- Formica is cost-effective, unlike its prevalent counterparts.
- Formica is crafted from highly resistant materials that can overcome extreme conditions.
- It is almost unimaginable to stain Formica, unlike other costly options.
- Formica doesn’t accept germs to absorb on the surface.
- You can shape Formica’s edges to come up with a bullnose. This feature enhances safety at home, primarily if you have kids playing around.
- Formica is set to withstand years of maximum ill-use.
Note: Cleaning laminate and Formica surfaces require gentle strokes.
It’s normally best to use a damp cloth and mild detergent. For tougher stains, use a typical household cleaner and baking soda blended with paste.
You then utilize a bristle brush and wipe off the stains without messing with the surface’s finish.
What Kind Of Paint Do You Use On Laminate Cabinets?
The laminate cabinet doesn’t accept all sorts of paints. It only works with special paints designed to stick to its selective surface.
Whichever color you opt for, you will have to factor in the type of paint for your laminate cabinets. Oil-based or latex-based paint is the better pick for laminate cabinets.
Always start by testing the paint’s bonding capability before starting to paint. Take a considerable amount of paint and apply it to a small area of the cabinet. Give it time to cure and then examine the bonding.
If you notice bubbles emerging on the surface, then the paint is not sticking on it as expected. Consider consulting with a paint dealer to point out the recommended paint for your laminate cabinets.
How Can I Make Formica Cabinets Look Better?
Formica cabinets are set to endure years of heavy use. But, even though the integrity of Formica materials can stand the test of time, it is imperative to upgrade the style.
You only need a progressive plan and add some structural changes which conform to your preferences. Here are a few changes to adjust in your kitchen to make your Formica cabinets better.
-
Go, Faux
You can give your Formica cabinets a faux finish that mimics your best wood grain. Try this by applying wood finish to the doors, drawers, and the base of the cabinets.
If you decide on faux wood grain, paint the cabinets the prominent color based on your preferred wood grain. Follow with brushing on a finish encompassing the grain color. Your Formica cabinets will have a rustic new look.
-
Modern Metals.
If you did not know, the hardware could make Formica cabinets have that new and fresh look. You need to replace the entire knobs, handles, pulls, and hinges. Substitute these items with more stylish fixtures for an improved look.
However, if your old Formica cabinet is in good condition, do a makeover with spray paint. Doing this makes the pieces have a contemporary look.
-
Custom Creations
Customizing Formica cabinets to your liking is common with most homeowners. You can achieve this in many ways. You may want to add a piece of contact paper running on the inner back wall of your Formica cabinets.
This paper acts as an embellishing backdrop for drinking glasses, dishes, and other valuables.
What’s even better? You can remove the doors for the advanced cabinets to create space for viewing the attractive essentials within.
Next, fill in the openings left from removing the doors with wood putty. Not to forget, sand the surface before you paint.
Another alternative you can opt for is to substitute the cabinet doors with any glass version. Choose the glass that provides extra protection against dust and other impurities but still adds a sense of attractiveness.
Besides these innovative alternatives, also focus on adding some wood strips to the doors. When wood strips are attached to the door fronts, It makes the cabinets extra appealing. Ideally, that’s not an option but a must.
Note: These are the cheapest ways to transform your kitchen’s look. Try these options and enjoy the same visual appeal as getting a new set of Formica cabinets.
Can You Put New Formica Over Old Formica?
Yes, it is okay to add a new Formica over your old Formica. However, it is only achievable if you clean and dry the surface completely.
Before adding the new Formica, rebuild any bad spots in the old one and fix them in a well-suited patch. If you are confused about how you can arrive at that, check out these steps:
- Begin by roughing up the surface with sandpaper. Then clean the surface thoroughly and remember to leave it to dry enough.
- Next, measure your cabinet’s surface to get the actual depth and length. Shift the measures to the new laminate pieces in the cabinets. It will be best if you mark the extents on the back for cutting.
- Use a carbide blade to cut out a piece of laminate. If you are not precise with cutting, consider using a straight aid to direct the blade.
- This step needs you to cut strips that conform to the height of the edges of the cabinets. You can obtain this using a carbide tip blade knife.
- You then remove any buildup that may have formed on the surface.
- Apply adhesive to the cabinet’s edges and glue the edge strips in position. Use your fingers to align them straight. Once you are done, apply the adhesive on the upper side of the counter and put the sheet in place.
- Finally, you will need a rubber roller to rub the top of the laminates by firmly pressing it down to peel off bubbles.
Final Thoughts
Are you on a shopping spree to help improve the look of Formica in your kitchen? Well, there are many ways you can do that. It could be through staining, adding a polyurethane finish among other vast methods of adding beauty to your kitchen space.
One thing about Formica is that it is not nearly as absorbent as wood and this limits ways of decorating it. You will be forced to go through a series of preparation to get everything right and to end with a desirable finish. Our main question however is…
Can You Paint Formica Cabinets?
Yes, you can paint Formica Cabinets. Painting Formica cabinets remains one of the surest ways to enhance your kitchen’s appearance. Painting in this case gives you a lot of financial breathers as it is less costly compared to other alternatives like replacing the whole structure.
As I conclude this discussion, I’d like to stress that if you implement the steps provided in this guide, you will surely note the difference in your home with a great finish on your Formica Structure.
I appreciate you taking your valuable time to go through this post, I hope you found it helpful with your quest of getting the very best even as you plan to paint your Formica cabinets. Do you have a question, suggestion, or general opinion that you would like to air? I hope so, please share it with me in the comment section below!