Glow in the dark paint for walls is one of the best mediums to showcase creativity.
You can use it as a craft material for decorating objects or highlighting parts of a painting when you want to draw more attention to it.
You can also use the washable types to create body art during fun parties and events.
This paint type is versatile; hence you can use it on different surface types. You can use it on fabric, canvas, face, body, or even walls and ceilings.
However, the way you use it on the different materials varies in terms of surface preparation, application technique, how you charge it, etc.
This article will focus on glow in the dark paint for walls to get you started.
The purpose of glow-in-the-dark paint for walls is primarily decorative instead of protective.
Like regular wall paint, it comes in all kinds of colors, and you can apply it using a brush or a paint sprayer.
When choosing this pain type, you must consider several things; however, glow strength and duration are the most crucial.
Some paints glow for a few minutes before needing a recharge; hence are suitable for projects where you only need a temporary glow.
On the other hand, high-quality glow paints can emit light for hours even if you only expose them to little charge.
Before I get into details, let me discuss glow-in-the-dark paint basics. There are specific aspects about it you must understand to avoid making mistakes during your projects.
What Is Glow In The Dark Paint?
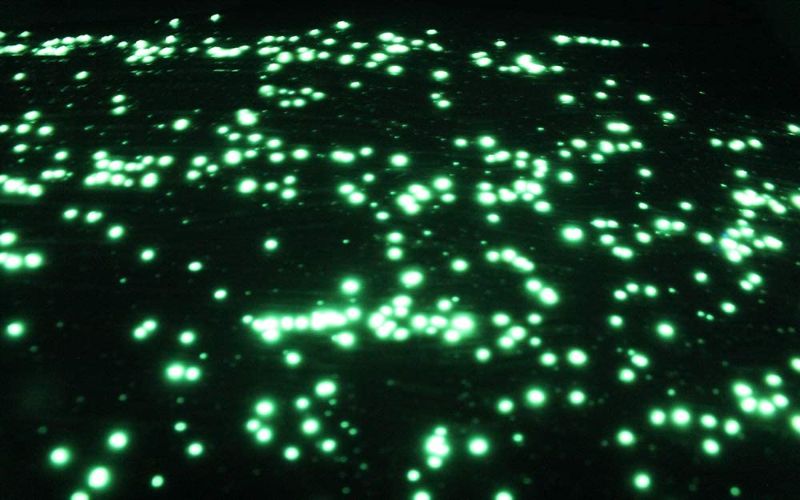
Glow in the dark paint is a surface coating that emits a faint glow when there is no light.
Manufacturers make it like regular paint, but they infuse phosphors like silver-activated sulfide and doped strontium aluminate into the formula to make the product luminous.
These phosphors need light to activate/charge them, to make them glow when it is dark.
In the olden days, this type of paint was self-luminous – meaning you did not have to charge it for it to glow. Manufacturers made it by mixing a radioactive isotope like radium-226 with a radioluminescent phosphor.
The radioisotope was a bit unstable, so it decayed with time. It emitted radiation particles that struck the phosphor molecules during the process, activating them to produce a little light.
These paints would keep glowing until all the radioactive isotope decayed – a process that would take years.
The radium paint stayed useful for about 40 years, especially on the faces of compasses, watches, and aircraft instruments, to allow users to read them effortlessly in the dark.
However, the radium in the formula proved to have harmful health effects; therefore, manufacturers slowly phased it out, replacing it with the phosphorescent substances used today.
The phosphors used in glow-in-the-dark paints are naturally occurring minerals, and they usually glow in shades of green, blue, or yellow.
On the bright side, paint makers found ways to tint the primary colors, creating the different color shades available today. Most of the glow-in-the-dark paints dry clear; hence are almost invisible in daylight.
They are perfect for when you want your main color style to stand out during the day and your enhancements to show up at night.
How Does Glow In the Dark Work?
The phosphors in glow-in-the-dark paint absorb and store UltraViolet light from different sources – usually sunlight or an artificial UV light.
Later, when you remove the light source, the phosphors re-emit the absorbed UV as visible light – the glow we see. Unfortunately, the glow of these products is not a permanent thing.
It fades away in minutes or hours; therefore, you must recharge the paint to keep it glowing.
Recharging means exposing the paint to more UV light for some time to absorb more energy, which it will release later. Without exposure, the glow-in-the-dark products will be useless.
Furthermore, recharging is more than exposing the paint to a UV light source. The light source itself and the period length of the exposure will affect the glow; therefore, you must always consider them.
Different lights emit UV at different rates; thus, they all recharge the paint at different speeds. They also cause the paint to glow at different levels.
Sunlight is the most common recharging source because it occurs naturally and produces sufficient UV rays. It charges objects in 2-3 hours, and the glow is just right.
You can use a blacklight if you want to recharge the paint faster. A blacklight emits pure UV; therefore, it charges better, and the paint’s glow will be brighter.
Fluorescent and incandescent lights also emit some UV, but very little. For that reason, they take ages to recharge the paint, and the glow will be very dim.
After continuously charging and glowing, glow-in-the-dark paints eventually lose their glow.
You will know it is losing its capabilities when you let it sit in light for the usual hours, and it doesn’t sustain the glow as expected, or the glow remains dim when charged.
In this case, you must retouch the paint to restore its shine.
Glow In the dark vs Fluorescent paint
Glow in the dark paints and fluorescent paints are photoluminescent, meaning they absorb energy and emit it as light.
However, they work in very different ways; therefore, you need to be careful when buying products for your project.
The main difference between glow paints and fluorescent paint is how they store and emit light energy. When fluorescent paint absorbs UV energy, it releases it immediately.
So fluorescent colors always have a bright neon look when a visible light source is present and glow intensely when you shine UV light on them.
However, when you remove the light source, these paints become invisible because they have no more energy to absorb.
On the other hand, glow-in-the-dark paints absorb the energy but release it much slower, so they continue glowing even after removing the light source.
The only catch is to let the object sit in sunlight for a while if you want the glow to last longer.
Fluorescent paints are much cheaper than glow-in-the-dark paints, but you will have to use a blacklight to make your work visible in the dark.
Glow paints are more expensive, and their cost goes up depending on how long the product can retain its glow. However, they are worth their price because there’s no need to have a blacklight on hand every time.
How Long Does Glow in the Dark Last?
An unopened glow-in-the-dark paint will last between 3 to 5 years, as long as you store it in proper conditions.
Once you apply it on a wall, it will glow after every recharge for up to 10 years and 12-15 years if you paint a quality clear coat over it.
The glow time after each recharge depends on a couple of factors, including the paint quality, how long it received UV exposure and how thickly you applied it. Let’s look at each of these factors in-depth.
Quality of the Paint
The quality of paint always comes down to the ingredients used to create it – better ingredients equals a better product.
When it comes to glow-in-the-dark paint, the essential ingredient that determines its quality is the phosphor used.
It is the component that stores and releases light energy; therefore, it also determines the length and strength of the glow.
The main phosphors used in these paints are Zinc sulfide and Strontium Aluminate. Zinc sulfide is the one that manufacturers use the most because it is cheap and works well above average.
Strontium Aluminate is a newer phosphor designed to glow brighter and longer than its counterpart. It is more expensive, but manufacturers who want to create higher quality products prefer them to zinc.
Therefore, when shopping, try looking at the ingredients in the paint you want to buy. If you see Strontium Aluminate as its main phosphor, know that it has better qualities.
It may cost more than the versions with zinc, but it will be worth it. However, if you’re on a budget, the products with zinc will work just fine.
UV Exposure Time
The amount of time you expose your paint to UV may not affect the paint’s glow strength, but it will affect how long it glows after lights out.
The usual time for most glow-in-the-dark colors to fully charge is 3-4 hours, and they will keep shining for the same number of hours or more if the paint has Strontium Aluminate.
If you charge them for a few minutes, say 30 minutes, the glow won’t last very long, but you may just enjoy the gleam for longer if you increase the time.
The Thickness of the Coat
The usual painting rule is not to apply the paint too thick to achieve the best results.
However, the practice slightly shifts when it comes to glow-in-the-dark paint. You have to put it on thickly to make the glow more prominent and last longer.
Don’t get me wrong. I do not mean that it is okay to slather on thick layers of the paint because they will peel off.
Instead, apply several thin layers, building them up until you achieve a thickness that gives you the perfect glow.
Remember always to allow each layer to dry properly before applying the next one for the best results.
How to Make Glow In the Dark Paint Last Longer
Here are the steps:
-
Prepare the Surface
The one thing that makes coating products last is proper surface preparation, and glow-in-the-dark paint is no exception. You must clean your surface and apply a suitable primer before applying the paint to make your work more permanent.
Since most luminous paints are acrylic, it is best to start with an acrylic primer to ensure that it sticks properly.
-
Apply a Sealing Coat Afterward
The best way to prevent glow-in-the-dark paint from degrading faster is by applying a good-quality clear coat over it after it dries.
The clear coating will act as a barrier between the paint and any damaging elements, thus keeping it safe.
And on the bright side, the sealing coat won’t interfere with the paint’s glow or recharge because it has no opaque pigments.
-
Charge the Paint Only When Needed
Glow-in-the-dark paints deteriorate slowly with each recharge as the phosphors lose their abilities. Therefore, if you reduce the frequency of the recharges to the necessary times, there is a greater chance of preserving the paint’s glow for longer.
Necessary times could be when you want to showcase a mural you did when you have company or during events like Halloween when the decorations are essential.
If you must recharge the paint every day, I recommend limiting the charging time to 60-90 minutes. This way, you’ll enjoy the paint’s abilities every day for a few hours while reducing its degradation rate.
Is Gloss In the Dark Paint Toxic?
The glow-in-the-dark paints used today are safe to use on your home walls and your children’s clothing, and you can even wear some of them as makeup.
However, like most surface coating products, you should avoid ingesting these paints to keep yourself 100% safe. Additionally, you must wear protective clothing whenever you work with glow-in-the-dark paints.
Wear gloves and coveralls, eye protection, and a mask, and ensure your workspace is well ventilated to keep the air free from paint fumes.
Even though they are generally safe, it is still hard to convince some people of the safety of glow-in-the-dark paints, primarily because of the metals used in their formula.
There’s always so much controversy surrounding the safety of metal elements to our health; therefore, I’ll explain the safety levels of the different metals used to create these paints.
How Safe Is Zinc Sulfide?
Zinc Sulfide is the primary type of Zinc found naturally. Its color is yellow-white; therefore, the paint glows the same color when you use it to make luminous paint.
Manufacturers must use other metals to activate the sulfide and produce paints with different-colored pigments. Silver makes it blue, and manganese produces an orange-red color, copper makes it green, etc.
Zinc sulfide activated with Copper Chloride is approved by the FDA to make cosmetics and glowing body paint.
It is not considered toxic or hazardous, but it is best to restrict its use for limited infrequent occasions such as birthdays and Halloween instead of daily use.
The reason for the usage limit is that the skin tends to absorb stuff after a while; therefore, if you keep these paints on you for too long, your health risks increase.
When it comes to outdoor use or use on other surfaces, the only risk you get from zinc sulfide is inhaling it or contaminating the environment during disposal.
When you look at your product’s packaging, you will notice a warning that you need to be extra careful during paint disposal.
How Safe Is Strontium Aluminate?
Strontium Aluminate is considered biologically and chemically inert and non-toxic. It doesn’t really glow by itself, so paint manufacturers activate it with Europium or Dysprosium to create a phosphorescent pigment.
Europium and Dysprosium are both rare-earth metals that are non-toxic and non-radioactive. Therefore, glow-in-the-dark paints made from these components are also non-toxic.
However, as with all paints, you should avoid ingesting glow paint made with Strontium Aluminate phosphors and wear protective gear when applying it.
You should also be careful during disposal because these components are still metals and may contaminate the environment if you do not do it correctly.
Is Glow In the Dark Paint Radioactive?
There’s this misconception that any non-biological thing that glows is radioactive; therefore, some people question whether or not luminous paints are dangerous.
Additionally, some paint brands make it a point to advertise their products as “non-radioactive,” which makes people conclude that there may be radioactive products on the market.
In the olden days, manufacturers used substances like Radium, Promethium, and Tritium to activate the Zinc Sulfide and make glow-in-the-dark paint.
However, these components proved to be fatal over time; hence they are no longer used to make consumer products.
Radium was phased entirely out; therefore, you won’t find it anywhere near paint industries. However, Tritium is not as harmful as radium, so you can still find it in small amounts on watches, cockpit instruments, and gunsights.
Their use is wholly restricted; thus, there’s no risk of them contaminating the glow-in-the-dark products we use today.
Best Glow In the Dark Paint for Walls
Here’s my list of the very best glow in the dark paint for walls:
GlowPaint Glow In the Dark Paint
 GlowPaint from MagPaint is a high-quality, water-based acrylic paint designed primarily for use indoors.
It has special glowing pigments that can emit light for up to 25 hours upon recharging for a short time.
Homeowners use this paint to create wall decorations like a brilliant night sky with stars or to mark exit routes and obstacles around the house so that you don’t miss a step when walking in the dark.
This product is odorless; therefore, it won’t make you uncomfortable as you use it, especially indoors.
It is also radiation-free and emits very low Volatile Organic Compounds (VOCs), making it safe for the environment.
Before painting your walls with GlowPaint, you must ensure that the surface is free from grease and dust to make it stick.
You must also use a suitable light-colored primer before applying it to enhance paint adhesion and improve its glow.
You can apply this product with a paintbrush or a roller, depending on the size of your wall, and it can stick to any wall material, including wood and brick.
You can also use it on fabric and other small art objects with sections that require a slight glow.
This paint dries and is ready for a second coat within an hour, provided the temperature and humidity of your work area are just right.
You can get a good glow with two layers of this paint, but I recommend applying three or more for the most brilliant shine.
The shelf life of GlowPaint by Magpaint is 36 months under proper conditions. However, you should know that its shelf-life becomes limited once you open it, even under appropriate conditions.
Ensure that you keep it in a cool, dry, and frost-free space, and keep it appropriately sealed until you’re ready to use it. Once opened, keep storing the product in the same conditions as before to make it last longer.
Pros
- Charges quickly and stores the energy for long
- It is odorless
- it has low VOCs hence great for the environment
- Water-based, thus easy to apply
- It dries quickly between layers.
Cons
- It has a shorter unopened shelf life compared to most luminous paints.
- Consumers complain that it coagulates easily, especially when it’s been on the shelf for too long.
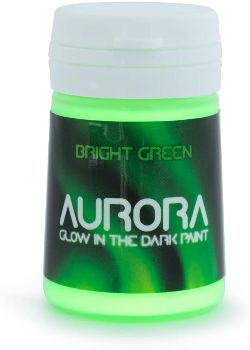
Aurora Bright Green Glow in the Dark Wall Paint
The Aurora Bright Green Glow-in-the-dark Wall Paint is one of the best and brightest glowing paints.
Its manufacturers create it using Strontium Aluminate doped up with top-grade Europium pigments that charge quickly and hold the charge for hours.
This product comes in 50ML containers, which may seem very little, especially for walls, but you can be sure that it’s enough.
How? The Aurora Bright Green is a very thick product, much like a paste; therefore, you will have to thin it before most projects.
When you thin it, its quantity increases, allowing you to use the little container for extensive projects like coloring your walls.
However, I wouldn’t recommend diluting this product until absolutely necessary. Remember, diluting glow-in-the-dark paint decreases its glow; hence you must be careful when you do it.
For instance, if you only want to draw some stars or shapes in your child’s playroom, you only need a little paint, so it would be pointless to dilute it.
Aurora keeps energy for a long time after charging for a few minutes, but you have to use a strong source to enjoy these abilities.
Sunlight is the cheapest source and works optimally, but I recommend using a UV flashlight if you want a faster charge and a better glow.
You can also use lamps and LED lights, but these emit very little UV, so the paint will either take too long to charge or won’t glow properly.
Also, this product is non-toxic and non-flammable; therefore, it won’t affect your health. However, it is best to keep it away from your skin and hair because it will be hard to remove.
 Pros
Pros
- Non-toxic
- It is Water-based; hence easily cleaned up with soap and water
- It is non-flammable
- Easy to apply
- It glows brightly and long with a few minutes of charge.
- It is exceptionally durable.
Cons
- Some consumers complained that the product was congealed when they first opened it.
- Fairly expensive
- You cannot use it on skin or hair
Astro Glow Non-Toxic Glow in the Dark Wall Paint
The Astro Glow Non-toxic Luminous paint produces one of the brightest glows, especially on light backgrounds.
It is a water-based acrylic paint that’s neither too thin nor too thick; therefore, it is simple to apply – even beginners can use it. It dries clear, so you cannot see it in daylight, but you can’t miss the glow once the lights go out.
Because of its water base, you can clean up this product with regular soap and water when you spill it.
However, because it is acrylic, it gets hard and tough to remove once dry, so even solvents like acetone cannot get it off.
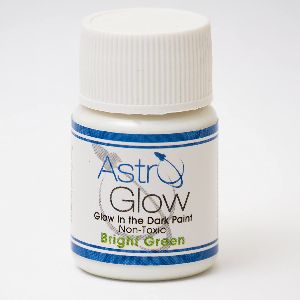 For this reason, you must clean all accidental spills as soon as they happen to keep your work surfaces spotless.
Even though this paint glows brightly, I noticed that the glow is only bright for the first hour, then it slowly fades – a bit faster than the Aurora.
This, however, only happened when I used the usual two coats of paint. If you want the glow to last longer, I recommend applying between 3-5 coats, then charging the paint for longer durations.
Like most glow-in-the-dark paints, the Astro Glow Non-Toxic Paint charges optimally in direct sunlight but better and faster under UV light. Actually, UV light is the best option because it may be tough to get the sun to shine directly on a wall, especially an indoor wall.
On the downside, manufacturers package this paint in small containers; therefore, it may not be feasible for whole wall painting. However, it works marvelously for creating murals and other minor arts on walls.
Pros
- It glows brightly, especially on lighter backgrounds
- Dries clear hence won’t show up over your other paintings during the day
- It is not a health hazard.
- Versatile, therefore, you can use it on surfaces other than walls
Cons
- It comes packaged in a tiny bottle; therefore, you’ll need a lot of it for big wall projects.
Neon Nights Premium Phosphorescent Glow In the Dark Wall Paint
This product is one of the quality glow-in-the-dark paints, and it comes in a set of 8 bright colors, including red, green, blue, yellow, pink, orange, white, and purple.
These colors have a very strong pigmentation; thus, you can easily see them in daylight and glow brightly in the dark.
Unlike the other products on this list, Neon Nights Premium Glow Paint does not charge well under direct sunlight. It reflects UV light by nature; therefore, it doesn’t store enough energy to glow later.
When you charge it in the sun, this paint will only glow for a few hours, and the glow won’t be bright enough.
You must use a blacklight on this product to experience its full capabilities. It will charge the paint a little while making the colors brighter, like fluorescent paint. However, you must keep the blacklight on for the paint to sustain its glow.
The Neon Nights Premium Phosphorescent Wall paint is non-toxic; hence it is safe to use on your kid’s bedroom walls. You can also use it to decorate floors and other surfaces except for skin and fabric.
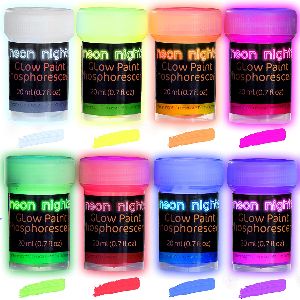 Pros
Pros
- It comes in 8 vivid colors
- Intense pigmentation that you can see even during the day
- It is entirely safe for humans and the environment
- It can be used on the floor or for other decorative projects
Cons
- This paint doesn’t charge or glow properly without a blacklight
Factors to Consider Before Buying Glow In the Dark Paint for Walls
Glow-in-the-dark paints are fun and everything, but like all products, you must choose them wisely if you want them to serve you well.
These paints may look alike, but they have some minor distinctions that are important to notice to know which one’s best for your project.
Some shine brighter than others, others have fewer color choices, and you cannot ignore the cost differences.
Below is an in-depth look into everything you need to consider when choosing glow-in-the-dark paint.
Type of Project
When using this type of paint, you want the glowing effects to be temporary or permanent. The acrylic glow-in-the-dark paint will work best if you have a permanent project.
It becomes more rigid and water-resistant as it dries; therefore, removing it is challenging.
On the other hand, water-based/washable glow paints are best for temporary art exhibitions.
They are thinner, and you can remove them with regular soap and water without issue. These are the kinds of paints that come in handy primarily for parties.
The surface you’re painting also plays an important role when selecting paint. If your project entails painting different surface materials in one go, the versatile multisurface colors work best.
You won’t have to switch between products every time you reach a different material. Contrastingly, if you are coloring only one surface material, I recommend selecting a paint designed specifically for that material.
For instance, use fabric paint for clothes and body paint for the body, etc.
Strength of Glow
The strength of the glow of luminous paints is one of their most significant aspects. Some give off an intense light, while others have a softer pastel shine.
These differences in intensity depend on two main things – the energy source and the paint’s formulation.
Glow-in-the-dark paints receive their charge either from direct sunlight or blacklights. Both sources produce UV rays, but the blacklights produce a more concentrated amount.
Therefore, when you charge your paint using a blacklight, it will charge faster, and the glow will be brighter than if you charge it in direct sunlight.
Some manufacturers use Zinc Sulfide while others Prefer Strontium Aluminate when it comes to formulation. The Zinc sulfide paints produce a sufficient glow, but the products with Strontium shine brighter.
Color
Color is essential in painting, so painters always look for different colors when shopping. Some glow-in-the-dark paint brands have products with only one or two colors per pack.
These will limit your creativity, but you have nothing to worry about if your project only requires a few colors.
Other brands produce products with multiple colors that you can even combine to create unique shades. Painters often prefer these products because they offer vast room for creativity.
Cost of the Paint
More often than not, everything always comes down to expenses. You may know the type of paint you need, but it may be out of your budget reach.
It is always best to purchase what you can afford in such scenarios because you don’t want to build up credit at your local paint store.
However, if you cannot settle for any cheap paint, I recommend that you postpone your project until you can afford the right product for you.
Safety of the Paint
Glow-in-the-dark paint is a fun product, and it will attract children and pets. They will be tempted to touch it play with the painted objects etc.
For this reason, you must always ensure their well-being by checking the safety of your surface coatings.
If you intend to use the paint on your body as makeup, ensure that you’re using body paint because they’re non-toxic.
For wall paints or any other surface application, check to see the VOC emissions and other paint components to ensure that you are not putting anyone in danger.
How to Use Glow In The Dark Paint On Walls?
There are two ways you can use glow-in-the-dark paint on your walls:
- You can apply it as one solid color coating like regular paint or
- You can paint a mural or essential elements of a mural in different locations on the wall.
Both applications are fine, but they also have flaws or setbacks that you cannot ignore.
For instance, You can choose to paint a room with one solid color that shines at night. It will be a unique addition to your space, and your kids may even enjoy being in it for long periods.
However, the single color will get boring soon enough, forcing you to start looking for a change. Change often means applying new paint or setting up wallpaper.
It would be very challenging to cover up an entire wall of glow-in-the-dark paint with fresh pain. You will need to put on many coats and use a high-quality primer to try and block the glow from coming through the coats.
If covering the paint proves difficult, your only option would be to strip the paint and then repaint the walls – a tedious task.
If you choose to do a mural, you must ensure that you have the proper skills to pull it off without mistakes. If you don’t trust your abilities, it is best to hire a professional instead, costing you extra.
Tips for Using Glow In the Dark Paint For Walls
Using glow-in-the-dark paint is easy, but a few special considerations will give you better results than the next painter.
I have made a list below from my first-hand experiences with the products and the feedback I get from customers to help guide you – especially if it’s your first time using the paint.
-
Paint On Light Backgrounds
Most of the glow that you see from luminous paints is reflected light. Therefore, if you apply the paint on a lighter background, it will glow brighter.
You can test these facts by painting over a black and white background with the same color to see the difference.
-
Load the Paint Brush Thinly
You need a thick coat of glow-in-the-dark paint for it to glow best, but you must never slather on the paint too thick.
Instead, start with the least amount of paint on your brush, spread it thin, and build it until you reach the perfect thickness and glow.
When you paint this way, you will avoid creating raised edges that shine brighter than the rest of the strokes.
-
Use a Blacklight While Painting
Most glow-in-the-dark paints are clear; hence it is challenging to identify mistakes as you paint. You won’t be able to see inconsistencies in your brush strokes or raised edges until it gets dark or you shine a blacklight over the paint – so always keep a UV light handy.
Even if you are painting in a brightly colored room, you can use a blacklight to check your paint regularly. This way, you can make corrections where necessary while the paint is still wet.
If you allow the paint to dry with the inconsistencies, you will have to endure the look until you’re ready for a retouch or repaint.
-
Allow the paint to Dry Sufficiently Between Coats
If you rush to apply the second coat of luminous paint before the first one dries, you will remove some glow from the first one leaving dark spots on the surface.
The only way to avoid dark spots is to treat glow-in-the-dark paints like regular paints and allow them to dry properly between layers. You can use a hairdryer to dry it faster, but I recommend letting it air dry for the best results.
-
Use More than Two coats
Most products instruct the consumer to apply two coats of paint. However, I noticed that the paint glow becomes brighter if you put on 2-3 coats after the usual two. You can reach a maximum of 5 coats because any layers after that won’t make a difference.
Glow In the Dark Paint DIY
Creating DIY luminous paint is lifesaving for all of us. It cuts on purchasing expenses, and you’ll be able to play around with colors to create the shades you need. You will also be able to control the ingredients you use, ensuring that the paint is not a health hazard.
Creating Glow-in-the-dark paint at home is easy, and you can do it in two ways:
- Using Phosphorescent Powder
- Using A highlighter and water
Method 1: Using Phosphorescent Powder
Step I: Choose a Glow In the Dark Powder
You can find glow-in-the-dark or phosphorescent powders online and in art and craft supply stores, and they come in different colors and particle sizes.
Powders with large particles make rough paint, but they also glow brighter. They’re also perfect when you want to create a speckled look. On the other hand, powders with smaller particles create smooth paint, but the glow is dimmer.
Step II: Select a Paint Medium
The luminous powder cannot stick to surfaces by itself, so here’s where the paint medium comes in.
Paint medium is the liquid you mix with the phosphorescent powder to create glow-in-the-dark paint, and the type you choose will dictate a large percentage of the paint’s look.
For instance, if you want your paint to be invisible when there’s light, I recommend using a transparent medium like acrylic gel. Select tempera paint or any acrylic in your preferred color if you want the colors to be visible in the light.
Additionally, you must ensure that the paint medium is compatible with your powder. For instance, if you want to use a water-based medium, it is best to use coated glow powder/coated phosphorescent pigment.
The standard//uncoated powders work best with oil and solvent-based mediums.
Step III: Make the Paint
- Put one part of the glow powder into a bowl, then gradually add five parts of the paint medium. If you measure by volume, use 20% powder-80% paint medium.
- Stir the mixture thoroughly until it mixes well, and add more paint medium if you want to make it thinner. Remember, the luminous powder won’t dissolve in the medium, so stir until all the lumps break.
- Afterward, the paint is ready to use. Most DIY paints have very little shelf-life; therefore, you should only mix what you can use up during the project. If you want to store the color, pour it into a sealable container, seal it then keep it in a cool, dry place. When you take it out again, stir it well before using it, and do not store it for more than a week.
Method 2: Using A Highlighter and Water
Step I: Remove the Highlighter’s Felt
- Use some pliers to open the back end of a highlighter, then remove the felt strip from its center. Discard the plastic casing in an appropriate place.
- Do not just use any highlighter; ensure that the one you have glows under a black light. You can test this by writing something on paper with the highlighter and then holding a black light over it in the dark. If you can read the scribbles, you can use the highlighter to make paint.
Step II: Run Some Water Through the Strip
You will need to extract the highlighter ink from the strip to make the paint.
- To start, place a cup or bowl in your sink.
- Next, slowly run water through the felt strip allowing the pen liquid to fall into the cup.
- Keep running the water until the strip turns white.
Repeat this process with several highlighters until you create enough highlighter water.
Step III. Make the Paint
- Pour 1/4 a cup of corn starch into a tin, then add an equal amount of the highlighter fluid you extracted earlier.
- Stir the combo until all the cornstarch dissolves completely.
- If you want to alter the mixture’s color or create different shades of color, add a few drops of food coloring into the combo and stir.
- Before adding food coloring, Pour the cornstarch mixture into smaller containers. This way, you can create different colors quickly.
- Once you have the different colors, your paint is ready to use.
- This mixture is pretty runny; therefore, you’ll have to apply several layers – up to 5 or 6 – to make the glow bright.
- After creating your art, shine a blacklight on it to watch it glow.
Can I Put Glow In the Dark Paint Over Regular Paint?
You can apply glow-in-the-dark paint over regular paint, especially if you want to make different sections of the standard paint stand out.
The only detail you have to remember is that the regular paint should be of a lighter color to make the luminous paint glow more.
The one mistake that some painters make is mixing glow-in-the-dark paint with regular paint to try and make more.
This method won’t work because the colored pigments of regular color will block light from passing through and charging the phosphors in the luminous paint.
As a result, the glow will fade or disappear altogether. If you must combine the two kinds of paint, ensure that you use transparent paints for the best results.
Conclusion
Glow-in-the-dark paint is fascinating, and it elevates every painting or decor no matter how simple it is.
We use it regularly on different surfaces like metal, wood, and stone, and sometimes we put it on our bodies to enhance beauty. This article focused mainly on
Glow In The Dark Paint for Walls
Glow-in-the-dark wall paints are the permanent kind, and we mostly use them for decorations instead of protecting the surface like regular paint.
They emit a beautiful glow that lasts hours at night, as long as you charge it properly in direct sunlight or use a black light.
The length and strength of the glow of these products depend on the source of charge and how long you charge it. LED lights are the weakest while Blacklights are the strongest.
However, the most standard way of charging these paints is in direct sunlight for about 3-4 hours to get the maximum glow.
These paints are not toxic; therefore, you can use them on your children’s bedroom walls and decorative pieces that they can reach. They are a little costly, but you can make some at home using readily available materials on the bright side.
I hope I’ve cleared up everything about Glow-in-the-dark paint for walls to help you get started on your creative journey. If you have more to share with the group or queries, please reach out in the comments section.