 Painting light bulbs may come off a bit odd. Probably, you have never heard of it before. But applying paint to an LED light bulb is an excellent way to theme up a party. It helps you to transform a simple space into a ‘cool den cheaply.’ Even so, many people struggle with the question, can you paint led light bulbs?
Led light bulbs are pretty safe and easy to paint. However, you need to do it correctly. For instance, use heat-resistant glass paint formula and avoid flammable products, like nail varnish and oil paint. Also, it would be best to sand the bulb before applying the formula to get a diffused effect.
Nonetheless, remember that heat is an enemy to LEDs. And by applying paint to the bulbs, you allow excess heat to accumulate. Therefore, they slowly dim and will have a shortened lifespan. But still, it is okay to paint LED bulbs. Get more tips on the subject in the following segments.
How Do You Paint LED Bulbs?
Although painting LED bulbs shortens their lifespan, they are an excellent way to spice up a room temporarily. Also, there is no safety hazard because the bulbs get their power from a transformer that regulates the electricity supply.
Are you ready to paint? Follow this detailed guide to guarantee a successful product.
- First, determine the most suitable bulb for the project. There are some hazards associated with painting light bulbs. So, it would be best to get a low voltage bulb, preferably 40-watts.
- Then, decide how you would want the lights to appear. For example, you may want a diffused look. If yes, lightly sand over the LED bulb using fine-grit sandpaper. On the other hand, proceed to clean the bulb if you want a normal look.
- Also, choose the right type of paint. Please avoid using oil and acrylic paints as they heat the bulb faster. Instead, use ceramic paint formulas as they are most suited for glass surfaces.
- The other step is to clean the bulb with rubbing alcohol and a paper towel. Ensure that you eliminate all the dust and grease from the glass. Also, you can use soapy water if you cannot access alcohol.
- Prepare the bulb with a primer if you want to deliver an opaque look. In addition, the primer helps the formula adhere to the surface. Therefore, you’ll hit two birds with just one stone.
- Next, apply the paint to the bulb’s surface and use thin layers. Remember that multiple thin layers deliver a better finish than one thick layer. Also, ensure that you cover the entire LED bulb to prevent white light from shining through the surface.
- Finally, let your creative ideas flow. You can choose a fancy design for an old bulb. In addition, stationery materials can help create things like a Santa Claus model, snowman, or a reindeer. The possibilities are infinite so have it big. But ensure that you give the bulb enough time to dry before plugging it.
What Kind of Paint Do You Use On a Light Bulb?
Non-water-based glass paint is the most suitable formula to use to paint light bulbs. It does not evaporate while the bulb is lit and can withstand high heat levels when the bulb is on. Also, ensure that you confirm the paint because we also have water-based glass formulas. Water-based paints evaporate off the bulb and will not do you much good.
Clean the bulb to enhance paint adherence to the surface. Use a brush to apply the formula lightly and allow it to dry completely. You can also bake the bulb in the oven to enable the paint to set. In addition, let the bulb cool in the oven before you remove it as it may be too hot to handle.
Can You Paint a Light Bulb and Still Use It?
Yes, it is safe to paint a light bulb and use it to light a space. All you need is a clear 40-watt or less bulb, heat-resistant glass paint, and your creativity. You can also get old light bulbs and create unique decorations.
However, it would be best to avoid oil-based or regular acrylic paint on light bulbs. They may cause the bulb to explode after you light it. Also, clean the bulb’s surface with rubbing alcohol for a better finish.
Can You Paint Over LED Strips?
Whether or not you can paint on LED strips depends on the strip light. Many LED strip lights are usually very heat sensitive and may not lead to a successful painting venture. But you can check the manufacturer’s instructions if you want to paint them.
On top of that, the LED strips feature individual LED emitters on a flexible and narrow circuit board. Also, they operate in low-voltage DC power and come in a wide range of variable and fixed brightness and color. Thus, you can paint them as long as you follow the correct procedure and use the right supplies.
Can You Paint LED Light Bulbs With Acrylic Paint?
Although it is safe to paint LED light bulbs, selecting the correct paint for the work is prudent. Many ask if it is possible to use standard acrylic paint, and here’s where it becomes tricky.
Acrylic paint is a water-based product and is likely to burn, evaporate, or change color with constant heat exposure. Therefore, it is not the best alternative for a long-lasting project. But, even so, you can use it for temporal modifications.
Frustratingly, oil-based formulas are also not ideal for LED bulbs either. They are highly flammable and constitute a safety hazard if the bulb reaches high-temperature levels. So, what can you use?
The trick is to go for heat-resistant glass paint. It is similar to the acrylic formula as the paint is also water-based. However, glass paint has heat-resistant chemicals that keep the paint from changing color or degrading because of increased heat levels.
Besides that, there is a downside to painting the bulb. The formula negatively impacts the lumen output and causes the bulb to dimmer than a non-painted one. Also, the light may not be usable if you have extremely opaque paint.
Can You Paint Light Bulbs With Nail Polish?
It is possible to paint light bulbs with nail polish. However, first, ensure that you clean the bulb and give it enough time to dry. You can stuff a crumpled paper towel into the light bulb’s end and wipe away any glass bits or powder. Then, allow the remaining water content to air dry.
Next, use nail polish or any other suitable paint to paint your designs on the vase. Also, you can paint the cap only to deliver a simpler look.
How Do You Paint LED Signs?
One way to brighten a high traffic space, like an entertainment area, is to have LED lights. Some people even prefer getting neon lights for a more lit-up scenario. However, getting these lights requires money, and thus you can have frustrated plans if you can’t afford them.
Fortunately, you can paint LED lights and deliver the intended look. Moreover, it is a pretty cheap and easy project. Thus, you’ll complete it within no time while incurring a minimal cost.
You’ll need acrylic paint, small paintbrushes, canvas or another painting surface, a round foam brush, and acrylic paint. Next, paint the canvas or painting surface black and sketch out your preferred design. You can make one of those ‘on-air’ signs you see in entertainment places or TV stations. Therefore, go all out and be creative,
Start painting the letters or shapes once you get the correct sketch. Follow the steps below to get an excellent outcome.
- Use the round foam brush to go over each letter with your desired base color. Go over the paint with white to form the neon sign tubes.
- Dip the paintbrush in some white formula and sketch out the neon sign tubing. You can consider working with one letter at a time to keep the paint from drying out before you create the tubing. Also, it would be best to finish this step while the paint is still wet for better results.
- Check whether the letters are dry. Then, dip a small paintbrush in white paint and add highlights to the left side of the letters.
- Mix a slightly darker color than the letter. Next, add shadows on the right side of the letters using the same small brush.
- Lastly, dip the small paintbrush in white paint. Then, add a few desired shapes, like stars, little crosses, or small white dots, in a few random places. This exercise gives a perfect finish touch. In addition, you can add an LED strip light at the canvas’ edge or use glow-in-the-dark paint to get a more exciting result.
How Do You Get Paint Off LED Lights?
Sometimes you paint your LED lights for one-time events, and you’d want to remove the paint afterward. Thankfully, it is possible to remove paint from the lights. All you need is the correct supplies and procedure.
For instance, nail polish remover is a perfect acetone formula to remove paint from glass surfaces. It is a special solvent compound that removes tough materials in nail polish such as plasticizers, synthetic resins, and nitrocellulose. Therefore, it does a good job with paint on glass.
In addition, it would be best to use the nail polish remover with a microfiber cloth. Next, rub it onto the bulb glass with the paint and wait for a while. Use a dry cloth to clean it off, and with the wipe, you remove the paint.
Alcohol can also help remove the paint. Get a lint-free rag or cloth and soak it in rubbing alcohol. Ensure that you squeeze to remove any excess liquid as you do not want alcohol dripping all over the work area. Then, rub the alcohol on the painted surface until you get rid of the paint.
Besides that, it is prudent to avoid reusing rags after using them to remove paint. The formula dries to the materials, and it becomes difficult to use them again. You can handwash them after the paint job, but it does not yield results.
Also, it would be hazardous to put the paint rag in a washing machine. Moreover, it is recommended that you avoid putting clothes with paint in the washer. Rubbing alcohol and acetone is highly flammable. Thus, you may be writing a fire recipe by machine washing them and putting them in the drier.
So, please do your paint jobs with clothes you do not mind disposing of after the paint job. Washing to reuse them may be costlier than getting another piece.
Can You Paint Lead Flashing?
It is possible to paint lead flashing. Also, it is a long cleaning job for a lead-painted surface. So, most people prefer to repaint it once it gets old or peels.
Remove any white substances and loose flaky paint from the surface during the paint or paint job. Ensure that you also get a flexible undercoat and topcoat, like Dulux Weathershield undercoat and gloss. It is long-lasting and thus a perfect formula for lead flashing.
Besides that, you will find lead flashing mostly under the windows of most houses or along the roof of a conservatory. Therefore, during a house’s exterior painting projects, people prefer to repaint these areas as the paint on the lead may be peeling.
One primary reason why the paint coat peels off is that lead oxidizes with time. Then, the paint lifts and leaves a white powder on the surface. Also, paint peels because lead surfaces contract and expand with various heat levels. Therefore, the paint coat cracks and allows water or moisture in, and it lifts.
However, we have a few concerns about painting lead flashing as the paint coat peels over time. So, it would be best to use oil to treat the lead. It keeps the surface supple, and thus it does not crack after some time.
Additionally, the application process is quite easy and does not take much time. Take a rag or cloth, tip it with some oil, and then apply it into the lead. Also, check whether the lead becomes darker as it absorbs the formula. Proceed with the application until you get your desired result.
This strategy works perfectly and keeps the lead in good shape for an extended duration; it keeps the lead attractive and able to breathe. Thus, you will not see the surface drying out or cracking.
On top of that, it is easy to note if the surface needs you to reapply the oil. Assess whether the lead is a little bit weathered or light grey. If yes, you need to engage in an oil reapplication job. Fortunately, the lead will last for years, and you do not have to stress about peeling paint.
Finally, some of the best oil formulas include WD40, Patination oil, and 3in1 oil. They are widely available from builder’s merchants and hardware shops.
How Do You Make Acrylic Paint Look Like It’s Glowing?
You can easily do glow effects on art projects with computer software. However, you can also use some acrylic paint formulas on canvas. But it takes practice to get a perfect paint job.
The primary skill you need to achieve a flawless finish is blending, which is vital in creating a glow effect. However, it is a pretty simple affair, and with more practice, you’ll get better within no time.
It is best to have a paintbrush, pale yellow acrylic paint, raw umber acrylic paint, a rag, pale blue acrylic paint, and white acrylic paint.
Also, follow the guidelines in the next session to see how to create a glowing effect with acrylic paint.
How Do You Make a Glowing Effect With Paint?
It is important to note that acrylic paints are the best formulas to use for glowing effects. They are chemical-based and more elastic. Thus, they expand and contract better than latex paints.
- Step One:
Assuming you are working on a candle flame, paint the design using a paintbrush and raw umber acrylic paint. You can make the flame any size as long as the flame’s bottom is wide around the candle’s wick. Also, ensure that the flame’s top tampers to a point.
- Step Two:
Add some white acrylic paint from the wick’s top portion at the flame area to its tip. Use the brush’s tip to lightly touch and blend the white paint into the raw umber color. Also, it would be best not to over the wick. Thus, leave a raw umber outline around the flame that you will highlight later.
- Step Three:
Use the tip of a dry brush and dab it in pale yellow acrylic paint. Then, load the brush’s tip with little paint and lightly apply the formula over the white on the flame. On top of that, the yellow color should streak through the white and allow some white hue to peek through.
Next, wipe the brush with a cloth between the strokes and dab it in the paint again. Then, paint with the yellow till it streaks through the entire white paint.
- Step Four:
Load the brush lightly by dabbing its tip in blue acrylic paint. Next, streak the blue formula gently around the flame’s bottom. Ensure that you blend it halfway up the edges of the flame. Also, wipe the brush with a cloth after applying the hue. Then, stroke the blue color into the flame’s bottom.
On top of that, blend the blue coat carefully into the other base colors. It would be best to leave a small hint of the blue hue around the bottom of the flame’s edge.
- Step Five:
Get a dry brush, load its tip with a pale yellow color, and follow the flame’s shape. It would help to consider a quarter-inch to the edges or sides of the actual flame. Next, paint small streaks on the flame’s sides below its top to where the base of the flame widens.
Wipe the brush with a cloth and go over the glow streaks. Concentrate on the flame’s outside to blend the yellow hue over the background. But, still, ensure that the background is visible through the streaks.
Lastly, continue stroking the yellow streaks until the yellow is evident but transparent in the painting.
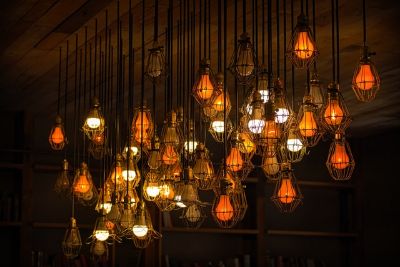
Will Painting LED Bulbs In Yellow Make The Light Look Warmer?
Interestingly, LED lights or standard soft white incandescent bulbs deliver natural and warm lighting. They make bright colors such as orange, red, and yellow appear more intense, while cooler hues such as gray, blue, and green seem a bit dull. Therefore, painting bulbs yellow makes the light appear warmer.
In addition, vintage bulbs are warmer than incandescent ones. They add a warm, occasionally amber, or sometimes yellow hue to a room. Many people also use vintage lighting alternatives to warm up a space, especially if the space does not get much natural sunlight. Also, they are perfect if you want to complement already set warm paint colors.
Conversely, a fluorescent light bulb delivers a cooler, blue-ish light. It pairs perfectly with other cooler paint formulas like those in the green, gray, and blue family. These colors are usually appropriate for kitchens or workspaces.
Frequently Asked Questions
Here are some of the questions many people ask regarding LED light bulbs:
- Can I Paint A Light Bulb With Sharpie?
It is okay to paint your light bulb with Sharpie. The product is water-resistant, heat-resistant up to 500 degrees Fahrenheit, and fade-resistant. Therefore, a perfect option as you showcase your creativity.
In addition, Sharpie comes in 40 unique colors and gives you a chance to select what works for the project. You can also blend various colors to have striking designs, patterns, and shapes on the bulb.
Unfortunately, although it is safe to use Sharpie on bulbs, you will shorten their life span. Therefore, it would be best to use the product for temporal purposes. That way, you will not get frustrated when the bulb stops working sooner or later.
- Is it Okay to Paint My Light Bulb to Change Its Color?
You can create custom-painted light bulbs to brighten up a space and change the colors completely. Get clear 40-watt bulbs, heat-resistant glass paint, and some ideas. Also, you can use old bulbs and turn them into new and unique decorations.
However, since glass paint formulas are water-based, they will burn, evaporate, or change color. Therefore, high heat levels are likely to damage both the paint and the bulb.
In addition, painting the bulb is a cool way to make temporal modifications. Thus, consider other options for long-lasting projects.
- Is it Dangerous to Paint a Light Bulb?
It is dangerous to paint fluorescent and incandescent bulbs. They emit much heat and thus can blow up after a paint job. Also, the bulb’s surface functions as a heat dissipation device and emits excess heat inside the bulb to keep it balanced. Thus, adding a paint layer causes a heat build-up inside the bulb, leading to damage.
Even so, you can safely paint your light bulbs if they are 40-watts and below. It will be a temporal touch-up project, but you will have created a customized space for your event.
- Can I Spray Paint Mini Lights?
Yes. You can spray paint mini lights. All you indeed is the recommended paint formula, and you are good to begin! Also, ensure that you unplug the bulbs and position them in a safe area away from the workspace.
The next step is to lay the string lights on a drop cloth to keep them from touching each other. You can also use painter’s tape to protect bulb parts that you do not want to paint accidentally.
Finally, begin the painting process and give the surface enough time to dry. And there you go. You have ordinary lights on another level!
- Can I Paint Fairy Light Bulbs?
It is possible to paint fairy light bulbs. Use a small paintbrush and apply a thin glass paint layer on each bulb. Also, you can choose to cover the entire bulb or concentrate on the bulb’s tip for subtle color.
In addition, it would be best to avoid painting the bulb’s bottom as it widens the area slightly. Therefore, the bulb may not fit into the bulb stem once you finish painting.
Conclusion
You can easily give your next photoshoot a creative edge or modify your lighting by painting LED light bulbs. Also, various colors alter the room’s natural appearance to give a cool or vibrant feel. Moreover, you can blend different hues to create your preferred personality. But, still, painting bulbs is not yet common practice, and painters have a concern.
Can You Paint Led Light Bulbs?
It is okay to paint your LED light bulbs. Moreover, the application process is pretty simple as long as you do it properly. In addition, invest in non-flammable and heat-resistant glass paint products.
You can also sand the LED light bulb before applying the paint coat to deliver a diffused appearance.