Today, we are going to discuss more on how to paint styrofoam! Here’s why…
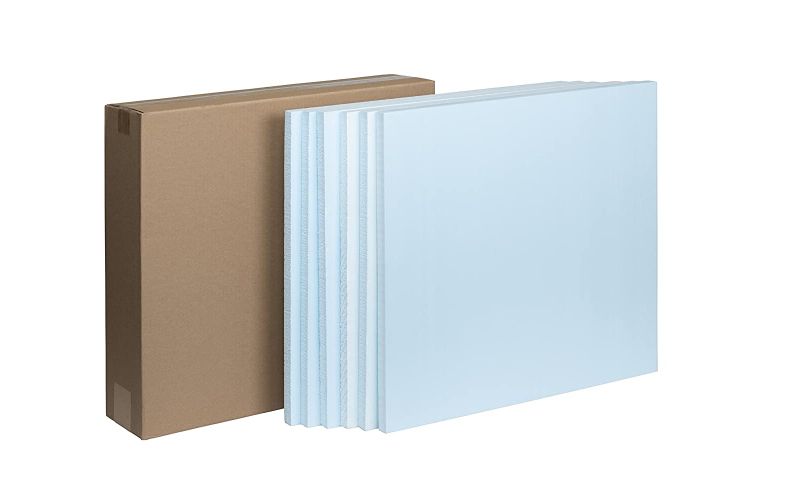
The natural look of Styrofoam is plain, white, and boring. This look was never an issue because there was no urgent need to decorate insulating and packaging materials.
However, since the start of the inclusion of Styrofoam in craft projects, there has been a constant need to improve its appearance, and the easiest way to do this is by painting it.
Styrofoam is an unconventional material to paint; therefore, you must use specific products and techniques to get it right.
In this article, I’ll show you How to Paint Styrofoam step by step to keep you from making any mistakes.
Styrofoam is a highly porous material; therefore, you need to seal its surface with a foam sealant or a craft sealer before painting it.
You can also start without the sealant, but you must apply several coats of paint to achieve the coverage you want.
The best paints on Styrofoam are acrylic or latex paint because they won’t dissolve the material.
Apply the paint using a brush, roller, or spray gun, depending on your preference, and ensure that each paint coat dries thoroughly before the next to ensure the success of your project.
Before I explain the painting process in detail, let’s first understand a few things about Styrofoam.
What Is Styrofoam?
Styrofoam is a petroleum-based plastic formed by polymerizing styrene monomers.
Manufacturers refine Styrene to create Polystyrene and then add a chemical agent to it – usually hydrofluorocarbon.
Afterward, they force the mixture to expand under a certain pressure to form compact closed-cell materials, the styrofoam boards we use for insulation.
The scientific name for the end material is Extruded Polystyrene Foam (XPS), and its biggest manufacturer is a company known as the Dow Chemical Company.
This company trademarked their product, referring to it as “styrofoam,” and since they are the biggest supplier, styrofoam has become the default name for XPS to many.
There is a material called Expanded Polystyrene (EPS), which looks so much like XPS that it confuses many people.
A good example is the disposable foam cups and food containers we see daily.
They may look like XPS, and people call them styrofoam, but they are very different. Let me explain.
XPS and EPS differ mainly because of how manufacturers make them.
XPS involves adding chemical agents to Polystyrene and then continuously extruding the mixture under pressure to form closed-cell foams.
On the other hand, EPS involves expanding spherical polystyrene beads in a mold and then using pressure and heat to fuse the beads.
The result is an open-cell foam product that contains 95% air in it.
Basically, XPS is a mixture of Polystyrene and other chemical agents, while EPS is an inert form of Polystyrene.
We use styrofoam (XPS) for crafts instead of EPS because of their structural difference.
XPS is sturdier; therefore, you can easily shape and decorate it however you want.
EPS, however, is lighter; hence the crafts you make from it will not last long.
However, it has the upper hand because it is safer to use around food, which is why manufacturers use them to make food packaging.
If you were to use XPS to package food, the heat would cause the chemicals mixed with the Polystyrene to leach and mix with the food, which is a health hazard.
Why Paint Styrofoam?
The main reason for painting styrofoam is to seal and decorate its surface after making crafts.
As we know, when you make something beautiful, you want to put it in a place where everyone can see it – outside or indoors but in an open space.
The conditions in the open make Styrofoam degrade slowly, so without protection, all your crafts will fail at some point.
Paint seals the Styrofoam surface to prevent water and UV rays from affecting it.
You see, when you expose Styrofoam to UV rays for a long time, it will become brittle and turn yellow.
On the other hand, water causes it to break down into small particles called microplastics that pollute the environment.
So if you paint the Styrofoam, you protect it by keeping water and UV rays at bay, and as a bonus, the paint colors make them look stunning for longer.
What Kind of Paint Do You Use On Styrofoam?
The plastic used to make Styrofoam has a petroleum base, and as a result, some paints may not adhere properly, while others may straight up melt the foam.
It is best to avoid coatings that contain solvents such as acetone, toluene, benzene, and tetrahydrofuran (THF), as they will degrade the foam before you even complete the project.
So, which paints are safe to use on Styrofoam?
Acrylic Paint
Acrylic paint is the best and most widely available product for coloring Styrofoam.
It is water-based and contains no chemical agents or solvents that would dissolve the Styrofoam.
This paint type adheres effectively to foam even without a primer.
However, if you want a smooth and seamless finish, I recommend starting with a primer before going in with the color.
Acrylic paint is easy to clean with soap and water when wet, but as it dries, it becomes impervious to water.
This feature makes it ideal for crafts that you’ll hang outside or in areas with a lot of moisture.
This paint also comes in several colors, which you can mix to create different shades as you like – a feature that gives you room to be creative.
Even though acrylic paint is the go-to product for this kind of project, they also degrade the foam over time, making them ideal for short-term projects like Christmas tree decorations.
If you want to use it for a more long-term project, look for acrylic paints designed for painting foam products.
You may not find products solely for painting Styrofoam, but ensure that foam products are on its list of recommended painting materials.
Latex Paint
Latex paint is also ideal for painting styrofoam because it is water-based.
Manufacturers package it in larger tins than acrylic paint, and it can last up to two years if you store it properly.
These paints also come in a wide range of colors, and cleaning is simple with a bit of soap and water.
Latex paints dry fast but not as quickly as acrylics. This feature, plus the large tin packaging, make latex paint better for larger styrofoam painting projects.
On the downside, these paints tend to crack faster than acrylics, so it is better to use them for indoor craft projects.
Note: You can purchase acrylic-latex paints if you want your projects to last much longer.
Tempera Paint
Tempera paint is also a water-based craft paint that adheres readily to foam products.
Its main ingredients are starch, water, calcium carbonate, cellulose, and pigment, making it allergen-free and non-toxic.
This paint is easy to clean with soap and water while wet, but unlike other paints, it remains water-soluble even after it dries.
For this reason, it is best for foam projects that won’t be exposed to water.
On the downside, the color range of tempera paint is limited; hence you have very few options to get creative.
Moreover, its colors do not mix well like other paints, making your creativity leash even tighter.
Spray Paints
Spray paints also work well on Styrofoam, but only if they are latex, acrylic, or a combination of both.
Most traditional spray paints contain point solvents that deteriorate Styrofoam quicker than other solvent paints.
Therefore, read all product labels as you shop to ensure that the product you choose is safe to use on foam products.
How to Paint Styrofoam(Step By Step Guide)
Painting Styrofoam can be tricky if you do not follow specific rules.
The first and most important rule is selecting the correct type of primer and paint.
Afterward, you must use a few application techniques to get a smooth finish.
Below is a detailed guide to everything you need to know about how to paint Styrofoam.
How to Paint Styrofoam With a Paintbrush
Here’s how to go about it:
Materials
- Butcher’s paper/Newspaper
- Your Styrofoam project
- Paint tray
- Paint (Acrylic, Latex, or Tempera)
- Primer
- Foam brushes/Regular paintbrushes
- Painter’s tape
Step 1: Choose Paint and Primer
It is not always necessary to start with a primer before you paint Styrofoam, but it will help give you a smoother finish, especially if the paint you use is not foam-friendly.
I recommend using foam finish to prime Styrofoam if you want a long-lasting paint job.
Foam finish can fill the little spaces on Styrofoam and any other gouges on the surface, and you can sand it to create an even smoother surface to paint.
It also makes the foam stronger without weighing it down. If you cannot find a foam finish, you can prime the Styrofoam with any other craft sealer like modge podge or plaster of Paris and get good results.
When it comes to painting, acrylic paint is the best product to use, so ensure that you select it in the color you want for your craft.
Also, purchase enough paint to cover everything as you don’t want to go back to the store in the middle of your project.
If you’re painting a few styrofoam balls or letters and shapes, you only need a small bottle that holds around 2 ounces of paint.
For larger projects, purchase paint in bigger containers so that you have enough product to apply two coats.
You can also use latex or tempera paints if that’s what you prefer.
Step 2: Set Up Your Work Space
Spread the butcher’s paper or newspaper over your workbench, then secure it with painter’s tape, so it does not move.
Put some paper on the floor as well to catch accidental paint spills and drips.
Arrange all the materials you need on another bench close to the workbench so that you won’t have to move across the room whenever you need something as you work.
Step 3: Apply the Primer
- Use a foam or a regular paint brush to spread a thin layer of primer over the Styrofoam.
- Allow it to dry for the period specified on the label.
If you’re using acrylic paint, one coat of primer is enough, but you need at least two coats if you are using either latex or tempera paint.
Also, remember to gently sand the first primer coat with fine-grit sandpaper to make the surface smoother and get the second coat to adhere properly.
Step 4: Paint the Styrofoam
- Pour a small amount of paint onto a paint tray, then dip ¼ of the ends of your brush bristles into it. This way, you will only pick up a small amount of paint, guaranteeing better results.
- Apply the paint on the Styrofoam using short even strokes until you cover the whole surface.
- Allow the paint to dry for about an hour, or better yet, check the product’s specifications for the precise drying time.
- After the time elapses, apply another layer of paint using the same techniques as the first one, then let it dry.
Two coats of paint should do the trick, but you can apply more coats until you are satisfied with the finish.
How to Paint Styrofoam With a Paint Sprayer
Paint sprayers are ideal for larger projects where you need to cover a lot of surface area.
These may include large displays, stage backgrounds, and big decorative crafts.
Paint sprayers are a little tricky to use if you’re a beginner, but it becomes easier once you master the technique.
They create more even layers that blend well and are perfect for coloring foam crafts with intricate designs.
The guide below shows the proper way to paint Styrofoam with a sprayer.
Materials You’ll Need
- A spray gun
- Newspaper/Butchers Paper
- Protective coveralls/Old clothes
- Paint
- Paint thinner
- Gloves, safety goggles, and a respirator
- Cheesecloth
- Containers for mixing
- Air hose and compressor
Step 1: Wear Protective clothing
Paint sprayers always spread paint to the surfaces surrounding the object you are painting, including you.
Therefore, you must protect yourself accordingly to avoid inhaling the paint fumes and soiling your clothes.
- Wear work coveralls over your clothes to prevent paint from staining them. If you do not have coveralls, wear some old clothes that you won’t miss if they get paint stains.
- Put on protective goggles to shield your eyes and wear a respirator mask to keep away the paint fumes.
Step 2: Prepare your workspace
I recommend that you move your project outside whenever you choose to spray paint.
This way, you will avoid getting paint on other items you don’t want to paint.
If it is too windy, keep your project indoors but ensure that you keep doors and windows open to increase air circulation.
- Cover your workbench and the floor with some newspaper and secure it in place with painter’s tape.
- Keep all your paints, brushes, cleaning tools, etc., on another bench near your workspace so you can reach them effortlessly during the project.
Step 3: Thin the Paint
The paints we recommend for painting styrofoam are thick. Therefore you must thin them before using them in a spray gun.
Since they are water-based, you only need water to bring them to a lighter consistency.
- Pour the paint into a separate container and add water slowly as you stir until the mixture reaches the same viscosity as milk.
To test if the viscosity is correct:
- Dip a mixing stick into the mixture, then remove it immediately. If three or four paint drops fall, you have achieved the right consistency. However, if the liquid trickles in a single stream, you have over-thinned the product and need to add more paint to the mixture.
Step 4: Fill Your Spray Gun
- Pour the thinned paint into the cup of your spray gun, taking care not to make it overflow. As you pour, use a cheesecloth to strain the paint and remove dust particles and paint residues which will block your spray gun nozzle while you work.
- Afterward, close the sprayer cup lid and ensure that it is secure so that no paint comes out. Next, check the connection between your air compressor and spray gun to ensure that there are no leaks before you begin painting.
Step 5: Paint
Before you start painting, do a test spray on a scrap piece of styrofoam to ensure that the spray gun is working properly.
Test sprays are essential because you can make the necessary adjustments to the sprayer before you begin the project, thus saving you significant problems afterward.
Once you are happy with the spray gun’s settings;
- Hold the spray gun at least 8 inches from the styrofoam at a 90-degree angle, then squeeze the trigger to release the paint.
- Start spraying from the top of the styrofoam, going down or going from left to right if you prefer. Once you reach the bottom, gently release the gun’s trigger, go back to the top, and squeeze it again. Ensure that you overlap each spray pass to avoid leaving some spaces bare.
- After the first coat, allow the paint to dry as specified in the label, then apply two or three more coats until you achieve the level of coverage you want.
Here’s How to Spray Paint Styrofoam:
What Paint Will Not Melt Styrofoam?
Water-based paints will not melt styrofoam because water will not react with the petroleum-based plastic in polystyrene.
I recommend that you avoid coatings containing acetone or harsh solvents such as toluene and benzene because they will react with the petroleum and dissolve the styrofoam, causing it to lose its structure.
Best Paint For Styrofoam
Here’s the list of my top picks:
1. Apple Barrel Essential Paint Set
The Apple Barrel Essential is a set of acrylic craft paints that you can apply on several surfaces like foam, canvas, and ceramics.
It has a non-toxic water-based formula, making it ideal for crafters of all ages.
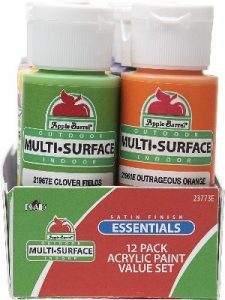 Moreover, it comes in several classic color shades like Outrageous orange, Candy apple, Timeless gray, Chocolate sprinkle, Lemon, etc., and you can find it in satin, matte, and glossy finishes.
This paint is easy to clean with soap and water, but only while it is still wet.
Once it hardens, you must use solvents like isopropyl alcohol and ammonia to remove it.
It is only ideal for smaller styrofoam projects because the manufacturers package it in 2-ounce bottles.
You can apply this paint using a paintbrush, stencil, or sponge.
Moreover, unlike most acrylic paints, you cannot thin the Apple Barrel Essential.
For this reason, you cannot use paint sprayers to apply this paint.
Pros
- It has unique classic colors that pop when dry
- It is affordable
- It is non-toxic
- It dries quickly
- You can use it indoors and outdoors.
Cons
- You cannot thin it.
- It comes in small bottles.
- Smaller quantity than other brands
2. Magicfly Acrylic Paint Set
The Magicfly Acrylic Paint Set is ideal for painting many surfaces, including styrofoam, canvas, paper, wood, pumpkin, ceramic, etc.
The set has 20 paint bottles with 16 classic colors, two neon colors, and two metallic colors.
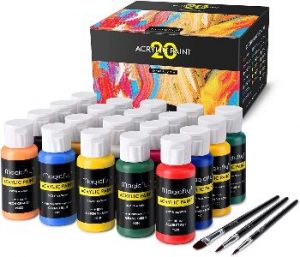 The manufacturers also include a set of three brushes that are perfect for applying this paint.
The paint in the bottles is of professional artist quality.
It is richly pigmented and has a creamy texture that makes it easy to apply on all surfaces, including styrofoam.
It also blends well, making it ideal for creating all kinds of crafts, including drawing pictures and coloring decorations.
This paint is easy to clean with warm water and soap, but it dries quickly; therefore, you must clean all accidental spills as soon as they touch the surface.
Painters love this product because it comes in large volume bottles, which last longer than most acrylics.
Pros
- It is water-based hence non-toxic
- The paints don’t fade quickly
- It comes in large volume bottles
- It dries quickly
- Easy to clean while still wet
Cons
- It is more expensive than most acrylic paint sets
3. Colorations Simply Washable Tempera Paints
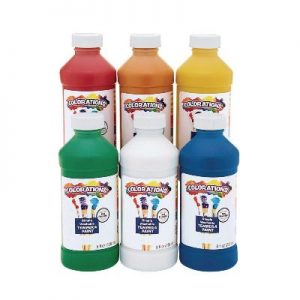 Colorations Simply Washable Tempera Paint is very soluble in water; hence you can wash it off any surface even after it dries.
It is non-toxic and certified for safety, making it the ideal choice for children.
The paint colors are vibrant, with bold shades that attract kids.
Furthermore, you can apply it using various tools like paint brushes, sponges, and foam rollers, making them the perfect medium for teaching different painting techniques.
This kit comes with six 8-oz bottles and is affordable; therefore, you can purchase it in bulk.
On the downside, it is not sprayable and degrades very quickly; hence you cannot use it for long-term projects.
Pros
- It is safe for young children
- It is affordable
- It dries to a matte finish
- Easy to clean up
- It has bold, vibrant colors.
Cons
- It has fewer colors
- It breaks down in water even after it dries
Sargent Art Acrylic Paint Set
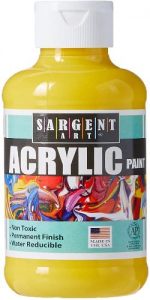 The Sargent Art Acrylic Paint Set is non-toxic and highly economical.
The package has 12 16-ounce bottles of acrylic paint ideal for painting large styrofoam structures.
This paint has 12 high-quality colors with high opacity, providing enough coverage with a few coats.
The feature, coupled with the large volume bottles, makes the Sargent Art Acrylic Paints last long.
This paint set is ideal for professional painters, students, and even kids.
It is easy to clean when wet but becomes water-resistant when it dries, meaning your paint projects will survive even outside.
On the downside, this sometimes cracks as it dries, although the cracks aren’t as severe on styrofoam as on canvas.
Pros
- It comes in large volume bottles
- It is non-toxic
- IT has vibrant colors
- It dries quickly
- It is highly opaque
Cons
- The paint cracks as it dries
What to Consider When Buying Paint for Styrofoam
Styrofoam is an unconventional surface to paint; therefore, you need to put much thought into the type of paint you buy to make your project successful.
The following is a list of all the things you should consider when buying paint for Styrofoam.
-
Paint Type
As mentioned earlier, the type of paint you apply on Styrofoam must be water-based because it has no solvents.
The best option is always acrylic or latex if you want the finish to last a long time.
However, you can also use tempera paints because they are water-based, even though they are not permanent.
-
Pigment
The pigment is the component in paint that gives it color and determines its opacity.
It is vital to select paints with vibrant pigments if you want your art and craft projects to stand out.
You should also choose high-quality products with a high pigment count because they cover surfaces well with a few coats.
-
Durability
If you want your project to last long, choose artist/professional grade paints.
Tempera/student paints do not last, especially when in contact with water.
You may get away with applying a sealing coat after painting with tempera, but the color still won’t be as durable as the artist-grade products.
-
Easy to Clean
All creative art projects require paints that are easy to clean.
You may make a mistake as you work or change your mind about color in the middle of a project.
Therefore, you need a product you can erase without ruining your progress.
When creating arts and crafts with children, it is best to use paints like tempera because you can wash them off even after they dry.
For older children and adults, acrylic paints are best because you can clean them if you notice a mess while it is still wet.
-
Toxins
If you paint with toxic products, you risk developing severe health implications like respiratory problems, skin irritation, and sometimes cancer.
Therefore, only purchase AP-certified acrylic and tempera paints because they are safe for kids to use.
-
Quantity
The quantity of paint you will buy depends on the size of your project or the number of surfaces you intend to paint.
Choose paints with more colors and large-sized bottles when working on big projects, and stick with the smaller paint tubes if you’re only painting one or two small decorative items.
How Do You Seal Styrofoam for Painting?
You must always seal Styrofoam before you paint it if you want the paint to cover the surface evenly and create a smooth finish.
When you seal the surface, the sealant blocks the pores in the foam, preventing paint from seeping into the surface. As a result, you will need fewer coats to cover the surface; hence you will use less paint for the project.
Follow the procedure below to seal your Styrofoam before painting it. It explains how to seal Styrofoam with plaster of Paris,
- Start by covering your work area with a plastic table cloth or newspaper. Plaster of Paris tends to leave an unattractive film on surfaces; therefore, the covering is essential to protect your countertop.
- Next, mix two parts of the sealant with one part of water in a large container and mix thoroughly to remove all the lumps. Leaving lumps in the mixture will affect the bond between the sealant and the Styrofoam, creating an uneven surface.
- Use a paintbrush to apply the mixture over the entirety of the Styrofoam, ensuring that no area remains bare. Allow it to dry as instructed by the manufacturer, then repeat the process until you apply at least three coats.
Here’s a Video On Sealing Styrofoam:
What Can You Spray On Styrofoam to Make It Hard?
Uncoated Styrofoam can be too fragile for some uses.
For this reason, coating manufacturers designed products that dry into a protective shell to protect the surface against impact and abrasion.
These coatings are meant to keep off effects from exposure to wind, rain, snow, sunlight, etc.
Before applying the hard coat, you must prime the styrofoam with a water-based Acrylic latex rubber coating.
It adheres well to foam surfaces and seals the surface in readiness for the hard coat.
It also limits air bubbles from forming in the hard coat, ensuring a smooth finish.
There are two primary hard coats you can use on Styrofoam.
These are epoxy coatings, polyurea coatings, and polyurethane.
Below is an in-depth discussion of each of them to help you decide which one is best for you.
-
Epoxy Hard Coating
The epoxy hard-coating is best when you only need a thin protective shell for Styrofoam that you will put outside for a short time – usually up to two months.
You can also use it on foam products that will be in constant contact with water for some time, like pool letters.
This product gives Styrofoam a glossy look with a smooth finish, but since it is thin, it does not last long.
You can apply this product by brushing or rolling it onto the surface. 1 to 2 coats are often enough, but you can add a third if your project needs more protection.
This epoxy coat is ideal for protecting props, letters, pre-cast molds, and large foam signs.
However, its drawback is that it cracks on impact; therefore, you must keep your projects where there is no chance of that happening.
-
Polyurea
Polyurea provides a stronger and thicker coating than epoxy making it ideal for projects that will be outside for a long time or projects that people will touch consistently.
It is also more expensive than epoxy and has a much more complicated application process.
You must spray Polyurea onto the Styrofoam using a plural component sprayer system and have a good experience getting it right.
Polyurea dries rapidly, but it stays flexible for as long as it is on the surface.
But on the downside, retouches are costly; therefore, you must take extra care of your surface after application.
If you don’t know how to use the spray system recommended for urea, you can purchase a product like the Styrospray1000 instead.
You can brush or roll it onto the surface, but it produces thinner coats which translate to less protection for the Styrofoam.
How to Make Styrofoam Hard
Here are the steps involved:
Step 1: Prime the Styrofoam
- Spread some drop cloths or newspapers on your workspace. Ensure the area is warm and well-ventilated to avoid inhaling fumes from the coatings.
- Next, open the can of primer, then use a wooden stick or a mixing spatula to stir it gently.
- Pour a small amount of the primer onto a paint tray, then roll a paint roller in it to coat it evenly. If you use a brush, dip ¼ of the end of the bristles into the primer to load it.
- Roll or brush the primer onto the Styrofoam pushing the product inwards to fill all the small crevices on the surface.
- Finally, allow the primer to dry overnight before proceeding.
Step 2: Apply the Hard Coat
- Pour a small amount of the hard coat onto a different paint tray, then load your paintbrush. I do not recommend using a roller for the hard coat because it tends to leave bubbles on the surface.
- Apply the hard coat in short, even strokes, ensuring you cover the whole surface.
- Allow the first coat to dry for about 40 minutes to 1 hour or as directed on the product label before applying the next one.
- Apply 2-4 coats of the hard coat for maximum protection using the same techniques as the first one, then allow it to cure completely before using the Styrofoam.
Conclusion
Styrofoam is a very unconventional material to paint, but we must do it because we use it for several art projects.
The trick to painting foam successfully is finding the right coating products and following a simple procedure.
This article provides detail on
How to Paint Styrofoam
Before painting, you must prime Styrofoam because it is highly porous, and the best products to use are foam sealants or a craft sealer like mod podge.
You can skip the sealing if you don’t have a primer, but you must apply several coats of paint to get enough coverage.
Acrylic is the best paint to use on Styrofoam because it adheres to foam without needing a primer and doesn’t contain solvents that degrade Styrofoam.
You can also use Latex or tempera paints, but they do not perform as well as Acrylics.
I hope you now understand the proper procedures and techniques for painting Styrofoam. If you have any queries or tips to share, feel free to reach out in the comments section.