
Veneered furniture looks fantastic when new, however, that changes when they wear out. Usually, the first thing structure and homeowners decide to do with an old veneer is to replace it altogether. However, it is much simpler to refurbish the piece and give it a new look to match the decor of your room.
The simplest way to give veneers a new look is by painting them. However, you must first ensure that the surface is still in good shape before painting.
You must establish that the entire veneer strip is still intact, and if it has any dings, it must be easy to repair. Once you verify that, use the following simple procedure to guide you on how to paint veneer furniture.
Painting wood veneer is as simple as painting regular solid wood. You clean and repair the surface, then sand it to level the repairs and give it tooth to grip paint.
Afterward, prime the surface to hide stains and enhance paint adhesion, then apply paint in whichever color you choose.
During this procedure, the most important thing to remember is that veneer is a very thin strip of wood. Therefore you must be careful not to sand through it.
Before explaining the painting process in detail, let’s first understand a few things about veneers.
What Is Veneer Furniture?
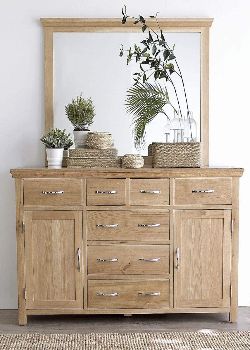 Veneer furniture is household property made from veneers and wood-based material instead of solid wood. A veneer is a piece of natural wood (usually hardwood) cut into thin sheets.
You cannot use this material to build stuff because of its thinness; therefore, you must first create a base for it.
The most commonly used substrates are less expensive materials such as plywood and Medium Density Fiberboard (MDF) or a cheaper type of solid wood.
You must first build the actual thing using the cheaper wood base to make veneer furniture.
Afterward, you cut strips that match your piece in shape and size from the veneer sheet, then glue it carefully to the base. The final product will look like natural solid wood.
The main reason for creating veneer furniture is that it is more affordable than solid timber. You use less wood to make it, but you’ll still enjoy the authentic finish without actual solid wood!
Furthermore, the bases used are often light which makes veneer furniture lightweight.
Is Veneer Furniture Good Quality?
The quality of veneer furniture depends on the thickness of the veneer, the base material, and the adhesive product used. However, some of these features – like adhesion – are hard to notice when shopping, so most homeowners judge the quality from the furniture pricing.
Usually, a higher price indicates that the carpenter used better materials to make the furniture. Nevertheless, a lower price tag doesn’t necessarily mean that it is of low quality. It is possible to find furnishings that cost little but have better stability in the long run.
Sometimes, a piece costs more because the veneer sheet came from a more expensive wood species. However, if the carpenter never considered the other quality factors, you’ll pay dearly for a piece that won’t last.
The vice versa is also true. You may find a cheaper piece with a veneer made from inexpensive wood. But if the carpenter considers each quality factor, the furniture will last longer.
If you want to control the quality of your furniture, use the guidelines below to buy the necessary materials and make the furniture yourself. If you do not have woodworking experience, you can acquire the materials and then hire a carpenter to do the building for you.
-
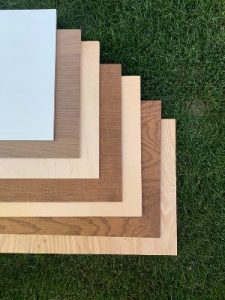
The Thickness of the Veneer
The thicker the veneer sheet, the better your furniture will be. A thicker veneer is easier to repair since you can sand it down without exposing the substrate. Furthermore, it is more durable and can stand up to the elements for longer.
On the other hand, thinner veneers aren’t as durable; they chip very easily. Moreover, they require much care when repairing to avoid exposing the base materials. Others are even too thin to fix, so the furniture becomes useless until you replace the veneer.
-
The Adhesive Product
Choosing a suitable glue for veneer is crucial because it ensures that the wood strip remains fixed on the substrate. If you choose a substandard adhesive, the veneer will lift off the base much sooner.
The best adhesive for veneer is the standard “cold press” veneer glue because manufacturers made it specifically for raw wood veneer.
It dries fast and becomes very hard when it cures; hence, it holds the wood strip in place for longer. Additionally, you don’t have to mix this type of glue; therefore, it is easy to use.
Plastic Powdered Resins (PPRs) like urea are also perfect for veneering. They offer better moisture and heat resistance on top of excellent adhesion.
However, I do not recommend using these adhesives if you are new to veneering. They have long-press times and require careful mixing to work correctly – most beginners get it wrong and end up with peeling veneer.
The biggest mistake beginners make is using contact cement and yellow glue to fix veneer. Neither of them dries hard, so the wood strip always peels. Furthermore, yellow glue tends to bleed through the veneer
-
The Base MaterialÂ
 Medium Density Fiberboard(MDF ) is the most commonly used substrate for veneering furniture because it offers the best stability and surface uniformity. Additionally, you can use any adhesive on it without a problem.
Plywood is also an excellent substrate. It is heavier than MDF; therefore, it is more stable and has fewer issues like moisture absorption and swelling.
However, not all plywoods are good quality, so you must choose wisely. Ensure that the face of the plywood isn’t loose and the core layers do not have gaps; otherwise, your furniture won’t last.
The third most used substrate is solid wood because it is heavier and stronger than the previous two. However, they have one major problem – expansion and contraction.
Changes in the environment influence the moisture content in wood, causing it to swell or shrink. If the wood and the veneer move differently, you’ll experience what’s known as “checking.” The wood substrate will crack, and as a result, the veneer will chip or peel off completely.
If you must use solid wood, go for quarter-sawn or rift-cut lumbers because they have less seasonal movements than other wood types. Also, I recommend using PPR adhesives for a stronger bond.
Why Paint Veneer Furniture?
After creating a solid wood look, why would one choose to paint veneer furniture?
-
To Protect the Veneer
Wood veneers are thin; therefore, they are more susceptible to water damage. Since they are made from actual wood, they will absorb any moisture that falls on them.
If the exposure to moisture is continuous, the veneer gets saturated, causing its base to absorb the excess. As a result, it will peel, or the substrate will swell and crack, thus interfering with the structural integrity of your furniture.
The best way to contain these problems is to coat the furniture with moisture-resistant paints to maintain the veneer.’
-
Renew the Furniture
Sometimes the classic look of wood becomes boring, prompting homeowners to crave something different -and the best way to achieve better new looks is by painting.
There are several colors and sheen finishes to choose from, so it is easy to find something that matches your current decor style.Â
-
To Make the Furniture Easier to Clean
Cleaning bare veneer poses several risks of adding moisture, which in turn causes peeling problems. However, when you paint it, the task becomes less risky and simpler.
The surface of dried paint is sleeker than wood, so dirt does not stick to it. Therefore, you can quickly wipe it off with a rag and some water.
How to Paint Veneer Furniture
Below are the steps involved:
Step 1: Organize Your Workspace
Start by moving your project outside if your furniture piece is small and easy to carry. You can work in your garage or build a temporary work shed outside if you don’t have one.
If you must work inside, protect the floor using drop cloths or large plastic sheetings. Also, ventilate the area by opening doors and windows to let in the fresh air and open the air vents to let out paint fumes. You can also run a fan on low speed to circulate fresh air within the space,
Step 2: Remove the Furniture’s Hardware
Most furniture often has practical hardware like handles, knobs, hinges, brackets, etc. You must protect these items from paint by removing them if you don’t want to spoil them or ruin the final look of your piece.
Remove each piece using a screwdriver or any other suitable tool. Label each piece and place all of them in one place to avoid losing them.
Also, tape away any furniture area you don’t want to paint. For instance, if you’re painting a table but want to leave the legs bare, cover them with painter’s tape near where they meet the tabletop. If you’re going to protect a larger area, cover it with a plastic sheet, then tape it in place.
Step 3: Clean and Repair the Veneer
Dirt, grease, and grime always interfere with paint adhesion, so cleaning is an essential part of the painting. Since veneer is wood, you can clean its surface with any degreasing cleaner such as denatured alcohol or ammonia-based cleaners.
You can also combine 1 gallon of water with ½ cup of trisodium phosphate to create a powerful cleaning solution.
- Dip a non-abrasive cleaning sponge into the cleaning agent, then wipe the veneer until all the grease comes off.
- Next, use another rag dampened in pure water to wipe down the surface to remove all traces of the degreaser.
- Finally, allow the surface to dry thoroughly.
Check the furniture after the surface dries to see whether the veneer has any chips or cracks. If there are none, you can jump right to the next step. However, if chips are present, use epoxy putty to repair the surface.
- Cut off a piece of the epoxy putty, then knead it until the color becomes consistent. When it gets sticky, the putty is ready to use.
- Form the putty into a shape that closely resembles the missing veneer, then press it into the space.
- Wet your fingers, then keep pushing the putty until it covers the whole area. Finally, flatten the putty even further with the flat end of a putty knife, then shave any hanging edges with a razor blade.
- After this point, we often create grain patterns and apply gel stains to match the rest of the veneer. However, we’ll skip that part since we’re painting the furniture.
- Allow the putty to dry as recommended by the manufacturer.
Step 4: Sand the Furniture
 Sanding at this point helps even out the surface, especially if you made repairs. The process will gently flatten the putty and scratch the surface to help the paint adhere better.
Depending on your comfort, you can sand your furniture by hand or using an orbital sander. The orbital sander works faster, but hand sanding gives you better control of the process.
It is always best to use high grit sandpaper to scuff veneer, so I recommend using 220 grit or higher for this step.
After sanding, vacuum the furniture to remove traces of dust, then wipe the furniture with a slightly damp rag to make it cleaner. Before proceeding, give the surface 1 hour to dry.
Step 5: Apply Primer
I always recommend applying a good quality primer before painting veneer or any other surface. The reason is that the primer will make the surface even for painting and make the paint adhere better.
Since the veneer is wood, your paint and primer options are limitless. You can start with any primer you like as long as its base matches that of your paint.
For instance, if you are using water-based interior paint, begin with a water-based primer – do the same for oil- and solvent-based products. I recommend using oil-based products on veneer because they are more durable and offer better protection.
You can apply the primer with a roller or a brush or use the spray types if you want to work faster.
Step 6: Paint
Just like the primer, you can use any method to apply paint. However, you must employ a few necessary tactics to smoothly get the paint onto the surface.
If you’re using a paintbrush:
- Only load ¼ inch of the bristles with paint so that you don’t put on too thick layers.
- Use short strokes that run parallel to the wood grain.
- Use the correct type of brush for the type of paint you have – synthetic brushes for water-based paint and natural;-bristled brushes for oil-based paint.
If you’re using a roller:
- Start applying the paint with gentle pressure, then gradually increase it after a few rolls. It is essential to master this technique because rollers trap a lot of paint in their pads. When you start, there is a lot of product on the outside of the roller pad; therefore, if you start with high pressure, the first few rolls will leave thick layers of paint.
As you keep painting, the paint reduces, so you have to increase the pressure gradually.
Allow the first coat to dry, then sand it a little before applying the second one. Scuffing at this point will remove inconsistencies in the paint and make the next coat adhere even better.
- Use 220 grit sandpaper or higher and use light pressure to avoid exposing the veneer. Wipe the surface to remove dirt, then apply the next coat.
- Allow the next coat to dry before moving the furniture back in its place. However, do not use it heavily for at least 21-30 days to allow it to cure fully.
How to Paint Veneer Furniture Without Sanding.
Sanding is a crucial step when painting, especially when painting wood. It levels the surface and helps the paint adhere better. However, when it comes to veneer, there is every likelihood that you might make mistakes that are hard to repair.
A veneer is a very thin material with thickness commonly ranging from 0.9mm to 2.5mm. You can find veneers with thicknesses of up to 4mm; however, they are rare.
 So when you sand veneer, you’re making the surface even and ready for painting. But simultaneously, you are removing minute particles from the surface.
Therefore, if you use sandpaper with a very coarse grit or exert too much pressure, you may accidentally sand through the veneer. Consequently, you will expose the base material underneath, making your piece unusable.
If you’ve ever had a sanding mishap with veneer, you know how difficult it can be to repair the damages caused. For this reason, I’ll show you some of the best ways to paint veneer furniture without sanding.
The safest way to skip sanding when painting veneer is with coating products that will stick to most surfaces without much surface preparation. Some of these products include:
Chalk Paint
Chalk paint is the product best known for adhering to any surface without preparation. It can stick to wood, metal, or even porcelain without sanding or applying a primer.
No prep aside, chalk paint also has a beautiful finish that is perfect for furniture. It is simple to use and dries very fast, so it is ideal for instances where you have to finish a project quickly.
On the downside, chalk paint is not as durable as other types of paint; therefore, you must protect it after it dries. The most common way to protect it is to seal its surface with furniture wax.
However, the wax also doesn’t last that long, so you will have to reapply every few years to maintain the finish.
You can also use clear sealants like polyurethane and polycrylic because they are more durable than wax. However, these products have a shine; therefore, you’ll lose the matte effect.Â
Additionally, some polys may tamper with your paint color because they turn yellow over time.
Milk Paint and a Bonding Agent
Milk paint has similar properties to chalk paint, but one main thing sets them apart – casein. Casein is a protein that acts as the binder in milk paint, making it a bit stronger than chalk paint.
So you can safely differentiate between the two paint types by stating that milk paint has organic properties while chalk paint is 100% inorganic.
On the other hand, a bonding agent is whitish product manufacturers make from acrylic resins. It works as a primer to help coating products adhere to different materials, but you mix it with the paint instead of applying it first.
To use this method:
- Measure equal amounts of milk paint and the bonding agent, then pour them into a small mixing bowl. You can use any container but avoid plastic ones because the chemicals in the material will start leaching into your paint mixture after some time.
- Next, use a wooden rod to stir the two liquids together until the mixture gets a uniform consistency,
- Wash your surface thoroughly with a home degreaser, then allow it to dry correctly.
- Finally, use a paintbrush or a paint roller to color the surface.
Mineral Paint
Minerals paints are very durable paints, and they stick to a wide range of sleek surfaces without sanding. They come in various colors, and they are water-based; therefore, you can easily clean them with soap and water.
As with the other paints, ensure that you clean and repair your surface before applying mineral paint for the best results.
A Bonding Primer
Bonding primers are slightly different from standard primers because they can bond to any surface without preparation. They will act as a magnet between the surface and the paint, allowing you to color your furniture without sanding first.
These are a good fit for you if you don’t want to use the usual “no-prep” paints and want to go with a google old latex or oil-based paint.
When shopping for primer, look for products labeled “no sanding required” so that you don’t end up with a standard primer. Also, look for bonding primers with stain blocking capabilities to cover the stains you didn’t sand off.
How to Paint Veneer Furniture Shabby ChicÂ
Many painters use the shabby chic paint style to decorate solid wood furniture. However, with the abundance of the more affordable veneer furniture, many DIYers want to know how to achieve the same look on veneer.
The standard and quickest way of getting paint to look shabby chic is to scuff the paint coat gently after it dries. Sanding distresses the color to give the appearance of a finish that has been there for a long time.
The best paint to create a shabby chic look is chalk paint. It has a chalky effect, and you can easily control the level of distress and limit it however you like. It also dries fast, so you can get the look done in a few hours.
You can also achieve the shabby chic look using other types of paint, but the process will require more effort. Moreover, you cannot control the level of distress with these paints.
Take milk paint, for example, it will produce a great chippy effect as you distress it, but you will have no control over how many cracks will develop and how long they will run.
Other regular paints have their issues too. First of all, you will have to sand and prime the veneer before applying them. Moreover, the heat produced when sanding causes them to gum up; hence the results won’t be as beautiful as chalk paints’.
Now that you know all that, here’s how to paint veneer furniture shabby chic:
You’ll need
- Chalk paint
- Chalk paintbrush
- Furniture wax – dark or clear
- Wax brush
- Sanding pads – coarse grit
- Lint-free cloths
Note: Before you start painting, leave your chalk paint container open overnight or put it in the refrigerator for a few hours before painting. Doing this will make the chalk paint thicker, which is better for distressing – it will crack and chip more easily.
Start by washing the surface to remove dirt and grease, then allow it to dry.
Afterward, use the chalk paintbrush to apply a liberal amount of chalk paint to the surface.Â
- You don’t have to move the brush precisely in one direction like in traditional painting. Instead, move the brush in all directions to create texture on the paint coat.
- You can also apply the paint more thickly if you want it to crack even more when distressing.
- Let the paint dry thoroughly, then sand with the coarse grit sandpaper. Sand back the color until you start to see the veneer below.
- Ensure that you focus your sanding on areas that would naturally wear out first. Focus on distressing the corners, edges, and hardware you frequently touch to produce a more authentic look.
Apply a dark furniture wax to give your piece a more aged effect without sanding further. But if you’re satisfied with the look at this point, clear wax will do.
Even though this method is standard and the most efficient, beginners might experience some problems with the sanding. I’ve seen some DIYers use too much pressure that they sanded through the veneer a little.
For that reason, I’ll show you how to paint veneer furniture shabby chic without sanding. This method may take more work and paint, but it is perfect for beginners.
The trick to creating this look without sanding is layering paints of different colors. You can use 2-3 colors depending on your look.
- Paint on the first color, ensuring that you cover the whole surface
- After it dries, start applying the second color. You don’t have to fret about coverage with the second color because the next step is to distress it.
- Don’t allow the paint to dry completely. Give it about 5 minutes to lose wetness, then begin wiping with a damp cloth to remove some of the colors. Wipe off as much paint as you want until you get the aged look you want.
- After the second color dries fully, apply the 3rd color and distress like you did the previous one. As you distress, ensure that you expose both colors underneath for the best look.
- After getting your look, leave the paint to cure, then wax the surface to seal it.
How to Paint Veneer Furniture Black
Painting veneer black is as easy as painting it with any other color. You must clean, repair, sand, prime then paint the veneer. However, you must consider two important things when your paint color is black. These are:
-
Color of the Primer
I always advise people to use dark primer whenever they use black paint. Here’s why
Most wood veneers have a light brown color except for a few wood species. Therefore it may take a few extra coats to achieve the level of dark you require. However, you will achieve better coverage if you start with a tinted primer.
-
The Paint Finish
The best finish to choose when using black paint is satin because it will give you a balance of shine and durability. Satin finishes work particularly best on furniture because they won’t chip when you move the pieces around.
Moreover, they are easy to clean – perfect for pieces you use a lot. The other good thing about black satin paint is that you can reach the color intensity you desire with a few coats.
If you want your furniture to have more shine, then a semi-gloss finish will be perfect. This finish is more durable than satin and is even easier to clean. The disadvantage of a semi-gloss finish is its low pigment volume. You may need more coats than satin paints to reach the darker intensity.
Matte paints are often beautiful, but they aren’t the best choice when painting furniture, especially in black. They scratch easily and show dirt even more openly.
They also attract dirt more than other paint finishes. If you want your furniture to have a matte-like finish without using matte paint, I recommend choosing black color with an eggshell finish.
How to Paint Veneer Furniture With Chalk Paint
Painting veneer furniture with chalk paint is the most straightforward project you will ever have. The reason is that chalk paint requires no preparation work – this means no priming or sanding is needed.
Start by wiping down your furniture with some soap and warm water. If the surface is too greasy, use a stronger cleaner such as TSP missed with water.
After the furniture dries, use a chalk paintbrush to apply the paint.Â
- Pour some chalk paint into a separate tray, then dip your brush in the new container as you work. I recommend pouring out the color to avoid contaminating the product in the main container.
- Use large strokes going in any direction. You don’t have to overthink the process because chalk paint is thick and will level itself out.
- Allow the paint to dry for 30 minutes, then apply a second coat.
After the second coat, you can distress the paint or leave the color solid.
You must seal the paint with furniture wax regardless of your style. Before applying wax, allow the paint to dry for about two hours instead of 30 minutes. More time will allow the paint to dry better so that you don’t ruin it as you wax – waxing involves a lot of rubbing; therefore, there’s a risk of rubbing off the paint.
- Pick up a little wax with a wax brush, then apply it to the surface.
- Apply the wax to one section of the furniture with the brush, then wipe off the excess with a lint-free cloth.
- Repeat the procedure until you cover the whole piece.
- After the wax dries, you can leave it as it is or buff it a little to create a gentle glow.
Laminate vs Wood Veneer
 It is hard to distinguish between laminate and wood veneer just by looking at them. They look the same and have similar functional applications, making the identification hard.
However, complicated does not mean impossible because there are several ways to distinguish between the two.
The main difference between laminate and veneer is the material. A veneer is a thin sheet cut from natural wood, while laminate is a synthetic product pressed down into sheets that look like veneer.
Furthermore, manufacturers print wood grain onto laminates to make them look like actual wood from afar.
Materials aside, there are other subtle differences between the two building materials. If you can identify them, you will have an easier time differentiating the two. So here is an in-depth look into Laminate Vs. Wood Veneer.
Appearance
The grain pattern on laminate is merely a print; therefore, it does not look as authentic if you know where to look. All the grain patterns on laminates are symmetrical. Moreover, you can find the same design on different laminate sheets everywhere, which is impossible with natural wood.
On the other hand, wood veneer has a natural grain pattern that looks warm and aesthetically correct. Woodgrain patterns are like human fingerprints; hence you will never find a veneer sheet with the same pattern as another.
Maintenance
Laminate can retain its look for years without regular maintenance. All you need to do is clean it with soap and water and, on occasion, a degreaser.
On the other hand, wood veneer is not waterproof and can get damaged by heat; thus, it requires consistent maintenance to keep it in good shape. Moreover, cleaning it can be a little tricky unless you paint it.
Use
Since laminate is waterproof, you can use it in moisture-prone rooms like kitchens and bathrooms without a problem. Some manufacturers also add fire retarding elements to their products, making laminate a better candidate for kitchens.
On the other hand, wood veneer is not waterproof or fire resistant; therefore, you should keep it out of the areas with moisture.
Failure to do that will cause the veneer to acquire stains or peel off its substrate. It is best to restrict the use of veneer furniture to bedrooms, living rooms, and dining rooms.
Eco-Friendliness
Laminates pose a danger to the environment because they are made of plastics and resins. When laminates chip or get removed, they always end up in the environment unless disposed of properly.
On the other hand, wood veneers are more environmentally friendly and sustainable because they come from natural wood. Additionally, you can obtain several veneer sheets from one trunk, preventing cutting down excess trees.
Cost
Laminates are cheaper because manufacturers make them by pressing cheap materials together. On the other hand, wood veneers cost a little more because they come from actual wood.
Conclusion
Veneer furniture is more affordable than solid wood furniture, so it’s not surprising that many people prefer to use them. They look amazing when they’re still new, but they wear out like all building materials over time.
Veneers stand out when they wear out, but not in a good way. This is why homeowners often want to know…
How to Paint Veneer Furniture
To paint veneer furniture, you must start by cleaning the surface and then repairing it. Afterward, you must sand down the surface to help the paint and primer adhere better.
If you want to skip the sanding, you can use milk and chalk paint products because they require no preparation before application. However, you must still clean the surface because no paint sticks to a dirty surface.
I hope all the steps of painting veneer furniture are clear to you. If you need any clarifications, reach out to us in the comments section.