 Skim coating is among the most appealing ways of deterring the unsightly texture of your painted walls. More so, it helps bring to life walls that were damaged by the removal of wallpapers. Applying it involves spreading a joint compound in a wall to cover and fill the visible deformities. After it holds up to the surface, you can paint or decorate the wall as normal. Despite skim coat being a great remedy for unpainted drywalls, the question is can you skim coat over paint?
Yes, it’s possible to skim coat over surfaces that have already been painted. However, you need to examine the surface before skim coating the paint. If the surface has cracks or damages, it’s better to avoid skim coating over the paint. If the paint on the surface is in good condition you can do your skim coating.
So let’s now dig deep and learn more regarding skim coating over paint.
Should You Prime Before Skim Coating?
Priming surfaces prepares it for better adhesion and smooth finishes. That is why it’s necessary to apply light coats of this formula before adding a coat of anything on it.
So should you prime before skim coating? It’s of paramount importance to prime before skim coating. Usually, a skim coat is naturally porous, which tells you it can soak up plenty of paint during application. So as an alternative to prevent utilizing too much paint, it’s wise to always prime the surface before spreading a skim coat.
Tip:
Ensure the primer dries completely before applying the skim coat.
Can I Put Joint Compound Over Paint?
You can use a joint drywall compound to fix nearly all deformities in drywalls. This material is an affordable plaster product, but it needs thorough preparation to work as intended. So check out the steps highlighted below to master how to use this product.
-
Cleaning Walls
Before putting in a joint compound, ensure your walls are free from dirt. You can achieve this by wiping down the walls with a damp sponge. Also, you will need to use a broom to bring down any cobwebs in the corners of the room.
-
Sanding
After you’re certain that the walls are dry, begin to lightly sand the walls to establish a surface that the plaster can attach to. This step is overly integral primarily if the current paint on the walls has a smooth sheen. Remember you have to put on your dust mask and glasses to prevent health issues while sanding.
I suggest you use a sanding pole and attached medium grit sandpaper to sand down the walls. Once you are through, take a clean sponge and wipe the walls down to get rid of the sanding dust.
-
Texturing
Suppose you decide to use a trowel, swipe on plaster to the trowel, then clasp the trowel’s edge to the wall. Next, use a small roller to roll on the joint compound. It’s better to use a small roller because a large one will be heavier when you attach the joint compound.
You can create your texture by spreading the plaster to the wall. But ensure that your texture has a uniform appearance on the entire wall.
Tip
- Don’t waste time covering the whole wall; at least 85 percent of the wall is sufficient.
- The joint compound needs to be wet and free from hard clumps in the mixture.
- Suppose the joint compound feels strenuous to apply, put in a little amount of distilled water, then mix.
- It’s best to opt for a lightweight joint compound rather than the regular one. This way, you will evade cracks on the surface as it dries.
Can You Skim Coat Over Painted Plaster?
Plaster walls often develop a configuration of cracks that are overly narrow to be filled with plaster. Still, you can’t cover the cracks with paint due to their nominal size. So what’s the best way of restoring a painted plaster?
I would recommend using a skim coat over painted plaster. Skim coating a painted plaster makes it look more appealing. The job is relatively tiresome, but it will rescue your painted plaster. However, this product might not work if the existing paint and plaster look loose and unsound.
Can You Skim Plaster Over Painted Artex?
Skim plastering over Artex is very much possible, but it largely entails proper preparation. Ideally, any Artex should have a bonding coat applied first because the skim coat is merely 3 mm thick.
After the bonding coat dries, take two coats of PVA and apply it to minimize suction while skimming the topcoat. This will deliver you the preferred flat finish.
How Long After Skim Coat Can I Paint?
Painting a newly installed skim coat is essential to transitioning both the walls and ceilings in any home. However, there are plenty of conflicting beliefs on how long the skim coat should dry before painting.
From experience, I would recommend roughly 4 to 5 days before painting over a newly applied skim coat. Sometimes this duration might surpass even a week depending on a myriad of aspects like central heating, time of the year, and the layers applied.
Before painting over a skim coat, ensure that the surface is free from dark patches. More so, you should make certain that there is a uniform light color on the surface before painting.
Tips
- Keeping the room well ventilated will lessen the drying time.
- If you want to achieve the best outcome, wait until the dry time is due before painting.
Should I Skim Coat or Replace Drywall?
You don’t have to replace the entire drywall, whereas you can skim coat it and attain the same objective. Skim coating drywall serves to smoothen the ravaged surface to improve its overall look.
It’s often applied in multiple layers to offer a smooth surface on the entire drywall. Or, you can apply only a single layer to touch up a restricted area.
When Should I Apply a Skim Coat?
Spreading a skim coat to walls or ceilings is overly easy to perform yourself. However, you need to understand when such a process is authenticated.
The list below displays when a skim coat is a worthwhile alternative.
-
Mending Damages from Wallpaper
Peeling off wallpaper often damages the wall behind it. In the process, it establishes gouges and the tearing of the drywall’s exterior paper. Luckily, skim coating over the wall can help to overcome such blemishes.
-
Retexturing
After repairing the drywall, it’s necessary to skim coat the entire surface to prepare the wall for painting.
-
Touching Up Unsightly Walls
Walls can degrade with time due to high traffic. Therefore, a skim coat is imperative in restoring the wall’s look without completely replacing them.
-
Bedding In New Drywall
Skim coating is an essential step when installing new drywall as it guarantees an even surface for priming and painting. Suppose you aren’t planning to texture the newly installed drywall; you should apply the skim coat to a very thin extent.
What Is the Best Joint Compound for Skim Coating?
A joint compound is integral to getting a smooth and masterly finish on cracked walls and other surfaces. This item should be a must-have component on your top-wish list if you are in for having your wall look its best. On top of that, a joint compound can easily handle limitless problems concerning walls.
But due to the numerous varieties that have streamed on the market, it’s hard to decide on the best solution. Fortunately, you can learn something from this article on how to choose the best joint compound.
The best joint compound for skim coating is the regular all-purpose joint compound. However, it would help if you were accustomed to the right types of joint compounds to avoid choosing an option not intended for a specific purpose.
This list highlights the best joint compound for skim coating;
- DAP 10102 Wallboard joint compound.
- DAP Wallboard joint compound.
- U S GYPSUM 385140 all-purpose joint compound.
- U S GYPSUM 380270072 U A Gypsum 380270 Quart joint compound.
- Dap 12278 Elastomeric Patch and Caulking Compound.
- USG 381466 lightweight all-purpose joint compound.
For such worthwhile tapping compounds, you will surely accomplish your job easier with a professional-grade output.
Can Joint Compound Be Used As a Skim Coat?
A joint compound is a gypsum-based material used to finish corners in newly installed drywalls and joints. This product exists in various varieties. So it’s up to you to settle on the option that suits your job at hand.
Usually, there are two types of joint compounds that you can use for skim coating: ready-mixed joint compound and setting-type joint compound. The setting joint compound has a powdery form and sets to a relatively hard finish when blended with water. The setting rates of this product are merely 30 minutes, an hour, or more.
On the other hand, the ready-mixed joint compound arrives wet and is ready to use out of the bucket. With this option, you will enjoy unmatched smoothness, and it takes several hours to dry.
Depending on the surface that needs a skim coat, you can choose from the setting or ready-mixed joint compound. Suppose the surface has endured major damages such as unsightly drywall textures, the setting compound will be a better pick. I would also recommend that you go for a slow-setting compound such as Durabond90 for tougher tasks like this.
Go for a ready-mixed compound to mend minor wall imperfections that need one or two coats to cover. This option is also a better pick for the final layer over any skim coating project. In addition, it’s easier to apply than the setting type, and this enhances a smooth finish while sanding due to its thinner application.
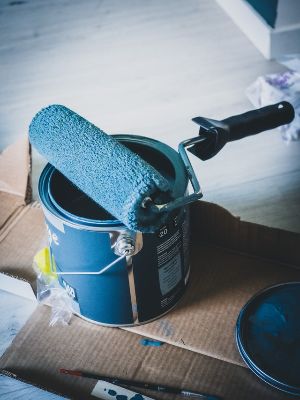
Can I Skim Coat a Wall Myself?
Skin Coating a wall is by no means a strenuous task, and you can do it yourself rather than hiring an intellectual to do it. The process differs from painting walls, but you have to use similar tools such as a paint roller.
So with a bit of time, understanding, and precise work, you can easily tackle this job. Remember, the trick here is to learn how to do it, and with time, you will start to skim coat to a professional standard.
Can You Put Joint Compound Over Latex Paint?
As spoken of earlier, a joint compound is primarily used to texture walls. Better still, you can employ it over painted surfaces, and latex paint is not an exception. However, you need to perform a little preparation to enhance the mission success of your project.
Can I Skim Coat Over Peeling Paint?
It’s not recommended to skim coat over peeling paint. Therefore, suppose your paint is peeling off; it’s wise to wipe down all the loose material and dust and coat the surface with a primer.
You may also want to rectify the damage and finish the repair with multiple skim coats to smoothen the surface.
How Can You Tell If the Joint Compound is Dry?
It’s easy to determine whether a joint compound is dry or not. For instance, you can pass your fingertips across the surface to certify if it’s dry. If the surface feels hard to touch, it’s dry, but it tells you it’s still damp when it indents.
At times, it’s wise to bring in air movers to facilitate quick drying time, primarily in corners.
What Happens If You Paint Over Cracked Surfaces Without Covering With Joint Compound?
Painting over surfaces without a joint compound can bring in undesirable imperfections after painting. Most often than not, pros fill holes and patch cracks with a joint compound before painting.
Suppose you use a joint compound on the patched surfaces, ensure it’s entirely dry before you paint over it. Painting on a wet joint compound means the compound naturally sucks the moisture from the paint, giving it an unsightly look. In addition, the imperfections will be visible on the entire surface after painting.
Why Does Drywall Mud Bubble Over Paint?
Indeed there is nothing extremely unsightly other than bubbling or blistering paint. Installing drywall mud is a technique that takes time to perfect. Sometimes, certain cost-drivers foster drywall mud to bubble over paint, such as improper application. More so, other aspects that bring about bubbling of your drywall mud include:
-
Using Old Drywall Mud.
It pays to utilize your drywall mud soon after acquiring it. Keeping the drywall mud for an extended duration means it will eventually harden, relinquish its adherence, and distort its viscosity.
-
Compounding Over Painted Walls.
Whereas drywall mud is commonly applicable on unpainted walls, sometimes it’s used to patch over holes on painted walls. This way, there are chances that you will encounter bubbling. That is because painted drywall is non-porous and rarely absorbs the compound allowing bubbles to occur. All the air in the drywall mud is propelled outwards, and bubbles manifest on the surface.
It’s interesting to know that the bubbles in your drywall mud can quickly diminish the quality of your product. So how Can you fix air bubbles in drywall mud?
Keep reading as we will walk through a simple trajectory on how you can fix bubbles in drywall mud.
First, you have to apply at least three coats of drywall mud. Before proceeding, ensure that the initial coat is skimmed instantly and firmly with your knife to create a base.
After that, add a second coat to fill and hide your joint, cracks, or holes. This coat should make them invisible exactly when giving your walls a professional look.
Next, repeat skimming over the surface with a knife, but you have to exert less pressure this time. After that, allow the second layer to set for a while as you watch out for any bubbles not to resurface.
Finally, you add the last coat, which ensures that no bubbles will emerge on the surface.
The whole process is indeed a tiresome task, but it’s the only way to evade bubbles from establishing on your drywall mud.
Tip:
Understanding what brings about mud bubbles on your drywall can help to deter future occurrences.
What Is the Difference Between Plastering and Skimming?
Skimming is the term used to describe a plastering technique whereby a wall is plastered with a thin coat. It is commonly applied to an existing plaster to smooth out the surface. If you aren’t accustomed to using this product, hiring a professional is better than messing with the costly job.
As opposed to common belief, plastering and skimming are not completely separate terms. So it’s correct to allege that skimming is a subset of plastering. The major variation is that skimming is primarily done to upgrade old walls, whereas plastering is done on newly installed walls.
Not to forget, the other dissimilarity is that plaster surfaces are naturally rough, unlike skimmed surfaces which are overly smooth. Despite the differences, both of these techniques are used to increase the durability of walls and decorate buildings.
How Do You Prepare a Wall for Skim Coating?
The cracks and holes on your walls are hard to cover up with only paint. So, for this reason, you need an ultimate makeover for your walls that will bid goodbye to lumps and bumps. You can only enjoy this convenience by skim coating your walls. And as an alternative, it will welcome even and smooth surfaces.
However, you don’t just rush into the job. You first need to take pleasure in what you are doing and be prepared with the essential supplies at hand.
Check out the guidelines highlighted in this guide to find out how you can prepare your wall for skim coating.
Step 1
Considering that skimming is a time-sensitive job, you need to equip yourself fully before commencing. The list below displays some essential supplies needed before you kick off.
- Paint roller.
- Skimmer plate.
- Trowel.
- Taping knife.
- A ladder to access high areas.
- Safety glasses.
- Drywall knife, but it’s optional.
- Large bucket.
- Quick-set joint.
- Ready-mixed joint compound.
- Plastic sheeting.
- Water-based primer.
- Drill.
Step 2
The next thing is to prepare the room. As usual, dust is elicited when fixing up walls. So it would be best if you save your floor from dirt by withdrawing all your valuables. Or, you can cover the furniture that can’t move with plastic sheeting.
Also, it’s good to cover doorways to prevent plaster dust from invading the neighboring rooms.
Step 3
Before you begin skimming, you should ensure that the walls are relatively clean and free from cracks. This way, you will attain a smooth finish with the fewest coats possible.
You will need to begin by scraping off any loose material and follow with filling the cracks using a rated ready-mixed joint compound. I would suggest you use a small drywall knife as it serves to minimize the number of marks and wiping lines you make.
After you repair the ravaged walls, dust and wipe them down to peel off the grime, which might affect sticking.
It’s a general rule to ensure that walls dry to touch before jumping onto the next step.
Step 3
At this juncture, your walls are fully prepared, and it’s now the ripe time to prime. You will need to use a water-based primer for best results.
Take your roller and spread a coat of primer over the entire surface you intend to skim the coat. The essence of the primer is to enhance better adhesion of your joint compound. Then, as usual, give the surface enough time to dry before putting in anything else.
Step 4
The next thing is to mix your plaster. Suppose you are working with a quick-set joint compound; mix it with water before using it. You can as well check on the instructions to certify the time limit before it gets hard.
Take the large bucket and mix your compound inside using a drill to make the process straightforward. In the process, the compound should develop a mud-type consistency. Remember, you need to be quick enough so that the mixture won’t stiffen.
Step 5
It is now the ripe time to spread the first skim coat. Take your mixed compound and disseminate it to a skimmer plate. As you begin the first coat, ensure one hand holds the skimmer plate, whereas the other continues to spread the mixture.
It’s a good idea to pile a small amount of plaster on your trowel as you gradually add more later. Then drag it slowly over the wall with even pressure.
Step 6
After the first coat, you don’t have to wait for it to dry before proceeding. Go on dragging your trowel with a second one for a smooth finish.
If there are still visible grooves after the second coat dries, add a third coat and remember to drag the trowel vertically.
Step 7
After applying the third coat, let the surface dry for 24 hours. Then take sandpaper and begin to sand away the visible imperfections. You will want to smooth out the rough edges or grooves using 180 t0 220 grit sandpaper.
How Thick Is a Skim Coat?
A skim coat is roughly 10 to 12 mm thick.
How Long Before You Can Sand a Skim Coat?
Any skim-coated surface should tolerate at least 24 hours before sanding. If you try to sand before this duration, you will peel off the skim coat, which means you have to start fresh.
Do You Need to Sand After Skim Coat?
Sanding after a skim coat is of paramount importance as it helps to smooth out the areas you didn’t perfect using a trowel. However, you don’t need to rush to sand before the skim coat dries.
How Smooth Does a Skim Coat Need to Be?
A skim coat needs to be very smooth with the consistency of a thick pancake batter. Ideally, you can make it more smooth by using a taping knife at around a 10-degree angle to the wall.
How Do I Know if Walls Need Skimming?
The moment your walls start to exhibit signs of cracks, it is the ripe time to skim over them. However, ensure that you bring down any loose material first before skimming. Otherwise, installing a skim coat won’t be a worthwhile option.
Final Thoughts
No matter how well you maintain your painted walls or ceiling, they will still be susceptible to wear and tear. As such, they will develop cracks and holes over time. It’s best to use several certified methods to deter this, such as skim coating. But…
Can You Skim Coat Over Paint?
Yes, skimming over paint is feasible. But it would help if you were watchful of the current condition of the paint before skimming over it. If the paint appears sound, you can proceed with skimming over it. If not, follow the necessary procedures before skimming over the paint.
This article is a worthwhile resource for all the information you need on skim coating over paint and I hope you have gained a lot from exploring through this guide. Feel free to put forward your concerns in the comment section below. Meanwhile, relish your paint job, and let’s meet in the next one.