
Finishes like gel coats have a reputation for their performance; however, can you add another layer of a different finish to them? Like, can you paint over gelcoat?
In this post, I’ll answer the question of whether you can paint over gelcoat and why you should paint it; please keep reading for more…
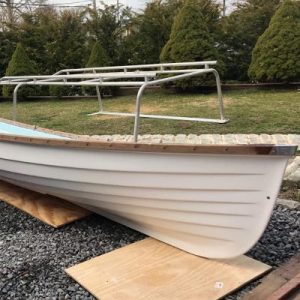
Gelcoat is the most popular surface coating for fiberglass-reinforced products.
While it does provide high quality, aesthetically pleasing finish, gelcoat will lose its luster and degrade a bit over time, requiring repair, thus the need for painting.
For marine vessels, you would need to paint over gelcoat mainly for aesthetic purposes and to prevent biofouling.
Note: Biofouling is the accumulation of animals and microorganisms on the vessel’s surface, causing several deficiencies.
Back to our main question, can you paint over gelcoat?
Yes, you can paint over gelcoat. The Gelcoat is more like an adhesive that holds the paint in position. If your gelcoat is in good condition, meaning it does not have significant cracking or crazing, then painting over gelcoat is easy.
All you should do is clean and prepare the surface, apply a light coat of epoxy primer, sand over the primer, remove the sanding dust then apply the topcoat.
Note: The painting will, of course, depend on the state of the gelcoat that you wish to paint over. A gelcoat surface in poor condition will need more work than a gelcoat surface in good condition.
Painting over gelcoat offers numerous advantages, such as preventing biofouling if you use anti-fouling paint and improving the general appearance of your boat.
This article explores the qualities of gelcoat and how best to apply, care for and cover it on your boat.
What Is a Gel Coat?
A gel coat refers to the outermost structural coating on a fiberglass hull. The formula is designed to protect the base fiberglass layers.
Technically, a gel coat is a type of colored epoxy compound that gives a smooth, top-quality finish over materials like fiberglass.
A cured gel coat combines with fiberglass to create a smooth and durable surface that bars the weakening of the hull due to water intrusion and ultraviolet light.
Furthermore, the gel coat protects the boat from cracks and leaks.
What Is the Difference Between Gelcoat and Paint?
Paint is usually thinner than gelcoat and much easier to apply on the surface. It also easily adheres to a wide range of surfaces such as wood, metal, or concrete.
The shelf life for paint is around 15 years for solvent-based and up to 10 years for those that are water-based. On the other hand, gelcoat is thicker than paint and does not adhere to any existing surface.
Gelcoat will only adhere to a previously cured layer of gelcoat, fiberglass, or polyester resin.
The shelf life for gelcoat is also significantly lower than that of paint as it can stay only for approximately 3 to 4 months at 70 degrees.
Will Automotive Paint Stick to Gelcoat?
As the name suggests, automotive paint is usually applied to automobiles for decoration and protection.
Although automotive paint differs from marine paint, a good quality automotive clear should work well on your boat.
All you need to do is to prepare the surface, clean it and sand the gel coat to remove any contaminants and provide a good surface for paint to adhere to.
For a smooth gelcoat, you can paint over it with a urethane topcoat when using car paint.
Spurt three coats of urethane filler for rough gel coats over the damp epoxy primer, sand the primer after it finishes curing, and then spurt the urethane topcoat.
How Do You Paint a Gelcoat Boat?
Painting your boat will increase its value and bring new life into its appearance. The major steps to follow when applying gelcoat to your boat are:
Step 1: Determine the Existing Surface
 The first thing to find out is the nature of the surface you want to paint.
Remember that gelcoat will only adhere to certain surfaces.
If the surface is fiberglass, polyester resin, or already covered with gelcoat, applying a gelcoat layer will be quite easy.
However, if the surface is covered in paint, you will need to remove the paint before applying a coat of gelcoat.
Step 2: Prepare the Surface.
Apart from cleaning the surface, which we will discuss later in detail, you will also need to remove as much hardware as possible to get a smooth, clean job.
You can cover any parts you can’t remove and don’t want to be painted using duct and masking tape.
Step 3: Sand the Existing Surface.
If the existing surface is covered in gelcoat, sanding it will roughen up the surface and allow it to bond well with the gelcoat layer you want to apply.
Step 4: Apply the Gelcoat
After the surface is ready, you can then proceed to apply the gelcoat. You can choose to brush, roll, or spray on the gel coat.
However, most experts recommend spraying it on as it allows you to get an even, smooth finish.
Step 5: Finish the Gelcoat
After allowing the gelcoat to cure completely, you can sand and buff your newly-coated surface. Start by wet sanding with the finest grit to avoid adding any unnecessary sanding scratches.
You can start with 400 or 320 grit paper and gradually increase to, 800 grit. If you want a beautiful glossy shine, you can also use a machine glaze and apply two wax coats.
Here’s How to Gelcoat a Boat:
Do You Need to Sand Gelcoat Before Painting?
Yes, you should sand gelcoat before painting. Sanding will roughen up the gel coat surface and ensure the paint adheres to the surface and stays in place.
If you applied primer before the paint, you could sand the finish primer with 320 to 400 grit sandpaper.
Use 80 or 40-grit paper to sand cracks you have filled with putty and 220 or 230-grit paper for the surface around any repaired areas.
You can start with 36 to 60-grit sandpaper if the surface has a deep crack.
Can You Bottom Paint Over Gelcoat?
Yes, you can bottom paint over gelcoat. The choice to bottom paint over gelcoat depends on several factors that we will explore at length.
But first, what is bottom paint?
Bottom paint, also known as anti-fouling paint, is a category of underwater hull paint applied to the outer layer of a ship or a boat.
It slows the growth of marine organisms such as barnacles from attaching to the hull.
Such organisms usually significantly affect the performance of the boat/vessel. Some of the ways marine growth affects vessel performance and profitability include:
- Reducing the maximum speed of the ship
- Some organisms may bore into the ship’s hull and cause severe damage over time.
- The vessel could potentially transport harmful organisms to other areas.
Anti-fouling paint is, therefore, vital to water transportation vessels. One significant importance it offers is the cost-saving factor. Bio-fouler accumulation on marine vessels can cause a large increase in drag that requires more fuel to compensate.
When applying bottom paint over gelcoat, one of the most crucial factors to consider should be the condition of the gelcoat. If the gelcoat is in disrepair and wears off, you will need to take care of it first.
If the damage is too much, you may need to remove the gelcoat and apply a fresh layer in the worst-case scenario. Here is what to do when applying bottom paint in two different scenarios.
-
If the Gelcoat Is In Poor Condition
If your gelcoat is in poor condition, you will need to start by repairing it. The first step in doing this is to clean the surface.
Any contamination on the surface that may cause a problem later must come off before any sanding is done. This removal is because sanding may spread the contamination instead of removing it as it may first seem.
Also, the heat produced during sanding may melt any grease, oil, or wax into the surface, making removal even harder. To wash the surface, you can scrub the surface using marine soap and water, then rinse off the soap residue.
After washing the surface, inspect it for any nicks, small scratches, and other minor damages. Fill in these areas with epoxy putty, which is more stable and does not shrink or distort.
If your boat still has some gelcoat stains that did not come off after washing with soap and water, use an acid-based stain remover to get these off.
A highly oxidized gelcoat will also have a powdery, chalky look. Polishes usually work well with surfaces with a low oxidation level, so you may need to remove the oxidation.
After filling the imperfections, you can apply 1 or 2 coats of a high-build primer and a coat of a finish primer to the surface. Then, sand the finish primer, wipe off the residue, and paint your surface.
If your paint is duller than expected, you can apply wax to the surface to act as a polishing agent and leave a shiny surface.
-
If the Gelcoat Is In Good Condition
The process is fairly straightforward if your gelcoat looks in good condition, has no major crazing or cracking, and does not need any grinding or scraping.
You will need to clean the surface and fix any minor cracks—using sandpaper of the needed grit, wet sand the area you will need to paint.
Sanding will roughen up the gelcoat surface and help the paint stay on. You can then use a bunch of newspapers and masking tape to cover any area you will not be painting, then apply the bottom paint.
What Is the Difference Between Gelcoat With Wax and Without Wax
When purchasing Gelcoat, you can buy a waxed or unwaxed one. The waxed gelcoat has paraffin wax added. When a catalyst is added to the gelcoat, the wax rises to the surface and seals off the gelcoat from oxygen, curing it fully.
Gelcoat without wax is often used to laminate gelcoat in stages and when applying to a polyester resin-saturated fiberglass.
You can also apply substances such as PVA over gelcoat without wax. When MEKP catalyzes the gelcoat without wax, it will harden but remain sticky.
How Much Does It Cost to Re Gelcoat a Boat?
There is no perfect estimate on the amount it costs to re gelcoat any boats since all boats have different builds that cause the price to vary wildly or have small differences.
You will need to consider the cost of your boat personally, depending on size and the amount of damage.
A professional might charge you anywhere from 300 to 500 dollars per foot of your vessel. You can use the rates to calculate the cost depending on the footage of your boat.
How Long Does Gelcoat Take to Harden?
A coat of gelcoat will usually take two to four hours to harden. If you apply multiple coats of gelcoat, the first coat should be tacky to the touch but not leave an impression when pressed with a fingernail.
If your pressed fingernail leaves an impression, allow our gelcoat to dry for some more hours. You could also leave your gelcoat to harden and cure overnight to be sure it is fully cured.
One of the most frustrating things to deal with in a gelcoat does not cure, which is, unfortunately, a serious possibility. When this happens, there could be some reasons why your gelcoat did not cure. Some of them are:
-
Wrong Surface Preparation
Gelcoat will usually only adhere to fiberglass surfaces, gelcoat that has already been cured, or polyester resin.
You will need to remove any other existing material, such as previously applied paint. The first step in proper surface preparation would be to clean and sand your surface.
Clean the surface thoroughly using marine soap and water, and use an acid-based stain remover for any tough stains that do not come off.
Many experts recommend cleaning your surface before you sand it, as sanding can spread any contaminants to the surface and cause some to melt in, making removal a lot harder.
Heavier grits are a great option for sanding a routed area before it is filled.
If you have already filled the sanding areas with putty, you can use 80 or 40-grit sandpaper and use 230 or 220 paper for the areas around the repaired area.
A rubber block will do well for flat areas.
-
Mixing In the Catalyst Incorrectly
MEKP is the commonly used catalyst for gelcoat, which plays a large role in helping your gelcoat harden and dry more thoroughly.
Over-catalyzing your mixture will result in the gelcoat starting to cure earlier than planned.
The gelcoat may start curing while in the can or when you are applying it. An easy way to prevent this is to mix the gelcoat and catalyst in smaller batches.
Use enough catalysts to cure the gelcoat quickly and within your working time. While over catalyzing is a serious problem, another serious issue is under catalyzing the mixture.
An inadequate catalyst will slow down your curing process and cause a faded, chalked-up final product. Ensure that the amount of catalyst you plan to mix with the gelcoat is adequate, and use the proper mixing ratios.
While taking all these precautions, it is also important to note that the room’s ambient temperature will also affect how the gelcoat reacts with the catalyst.
Warmer weather needs fewer catalysts, while cooler weather needs more catalysts for the perfect mix. To ensure you do it right, you can get some gelcoat-catalyst mixing charts that consider the mixing conditions.
-
Applying a Too-thin Layer
Gelcoat cures while giving off heat in an exothermic reaction. Applying a gelcoat layer that is too thin will cause the layer not to reach the required temperature and, therefore, not cure fully.
Most people recommend a wet film thickness of around 25 mils (a mil is the thousandth part of an inch), which gives a cured film of around 22 mils.
If you think about how impossible it is to measure such thicknesses, you can use a wet film thickness gauge.
-
Surfacing Agents
Gelcoat surfaces must be devoid of oxygen if they are to completely and properly cure. Surfacing agents such as wax additives seal the surface from atmospheric oxygen, allowing it to dry tack-free.
You don’t need to apply any surfacing agents for intermediate coats of gelcoat, only for the final coat. Most Gelcoats you purchase will come with a wax additive seal and catalyst, but you can also purchase them separately.
You can also choose to buy a gelcoat that does not need any surfacing agent and allow it to sit overnight for complete curing.
If your gelcoat does not cure, you can remove it and apply a fresh coat. Use acetone to break it down, then go in with a putty knife to scrape it off.
How Long Does Boat Gelcoat Last?
When properly maintained, a gelcoat can last you up to 15 years and more, depending on many factors.
Some of the factors that will affect the life of your gelcoat are exposure to UV rays, salt from seawater, water saturation, and fatigue from movement.
How Do You Restore Oxidized Gelcoat?
As time passes, unprotected gelcoat coats will oxidize due to UV light exposure. You can easily see moderate and light oxidation in a gelcoat with a chalk-like powder on the gel coat’s surface.
Below are the steps needed to remove oxidation from your boat’s surface.
Step 1: Prepare the Surface
Marine soap diluted in water is a great way to clean the surface easily. Not only do marine soaps rinse residue-free, but they are also environmentally friendlier compared to other dishwashing liquids.
If you are getting trouble cleaning the mold off non-skid areas, you could use a non-skid cleaner. After cleaning the surface dirt, you will then need to remove any stains. Almost all boats will have a degree of gelcoat stains.
You can remove these stains using acid-based stain removers, which will remove most organic and mineral stains. Remember to wear the proper personal protective equipment when using acid-based stain removers, such as rubber gloves and eye protection.
After ensuring the surface is completely clean and de-stained, repeat the steps mentioned above and repair any surface cracks and gouges that are there.
Step 2: Remove the Oxidation
Light oxidation often manifests as slightly dulling on the gelcoat surface, while moderate to heavy oxidation manifests as a chalky, powdery surface.
To remove oxidation, you will need to use polishes and rubbing compounds. You may need to start with a rubbing compound for a heavily oxidized surface and use finer polish grades later.
The compound is a thick liquid with very abrasive grit. It makes for quick material removal when combined with a wool pad.
Rinse the surface after two passes with the compound to see if you have removed the oxidation. Use a good quality finish for a surface that is not as heavily oxidized.
It is important to remember that each of these products takes off a little bit of gelcoat each time used, so it is advisable to use the least aggressive method to get the job done.
Step 3: Protect the Surface
After removing the stains and polishing the surface, you need to seal and protect the surface. Wax seals out oxygen and prevents oxidation, and has inhibitors that protect the gelcoat against UV light.
Here’s How to Restore Oxidized Gelcoat:
Can Gelcoat Be Thinned?
Yes, it can. However, you should only thin gelcoat for applications where thinning is needed, such as for use in a sprayer.
Thinning the gelcoat before spray painting is because the gelcoat has a too thick consistency for regular spray gun use.
You must, therefore, thin it before applying it using a regular spray gun. You can also add a small percentage of thinner for small repairs to help the gelcoat self-leveling and flow.
What Can I Use to Thin Gelcoat?
The most recommended product for thinning gelcoat is styrene monomer.
You can spray it with polyvinyl alcohol before the gelcoat reaches its gel stage or by adding around one ounce per quart of the wax additive.
The PVA is a release agent that you can use as a surfacing agent when using gelcoat without the sanding aid. It is also soluble in water and easily applied.
Another commonly used product for thinning is acetone, though some experts recommend against using it. You can, however, use it during clean-up to clean your spray gun.
Leaving the spray gun uncleaned will cause any gelcoat left in the gun to cure inside the sprayer, causing problems. Acetone can also affect the colors and lead to a less than optimal result.
It is vital to note that different gelcoat brands will need different amounts of thinner.
Remember to carefully read and follow the manufacturer’s instructions to avoid adding excess thinner.
Can You Apply a Second Coat of Gelcoat?
Yes, you definitely can. In some cases, applying at least two coats of gelcoat on your surface is encouraged. One of the cases in which you will undoubtedly need two gelcoat layers is when you change colors.
Going over a patch will also need two gelcoat layers for the best results. For most other cases, you will only need one gelcoat layer.
Before applying the second coat of gelcoat, wait for around 2 to 4 hours to ensure that the first coat is dry enough.
You can test this by pressing a fingernail into the gelcoat and checking whether it leaves an impression. The gelcoat is dry enough to apply the second coat if it leaves no impression.
If you leave an impression of your fingernail, allow the gelcoat a couple more hours to dry. You can also leave it overnight to be sure it is fully dried.
While two coats may be enough, you can still add more coats if you are unsatisfied with the results.
Ensure you allow each subsequent coat enough time to dry before applying the next one. However, ensure you add a sanding aid to the final coat.
As mentioned before, this is because the gelcoat will not fully cure in the presence of oxygen, and the wax will move to the final coat’s surface, create a barrier and allow the gel to cure fully.
Can You Apply Gelcoat With a Roller?
Yes, you can! With the right technique and tools, you can use a roller to apply the gelcoat.
However, it is important to note that you can also use other methods to apply gelcoat on your surface, which may be more convenient.
If you choose to use a roller, experts recommend using a ¼ or 1/8-inch solvent-resistant nap. Also, avoid using foam rollers since they tend to leave bubbles on your work.
If you choose another method, say spraying, ensure you are consistent and even with your gun movements. Start by covering up any repaired areas, then move to the masked-off areas.
Doing your work in layered passes is a great way to avoid having gelcoat build up on your surface. Overlap your previous passes slightly and avoid hesitating at the ends of the passes.
After you finish spraying, use acetone to clean your machine completely, and allow the gelcoat adequate time to cure, up to overnight if necessary.
If you are brushing on a layer of gelcoat, one main challenge you will face is the inability to apply the layer in a perfect self-leveling coat. Use a brush made of natural bristle that has a slightly tapered end.
Use horizontal strokes to apply the gelcoat in relatively thick layers and work from top to bottom.
One heavy layer should be all you need, although you can always go in with an extra layer if you have problems with opacity.
However, ensure that you do a light sanding between the two coats.
Final Thoughts
Painting over gelcoat offers several advantages that make it worth the time, effort, and cost.
A fresh coat of paint will do wonders for the appearance of your boat, while bottom paint will be invaluable in preventing biofouling. Still, the discussion remains,
Can You Paint Over Gelcoat
Yes, you can. If you prepare your surface adequately and use high-quality products, painting over your boat’s gelcoat surface will give you a beautiful, professional, and protective look.
I Thank you for taking the time to read this article, especially if you made it to the end, and we hope it was an educative read.
Please leave any comments, questions, or suggestions in the comment section below.