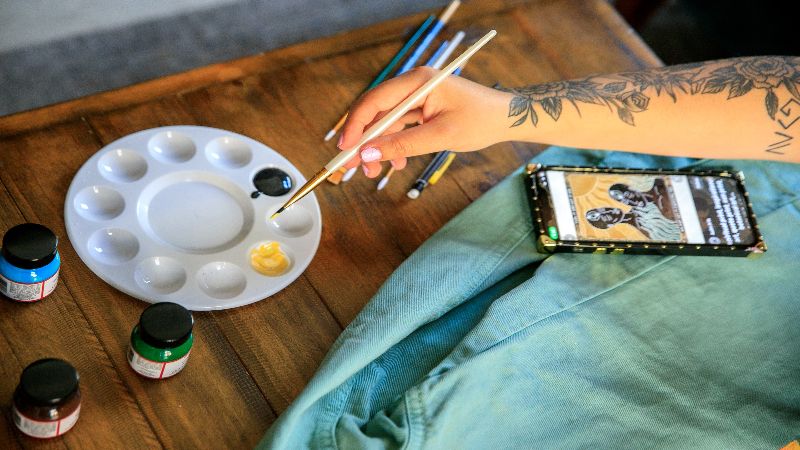
When decorating your phone case, can you use acrylic paint on a phone case?
Phone cases do more than protect your mobile phone from damage. They also determine the overall look of your phone, which is essential because you carry it around and use it publicly.
It is customary to buy a new phone case every time you need a change, but it can be expensive.
Therefore, many people are turning to customization to change the look of phone cases without purchasing a new one.
The best and fastest way to customize the look of any accessory is by using paint.
The most versatile and readily available paint on the market today is acrylic paint, which prompts many people to ask, can you use acrylic paint on a phone case?
You can apply acrylic paint on a phone case, provided you prime the case before painting and seal in the paint with a water-resistant sealer to prevent smudging.
Since acrylic paint is versatile, you can use it to paint any material, which is excellent because phone cases are made of several materials, including wood, plastic, silicone, and leather.
Before we dive into the details of painting phone cases with acrylic paint, let’s first discuss acrylic paint and phone cases in detail to help you understand the information better.
What Is Acrylic Paint?
Acrylic paint is a protective and decorative coating made by suspending acrylic resin and color pigment in an acrylic polymer solution.
It is highly soluble in water, and you can modify it with acrylic gels, pastes, and mediums to create effects that resemble watercolors, oil paintings, and gouache.
 Even though acrylic paint is soluble in water, it becomes water-resistant once it dries. Moreover, it dries quickly; therefore, you must always clean spills as soon as they touch the surface.
If you allow the paint to dry, it will become challenging to remove with water.
Acrylic paint is versatile as it can adhere to several surfaces, including paper, wood, canvas, cloth, concrete, and any other surface that is neither too glossy nor greasy.
You can apply it over sleek surfaces such as glass and plastic; however, you must prepare the surface with a bonding primer to help the paint stick to it better.
Regarding durability, acrylic paint dries into a flexible, elastic film.
For this reason, it expands and contracts in sync with whatever surface you paint, making it more resistant to chipping and cracking.
Due to its durability, versatility, and adhesive qualities, acrylic paint is the best choice for crafting, making collages, and mixed media work.
What Is a Phone Case?
“ Phone case” is the universal name for the protective covering you attach to your mobile phone’s back and sides.
Manufacturers make them in different designs to fit all the phone models available today.
They also come in different materials allowing phone owners to select whichever matches their style.
A phone case has two primary purposes; to prevent damage to the phone if you drop it and to amp up the look of the device( if you purchase the colorful ones).
Even though they provide protection, phone cases fail to protect the most delicate part of your device – the screen.
If you drop your phone, the delicate electrical parts will be safe, but the screen may still incur some damage.
How to Paint a Phone Case with Acrylic Paint
Manufacturers make phone cases using different materials, which include wood, silicone, plastic, and leather.
These materials have different properties; therefore, they require different preparation methods and products to get acrylic paint to adhere to them effectively.
In this section, I’ll explain how to paint each phone case material.
Before you begin painting your phone case, no matter the material, you must first prepare your workspace:
- Lay down a small towel on your workbench to catch any accidental spills. You can also use old newspapers if you don’t have towels to spare.
- If you are working indoors, open a door or window to allow fresh air to circulate.
- Put all the materials you need in one place close to the workbench. It is more convenient to begin working when everything you need is within reach.
How to Paint a Leather Phone Case With Acrylic Paint
Here are the steps to follow for the best results.
Step 1: Prepare the Leather
Leather phone cases have a shiny glaze that would prevent acrylic paint from adhering to them.
Therefore you must always prepare the cases by cleaning and then deglazing them with rubbing alcohol before you begin painting.
To clean the phone case:
- Mix one tablespoon of standard dish soap with three cups of warm water in a small container
- Dip a small cloth in the solution, wring out excess liquid to leave the cloth damp, then wipe the leather to remove grease and dirt.
- Once clean, wipe the phone case with a separate clean cloth dampened with pure distilled water to remove traces of the soapy water. Afterward, allow the case to dry for about 90 minutes before proceeding.
- Note: Don’t immerse your leather phone case in water when you clean it. Leather is a heavy material; hence, it will take ages to dry.
To deglaze the phone case:
- Pour some rubbing alcohol on a cotton rag or ball, then wipe the phone case gently until you notice it losing its shine.
Keep rubbing until the whole case becomes dull.
- If you rub for a while and notice no change in sheen, you may have a phone case made with faux leather or natural leather treated with a silicone coating.
If this is your case, I recommend using a leather deglazer instead of rubbing alcohol.
A leather deglazer may be expensive, but it is more effective.
Step 2: Apply the Paint
There are two ways to apply acrylic paint to leather. You can paint directly on the leather or formulate a “primer” and apply it before putting on the acrylic paint.
If you paint directly, you will need several coats to reach the color intensity you need, which isn’t an issue if you have enough time on your hands.
The second approach will conceal the leather’s natural color allowing you to reach the desired color intensity with fewer coats.
Approach 1
- Pour acrylic paint into a container and then stir it to give it a uniform consistency. If you want to get creative by mixing colors, this is the perfect moment.
- Next, dip a paintbrush into the paint, then apply a thin, even layer over the phone case.
Use long, even strokes that overlap to avoid missing any spot. The first coat will be a little faint because the leather will absorb most of it.
- Allow the coat to dry for two hours before touching the phone case.
Two hours is the standard time for drying acrylic paint but if you want to be more precise, check the manufacturer’s dry time recommendation.
- After the two hours, flex the phone case a couple of times before applying the next coat.
Flexing the case will prevent the paint from cracking later; therefore, ensure that you do it before each coat for the best results.
- Apply the remaining coats using the same techniques until the color intensity is to your satisfaction.
- After the final coat, let the phone case dry for 24 hours. Do not touch or move the phone case to avoid smudging the paint during this period.
Approach 2
- Mix equal parts of acrylic leather paint and water in a small container.
The water will thin the paint, allowing the leather phone case to absorb it better.
- Stir the mixture until the consistency becomes uniform, then apply it thinly over the phone case. Give it 2 hours to dry before proceeding.
- Note: Ensure you don’t dilute too much paint because you will only need the thinned product for the first coat.
This first layer will act as a primer. It’s thin; thus, it will stick to the leather firmly, allowing the following layers to adhere correctly.
It will also hide the leather’s natural color, so it doesn’t show through the following paint layers.
As a result, you won’t have to apply several coats for the color to appear solid enough.
- After the “primer” layer dries, paint the phone case following the same steps in approach 1, using undiluted acrylic paint.
How to Paint a Wooden Phone Case with Acrylic Paint
Here are the steps involved:
Step 1: Prepare the Phone Case
The key to painting any wooden item is to prepare the surface. Preparation usually involves cleaning and sanding down the wood to make the surface smoother.
When it comes to wood phone cases, the surface is almost always smoothened; therefore, you may not need to sand it.
However, I recommend making a pass with high grit sandpaper, say between 180-220 grit, to give the surface a bit of tooth to grip the paint.
- Apply very little pressure as you sand to avoid leaving deep scratches on the phone case because it will show through the paint.’
- After sanding, wipe the phone case with a damp cloth to remove sanding dust before proceeding.
Step 2: Appy Primer
Wood is highly porous and will suck up most of your paint.
For this reason, you must apply a primer to seal the wood pores and provide a smooth surface to paint.
The primer will also promote better bonding between the acrylic paint and the wooden phone case.
I recommend using a high-quality latex primer because it is easy to apply and dries fast.
It is also as flexible as acrylic paint; therefore, there will be no issues with paint cracking in the future.
Step 3: Apply the paint
- Use a flat brush to apply thin layers of acrylic paint all over the phone case.
Follow the wood grain’s direction to make the results more excellent, and overlap each brush stroke to avoid leaving parts of the phone case unpainted.
- Allow each paint coat to dry for about one hour before applying the next one. After the final coat, let the phone case sit untouched for 4 hours before putting it on your device.
How to Paint a Silicone Phone Case with Acrylic Paint
Silicone phone cases are super smooth and are the hardest to paint with acrylic paint.
Their smooth surface causes acrylic paint to slide right off, especially since it is a water-based product.
On the bright side, you can make acrylic paint adhere to a silicone phone case by using denatured alcohol to roughen the surface.
Then, use an oil-based primer to promote a tight bond between the paint and the surface.
Step 1: Prepare Your Work Area.
- Start by laying down an old towel or some old newspapers on your workbench to catch spills and paint drops.
- Ensure that you set up the workbench outside or in a well-ventilated room to avoid the build-up of paint fumes.
Step 2: Roughen the Silicone
The trick to painting any silicone surface is to roughen it with denatured alcohol before painting it.
- Pour some denatured alcohol on a cloth or cotton ball, then wipe the outside of the phone case.
This process will help break down the silicone’s outer part, making it rough enough to paint.
- If you’re dissatisfied with the material’s roughness at this point, you can sand the case with fine-grit sandpaper to make it rougher.
Step 3: Clean the Phone Case
- Mix some regular dish soap with water, then use the mixture to clean the phone case.
Washing the case at this point will remove all traces of the denatured alcohol and loose silicone particles from sanding.
- Rinse the case with a damp cloth, then dry it with paper towels before proceeding.
Step 4: Prime the Phone Case
Oil-based products adhere best to silicone surfaces; therefore, I recommend you prime your phone case with an oil-based primer.
The water-based acrylic paint will stick perfectly to the oil primer; thus, It won’t slide off the surface too quickly.
The oil-based primer may take longer to dry, so check your product’s label for the precise dry time.
One primer coat is enough to make the project successful, but you can apply two coats provided you keep them thin and sand between the coats.
Step 5: Apply the Paint
Once the final primer coat dries, use fine grit sandpaper to smoothen it out before applying the paint.
Depending on the method you’ve mastered, you can paint using a brush or sprayer.
I recommend the brush if you want to paint unique designs on the phone case and the sprayer if you are painting a single block color.
How to Paint a Plastic Phone Case With Acrylic Paint
Using acrylic paint on a plastic phone case can be daunting, especially if you do not follow the necessary preparation procedure.
Plastic is a non-porous surface; acrylic paint will easily slide off its surface soon after application, leaving you with a peeling and bubbling finish.
Surface preparation for a plastic phone case involves cleaning and sanding the surface.
Afterward, you apply a bonding primer to promote paint adherence, thus preventing the peeling.
Step 1: Cleaning the Phone Case
A phone case is something you touch frequently; therefore, it has grease and other dirt on its surface.
You must remove the dirt; otherwise, it will interfere with the adhesion of the acrylic paint.
- Clean the plastic case with regular soap and some warm water.
- Rinse it with a cloth dampened with pure water to remove all traces of the soapy mixture.
- Allow the case to dry before proceeding.
Step 2: Roughen the Phone Case
Since the plastic’s surface is sleek, you must roughen it up a little to give the paint some tooth to grip.
- Use fine grit sandpaper for sanding the phone case and ensure you use little pressure to avoid leaving significant scratches on the surface.
- Sand the outer side of the phone case until it loses its shine; then, you can be sure that the acrylic paint will stick pretty well.
- After sanding, dust off the loose particles, then wipe the phone case with a damp cloth.
Ensure that you remove all the loose particles because they will make the paint dry with an orange-peel effect.
Step 3: Prime the Phone Case
Even though sanding the plastic case will improve paint adhesion, it is not enough. You must apply a primer to ensure that the paint sticks even better.
I recommend using a bonding primer on plastic because manufacturers design it to stick to stubborn surfaces.
It will act as a magnet between the plastic phone case and the acrylic paint, thus keeping the paint from peeling too soon.
You can apply the surface primer using a paintbrush or purchase the spray versions if you want to finish the task faster.
Apply at least two thin layers of primer, allowing each to dry as specified by the manufacturer for best results.
Step 4: Apply the Acrylic Paint
As with the primer, you can paint your plastic phone case with a brush or sprayable acrylic paint.
Brushing will give you better control of the whole process, especially if you intend to draw some designs on the phone case.
If using the spray method, ensure that you hold the spray can at least 4 inches away from the surface to coat it evenly.
You can use painter’s tape to cover small areas you don’t want to paint or create straight-lined designs on the case.
Allow each paint coat to dry for one hour or according to the time recommended on the product label.
Also, check out the number of coats recommended by the manufacturer to achieve the intended color intensity.
Here’s How to Paint Plastic Phone Case With Acrylic Paint:
How to Seal Acrylic Paint on Phone Case?
Painting your phone case with acrylic paint is easy, but the most vital thing is getting the color to remain on the surface.
You can leave the paint as it is after it dries, but the exposure will cause the color to degrade quickly, and you will have to repaint too often.
Sealing acrylic paint is the best way to prevent it from degrading too quickly.
The sealing product will be a protective barrier between the paint and damaging elements, preventing it from fading and cracking over time.
The sealant will also make the paint’s color more vibrant.
The best sealants to use over acrylic paint are water-based acrylic clear sealants. These products are as flexible as acrylic paint because they contain acrylic resins.
Therefore, they will move in sync with the paint, preventing it from cracking.
I also recommend using water-based sealants because they are non-toxic, easy to clean up, and do not turn amber over time.
It is best to seal acrylic paint immediately after it dries for best results.
Follow the procedure below to seal acrylic paint on a phone case. (This procedure applies to wooden, plastic, and silicone phone cases)
Step 1: Clean the Painted Phone Case
When you leave the final coat of acrylic paint to dry, dust, debris, and other specks will settle on its surface.
They may not be big enough to see with the naked eye, but they will be there; thus, you must clean the painted surface before applying the sealant.
If you do not clean the paint, the particles will get trapped under the sealant and ruin the finish.
The particles will also interfere with the adherence of the sealant, causing it to bubble.
- If you apply the sealant precisely 24-48 hours after painting the phone case, the particles will not be too deeply embedded into the paint.
Therefore, you can use a soft brush to dust them off, and you’re good to go.
- If you let the phone case sit for longer, say a week after painting, it is better to wipe the surface with a damp cloth to get rid of the dust more effectively.
Step 2: Apply the Sealant
- Apply the sealant with a soft-bristled brush to avoid disturbing the paint in the background.
Ensure the brush has a flat head to make the application easier and faster.
- Use long brush strokes to apply the sealer and ensure that the layers are thin. It is better to apply several thin layers than one thick layer that will take ages to dry.
- After applying the sealer, leave the phone case untouched for up to one week to ensure that it cures properly.
This drying period is crucial because you do not want to ruin the finish in its last stages.
If you ruin the finish at this point, you may have to remove the paint and start the painting process all over again.
How to Seal Acrylic Paint on a Leather Phone Case
Unlike the other phone case materials, leather is a bit more delicate; therefore, you need slightly different products to seal the acrylic paint.
You must apply a high-quality leather finisher followed by a waterproofing sealer to ensure the paint and leather case stay intact.
After cleaning the painted phone case, follow the following steps to seal the paint.
Step 1: Apply a Leather Finisher
Acrylic leather finishers come in brush-on and spray-on forms. Most people use the spray-on versions because they are easy to use and get the work done faster.
However, I recommend using the brush-on finishers because they have a more permanent effect and give you better control of the process.
- Mix the finisher with water in a 1:1 ratio to dilute it, thus allowing it to stick to the painted leather case much better.
- Next, use a wool dauber or a soft flat paintbrush to apply a thin coat of the finisher. Be careful not to apply thick layers to avoid ruining the project.
- Allow the first coat to dry for about 10 minutes, then apply the next one.
Continue building up the leather finisher in 10-minute intervals until you have about 20 coats, then allow it to dry for 24 hours.
Step 2: Apply a Waterproofing Sealer
After the leather finisher dries, your phone case is ready to use because it has enough protection.
However, I recommend applying a waterproofing sealer if you want to protect the finish further.
This final step is crucial, especially since you’re painting a phone case – something that you’ll use regularly.
How to Remove Acrylic Paint from a Phone Case
Sometimes you may spill some acrylic paint on the part of the phone case that you did not intend to paint, or you may be unsatisfied with the paint job you just did.
In these cases, the best action is to remove the acrylic paint and start over.
Remember that acrylic paint is only easy to remove with water while still wet, but it becomes more water-resistant as it dries.
Therefore, if you catch any spills or mistakes early, the removal process will be easier than when the paint hardens.
So, How do you remove dried acrylic paint from a phone case?
-
Use Rubbing Alcohol
Rubbing alcohol/Isopropyl alcohol is effective at removing dried acrylic paint, but it requires some elbow grease.
You must pour a little amount on a cotton ball, then rub the affected area until you notice it coming off.
Rubbing alcohol with 99% concentration works best to remove acrylic paint from phone cases.
However, it is hard to find products with that concentration at local stores; thus, you must order them online.
This solvent does not have any common side effects that come with paint removers; however, it causes irritation and skin redness in some people.
-
Use Denatured Alcohol
Denatured alcohol is stronger than rubbing alcohol because it does not contain water.
It also contains ethyl and methyl alcohol – solvents more potent than isopropyl alcohol.
Even though denatured alcohol is stronger, it is still safe to use on plastic and leather phone cases.
On the downside, denatured alcohol is highly flammable, burning with a pale blue flame that is invisible in bright sunlight. It also contains methanol which is a poison.
For this reason, you need to be more careful whenever you use this solvent to remove acrylic paint from your phone case.
-
Use Acetone
Acetone is an even stronger solvent compared to the alcohol mentioned above. It dissolves acrylic paint faster and evaporates from the surface even quicker.
Because of its potency, I do not recommend using acetone to remove acrylic paint from plastic, silicone, and leather phone cases.
It softens plastics and discolors leather; thus, it is not the best option if you want to return to your phone case’s original look.
I recommend that you only use acetone on wooden phone cases.
Can You Paint Clear Phone Cases?
You can paint clear phone cases. It is better to paint clear phone cases because you have the option to paint them on the inside instead of the outside.
When you paint the inside of a phone case, the paint stays protected for longer; thus, it won’t chip or peel off quickly.
Moreover, you won’t have to seal the paint to ensure its longevity as it is well protected from the elements.
Painting the inside of a phone case is not so different from painting the outer side.
You must follow the same procedures and use products compatible with your phone case material.
The first step to painting a clear phone case is to clean the phone case to remove any grease and dirt that may interfere with paint adhesion.
After drying, apply a primer designed for your specific material, then paint the case with whichever color and sheen finish you prefer.
How Can I Permanently Paint My Phone Case?
Most paints you use on phone cases are permanent in their own right, but they will still fade or peel off after putting the phone case to constant use.
You can make the paint last much longer by applying a varnish, thus bordering on permanency.
The best varnishes to use over paint are polyurethane and polyacrylic clear coats.
They are entirely waterproof and dry into a hard film that can resist scratches and abrasions for a long time.
They can also fend off UV rays; thus, you won’t have to worry about the paint fading over time.
These features ensure that the paint you use on your phone case won’t chip even if you accidentally drop your phone.
Even though both varnishes are great sealers, I only recommend that you use polycrylic clear sealers.
They are water-based products; hence, they have very little odor and are non-toxic, which is a plus since you’ll be touching your phone case all the time.
Polycrylic sealers also maintain the paint’s color over time, unlike polyurethane, which causes the paint to “yellow” with time.
Polycrylic sealers are easy to apply and clean up and dry pretty quickly.
However, they take a long time to cure, which is worth it considering you won’t have to think about repainting your phone case for a long while.
You can apply this permanent sealant as soon as the paint on your phone case dries – just like you’d apply the acrylic sealants. Follow the procedure below to get it just right.
- Pour a little polycrylic sealer into a little bowl. I recommend using a little bowl because you do not need a lot of product to cover a phone case.
- Dip a flat paint brush into the product and apply a thin layer over the painted phone case.
Use long, even strokes and overlap each stroke to avoid missing any spots, Do not apply thick coats, or you’ll risk leaving brush marks in the finish.
- Let the first coat dry for about two hours, or check your product’s label for a more precise time.
- Use fine grit sandpaper to smoothen the first coat, then apply another coat using the same techniques.
Two coats are enough to protect the paint for years until you feel like you need a change.
- After the final coat, let your phone case dry out for about 1-2 weeks before you put it on your phone.
Two weeks may seem like a long time, but it is the price you pay if you want a finish that will last years.
Conclusion
Painting a phone case is the go-to action of many phone owners seeking to spruce up its look.
It is a simple project that requires minimal effort and is always successful if you use the proper procedures and products for your phone case.
Since acrylic paint is the most readily available and versatile product on the market today, it is not surprising that the question I get asked the most is…
Can You Use Acrylic Paint On a Phone Case?
You can apply acrylic paint on a phone case as long as you prime it before applying it and seal the color after it dries to keep it from coming off.
The painting procedure is pretty straightforward; however, the products you use to prepare the case’s surface will differ depending on the material.
Leather, plastic, and silicone phone cases have sleek and non-porous surfaces; therefore, you must “dull” them for the acrylic paint to adhere.
On the other hand, wooden cases need sanding to level the surface and roughen it for the paint to stick.
After dulling/roughening the surface, you can apply acrylic paint, and it will stick; however, it won’t last. To make it last, you must prime the phone case – no matter the material.
Thanks for reading this article, and I hope it answers your question satisfactorily. Feel free to ask questions or share more information in the comments.