Knowing how to repair sun damage car paint can save you a big time as you won’t have to hire a professional painter!
In this article, I’m going to walk you through the process; please keep reading…
Sun-damaged car paint is a nuisance for many car owners, especially since it is hard to ignore.
You detail your car and make it shiny, but then you notice the finish fading after some time.
The fading starts as small unnoticeable patches and spreads until your vehicle looks like it has an ombre finish.
To maintain your car’s luxurious, shiny finish, you must repair sun damage as soon as it occurs. You can have a professional detailer do the work or DIY it to save some money.
If you go the DIY route, you must know how to repair sun damage car paint to avoid making the issue worse.
The first step is to wash your car using a microfiber cloth, car soap, and a lot of water to remove dirt.
Next, use a detailing clay bar to remove tougher residues that remain stuck on the paint.
Afterward, “cut” the damaged layers with a buffing compound to expose the undamaged paint below.
Finally, polish then wax the whole car to restore its shine.
This is just an overview of the steps required to repair sun-damaged car paint. However, there are specific products and tools that you must use for the project.
Moreover, you must know how to use them correctly for the best outcome.
In this article, I’ll discuss all the steps of repairing sun-damaged car paint in detail.
I’ll also explain what causes the paint to fade and how much money you can expect to spend when fixing the damage. Let’s get started.
What Makes Car Paint Fade?
Oxidation is the primary cause of paint fading, and the biggest accelerant is the sun’s Ultra Violet rays. Let me explain.
When car paint gets exposed to sunlight, UV rays penetrate the finish layers. Upon prolonged exposure, the excessive UV rays cause heat to build up within the paint layers.
When this heat mixes with the oxygen in the atmosphere, it reacts with the paint, causing it to begin degrading.
The heat+oxygen reaction causes the finish to dry out. Drying means the paint coat gradually loses the oils that make it shine and hold the color together.
The more oils the finish loses, the weaker it becomes and the more faded it looks. This degradation is what we call paint oxidation.
Oxidation of car paint will occur quicker in the areas that face the sun consistently.
For instance, if you always park your car with the bonnet facing the sun, noticeable fading will begin on the front side of the vehicle.
Fading will also occur quicker in areas of the finish that have little scratches.
The scratches make it easier for the UV rays to penetrate; therefore, oxidation begins sooner.
Even though sunlight plays a significant role in the fading of car paint, it is not the only one.
Several other factors accelerate car paint’s oxidation, including road salt, exhaust, improper washing methods, and bird droppings.
Let’s look at these factors in-depth and see how they cause car paint to fade.
-
Road Salt
When snow falls during the winter, salt is distributed to melt the ice and ensure the road’s safety.
Even though the salt helps keep the traffic moving, it can also wreak havoc on your car’s paint finish over time. Here’s how.
Salt is corrosive; therefore, it will eat through the finish if you allow it to remain on the car for long periods.
As you drive, the salt flicks onto the paint and the metal parts on the vehicle’s undercarriage.
When you allow the salt to remain on the car, Its crystals will start to corrode the paint, causing it to fade.
When salt is the main cause of your car paint’s fading, the color change will start from below near the undercarriage.
You may also notice bare metal parts start to rust, which will make the fading all the more noticeable.
-
Improper Washing Methods
Washing your vehicle is a great way to maintain its finish, but only if you use the proper car cleaning tools and chemicals.
If you use abrasive chemicals, they will corrode the paint finish and cause discolored patches to appear.
You may not notice the color change with the first few washes. However, continuous use will surely make the degradation more obvious.
Chemicals aside, the tools you use to wash your car also play a significant role in maintaining its finish.
For instance, The best equipment for washing a car is a microfibre cloth because it is gentle.
If you use a bristled brush, you risk leaving tiny scratches on the finish. The tiny scratches, plus an abrasive cleaner, are a recipe for guaranteed fading.
Even if you use the proper cleaning chemicals but ignore the right equipment, your car paint will still fade.
The tiny scratches left by the stiff brushes will make UV penetration easier, thus causing the paint to fade even faster.
-
Exhaust
The exhaust from your car mainly consists of unburnt fuel. The carbon particulates have a hard and jagged structure that binds them with the car’s clear coat.
After a while, the particulates will create scarring on the finish, which will cause the color to fade.
The oxidation issue would be manageable if you were dealing with only the exhaust from your car.
However, in this modern world, almost everyone owns a vehicle that runs on fuel. As a result, a lot of unburnt fuel pollutes the environment and destroys car paint.
-
Bird Droppings
Bird droppings can ruin more than just the superficial aesthetics of your car. They contain a nitrogenous waste called uric acid, which is highly corrosive and harmful to vehicle coatings.
Uric acid will slowly eat away at the paint when you leave the droppings on your car for a long time. Eventually, the paint will fade, and other damage, like rust, will occur.
In case your vehicle gets covered in bird droppings, make sure that you remove them as soon as possible.
Some warm water will do the trick, or you can purchase special car wipes when there’s no water around.
What Does Oxidation Look Like On Car Paint?
The most obvious sign of oxidation on car paint is white patches and residues on the finish.
When the patches become noticeable, you’ve missed the warning signs, and the oxidation has advanced. So how do you identify signs of oxidation in its early stages?
Let’s find out.
There are three signs of car paint oxidation, each marking a particular stage in the process. First, the paint dulls, then it fades, and finally, it becomes chalky and patchy.
Here’s how it happens:
Stage 1 Oxidation: Dullness
Car paint always has a brilliant shine when clean, thanks to the clear coat that protects it. However, the clear coat develops a hazy look when UV rays penetrate it.
This slight haze dulls the finish’s sheen and obstructs the paint color, making it look dull.
The clear coat remains intact at this oxidation stage, except for the light haze. There are no scratches or cracks on it; therefore, the damage is much harder to detect.
To know if your car paint is at stage one oxidation, you must compare the finish on each panel.
To spot differences, you can also compare your car’s finish to another vehicle with the same color and a newer finish.
Stage 2 Oxidation: Fading
Fading paint is easier to notice because there is a recognizable difference in color between the faded and non-faded areas.
At this stage, the damaged areas look duller because there is no sheen and the paint colors are no longer vibrant.
You may notice a few cracks on the clear coat at this point, but they are usually superficial. Therefore, they are easy to remove.
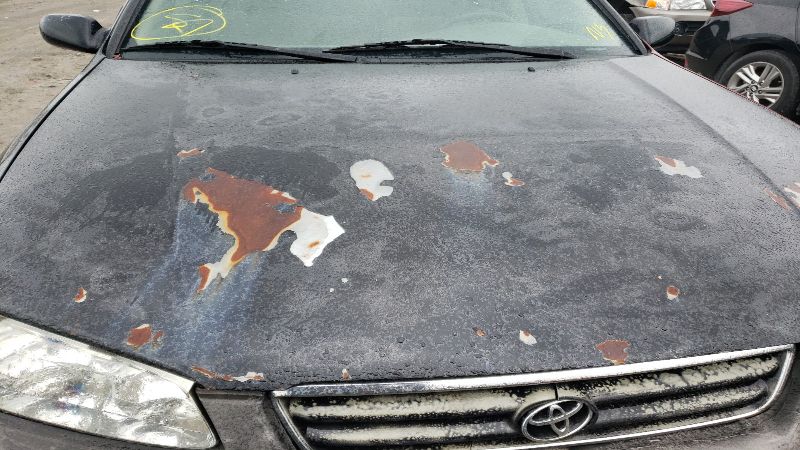
Stage 3 Oxidation: Chalkiness
When you start noticing white residues on the paint, you know that the oxidation is in its final stages.
At this point, the clear coat has deeper scratches that may even reach the paint layers.
Repairing this level of damage is quite challenging, especially since you don’t know the extent of the clear coat’s destruction.
I recommend hiring a professional car detailer because a trained eye can tell the severity of the damage and the best way to repair it.
How to Repair Sun Damage Car Paint?
The method you use to repair sun-damaged car paint will depend on the severity of the damage.
The steps used for stage one damage differ from those used for stage three damage.
In this section, I’ll discuss the proper ways to repair all levels of sun damage.
I’ll show you the correct products and proper tools for the job, then show you how to prevent future damage.
Step 1: General Preparation
- Start by inspecting your car’s finish to assess the level of sun damage. Focus on the clear coat’s condition and only proceed if the damage is stage one or two.
For stages three and above, I recommend enlisting the services of a professional detailer.
- Afterward, park the car in a shady and well-ventilated area. You can work in an indoor garage or build a temporary car shed outside.
Working in the shade will keep the repair compounds and other products from solidifying on the car’s surface.
On the other hand, ventilation will ensure that fumes from the repairing chemicals do not overwhelm you.
Step 2: Wash the Car
You must always wash your vehicle before performing any detailing work. If you skip this step, you will rub bits of debris and dirt into the paint during the reparation process.
You will also do more harm than good if you wash the car shoddily.
So here’s how to wash the car properly:
- Fill two large buckets with clean water, then add car soap. You will use one bucket to wash the tires and another for the car body.
Ensure that you follow the precise usage guidelines on the soap packaging to avoid damaging the finish.
- It is crucial to use separate washing buckets for the tires and the body to avoid transferring dirt from the tires to the body.
Fill a third bucket with water, but this time, leave it soapless. You’ll see why this water is essential in a few steps.
Hose down the car to soften and remove loose dirt, starting from the top and working your way down. Starting from the top will ensure that all the dirt that comes off runs down the car.
- Avoid using strong water jets for this step because you may accidentally chip the car finish.
Start by scrubbing the wheels with a stiff brush. The wheels are always the dirtiest part of a car, so it is best to start with them and work your way up.
- Dip the stiff brush into one of the soapy water buckets, then use it to clean the car rims and tires.
- Keep scrubbing until all the dirt comes off, then rinse the tires with the hose.
- If water from the first bucket remains, pour it down a drain. Do not reuse it on the car body because it has small rocks and dirt that could scratch the paint.
After the tires, it’s time to deal with the car body. For this step, you will need the second bucket of soapy water and the third bucket with clean water.
You will also require a car washing mitt or microfiber cloth to scrub stubborn dirt.
- Dip the washing mitt in soapy water, then scrub the car section by section, starting from the top.
- As you reach the bottom parts of the vehicle, focus on cleaning the crevices beneath the doors and wheel wells. These car parts trap a lot of dirt and grime; therefore, you should take extra time to ensure they are clean.
- As you work, ensure that you occasionally rinse your washing mitt in the clean water bucket. This step is essential after you have just cleaned a particularly dirty spot. It will help remove large dirt particles that could scratch the undamaged finish.
Rinse the car before the soapy water dries on it.
- Use a hose to rinse it from the top, ensuring that you pay attention to the lower parts of the car body and the wheel wells.
- After rinsing, inspect the car again for any missed dirt spots, and clean the area with the washing mitt if necessary. Ensure you rinse the car thoroughly, even after the extra cleaning passes.
Finally, dry the car with microfiber towels because you cannot leave it to air dry like most surfaces. When you air-dry a car, the water droplets evaporate, leaving mineral residues on the finish.
These residues appear as small white spots, commonly called water spots – you don’t want that.
- Use as many dry microfiber cloths as necessary for this step. You want your car to dry thoroughly before moving to the next steps.
Step 3: Rub the Surface With Detailing Clay
I’m sure you’ve heard auto detailers talking about “claying the surface” as part of detailing.
It is an essential extra step to guarantee that the car finish doesn’t have microscopic dirt embedded in it. For this step, you will need a detailing clay bar and an automotive clay lube.
- Start by spraying the lube all over the car surface to make the clay bar easier to slide across the surface.
- Stretch a bit of clay into a hand-sized puck, then rub it all over the surface using light pressure.
- When you hit a contaminant or a dirty spot on the paint, you will feel the clay drag a little. If this happens, slide the clay bar back and forth over that area until the motion becomes smooth again.
- After a few passes with the clay, fold and knead it to lock in the contaminants, and reveal a fresh surface before proceeding to another section.
- When you’re done claying the whole car, use clean microfiber towels to wipe off remnants of the clay lube before moving to the next step.
Step 4: Buffing and Polishing
Now, this is the primary reparation step for sun-damaged car paint. You will need an auto-detailing compound and some buffing pads to do the job.
However, the compound and application tools you use will depend on the stage of the paint damage.
So, before we get into it, let me clarify a few things about auto-detailing compounds.
An auto-detailing compound is commonly referred to as a cutting compound. It is an abrasive material suspended in a soft paste, making it liquid sandpaper.
Auto detailers use this product to remove thin layers of damaged car clear coats to reveal a fresh and intact layer.
Like all abrasive materials, cutting compounds come in different grits to serve different repair purposes. Compounds with finer abrasives can remove layers that are 10X thinner than paper.
These fine-grit compounds are also commonly referred to as rubbing/buffing compounds.
They are ideal for repairing stage 1 sun damage because there are no cracks on the surface.
On the other hand, coarser-grit compounds work best for more advanced damages where cracks are present. They can level down deep scratches to reach the undamaged clear coat layers below.
You can apply cutting compound by hand. However, hand detailing is best only if you are detailing a very small section of the vehicle.
I recommend using an electric orbital buffer to make the work easier and faster.
However, if you have never handled an electric buffer before, stick to hand detailing or hire a professional.
Now that you know which products and tools to use, here’s how to repair sun damage.
How to Repair Stage 1 Damage
- Put on some goggles and thick gloves to protect your skin and eyes from chemicals.
- Dampen an orbital buffing pad and attach it to the electric buffer. Working with a damp pad will provide lubrication, allowing you to move the machine smoothly across the surface.
- Apply small dollops of cutting compound all over the buffing pad or about one teaspoon smack in the middle of the pad.
- Since the damage is not severe, you will need a compound with the finest abrasives for repairs (rubbing compound). A fine-grit abrasive is not aggressive; hence it won’t leave gouges on the finish.
4. Dab the polish on the section you want to repair before turning on the electric buffer. If you turn on the machine before doing this, the cutting compound will spread everywhere, and we don’t want that.
5. Turn on the buffer and start working with a low speed of about one or two. Spread the compound evenly on the surface, then crank up the speed.
- Move the buffer over the damaged area in even, overlapping strokes to avoid missing any spots—alternate between up and down and left to right motions for the best results.
6. When the car starts looking shiny, wipe the surface with a clean microfiber cloth to remove the residues of the compound. Next, inspect the area to see if the color is restored to the faded spots.
- You may have to get to eye level with the car’s surface to see more clearly.
- Repeat the steps as many times as necessary until the paint color is uniform again.
How to Repair Stage 2 Damage
If the damage is more severe, you will need two grit levels of the cutting compound to complete the repairs.
- Start with the coarser grit cutting compound to remove scratches. Afterward, follow it with a rubbing compound or another low-grit compound.
- Each time you switch compounds, switch the buffing pads to avoid cross-contamination of the compounds.
- Follow the same application steps I’ve explained on stage one damage – for both abrasives.
Once you’re done with the repairs, it’s time to restore the shine to your vehicle. For this step, you will need a finishing polish, which you can find in auto stores.
You will also need a fresh buffing pad. DO NOT use the same one you used to apply the cutting compound.
- You will apply the polish the same way as the cutting compounds, but it will give the paint more shine. Polishing will also remove any swirl marks and other minor imperfections left over after repairing the finish with the compound.
Step 5: Protect the Finish
After doing all this work, it would be wrong not to protect the finish. Without protection, nothing stops the paint from getting sun-damaged again.
The most common way to protect car paint is wax, but you can also use a paint sealant if you want something more durable.
You can also take your vehicle to a detailing shop and have them apply a ceramic coating, which is better than wax or sealant.
In this section, I’ll show you how to protect your finish with car wax because it is the easiest for beginners. Ensure that you divide the car into sections and wax one section at a time for the best results.
- Pour a dab of car wax, about the size of a small coin, on a clean, dry microfiber cloth.
- Press the waxed cloth against the polished surface, then rub it in circular motions until you cover one section of the car.
- Take another clean and dry microfiber cloth and rub it firmly against the waxed surface in circular motions.
- Keep rubbing until there is no more wax on the surface and the car looks nice and shiny.
- You can apply another coat of wax to cover any bits you might have missed. You can even get away with three coats of wax, but any more will be a waste of product.
Here’s a Video On How to Repair Sun Damage Car Paint:
Can You Polish Sun Damaged Paint?
You can only polish sun-damaged paint if the damage is in its beginning stages.
As we know, car polishing involves removing minor imperfections like superficial scratches and swirl marks on the clear coat.
Therefore, it won’t work on paint that is severely damaged.
You can polish your car either by hand or using a machine.
Hand polishing is best for beginners and intermediate painters who have never used a machine. It’s the best way to learn how to polish a car before investing in a machine.
On the downside, hand-polishing is labor-intensive and will take a long time to complete.
On the other hand, machine polishing is faster and requires less labor to complete.
It removes minor defects better than the hand method; therefore, professional detailers prefer it more.
On the downside, Machine polishing can ruin the finish if you don’t do it properly. It is possible to burn the paint if you use the wrong polishing techniques.
How Much Does It Cost to Fix Faded Paint On Car?
You can expect to spend between $200 and $1000 to fix faded car paint.
The margin is quite extensive because the repair costs will depend on three critical factors: the damage’s severity, the car’s size, and the labor type.
Let’s see how these factors affect the cost.
-
Severity Of the Damage
As we know, paint fades in different stages. Every stage requires different steps to repair; therefore, the amount you will pay for each will differ.
Let’s start with the cost of minor damages.
Minor damages like superficial scratches and minor scrapes will cost you between $200-$500 to repair.
These damages often require one-step or two-step polishing methods. This means you may only need to polish the surface or use a cutting compound before polishing.
On the other hand, extensive damages such as deep scratches and chalkiness will cost you between $500-$1000 to repair.
They require more steps and more products to repair, hence the higher cost.
If your paint is more than faded and has irreversible damage, you will need a new paint job.
Fresh car paint can cost upward of $1000 because you will need to hire professionals to do it right.
-
Size of the Car
The size of the car plays a vital role because of simple science. The larger the car, the more product you will use; therefore, you will spend more money.
A detailing professional will charge you more to repair the paint on a large truck than on a small sedan.
The reason is that they have more area to cover, and they will take more time to complete.
-
Type of Labor
Type of labor means choosing between DIY and taking the car to a professional detailer.
If you do the work yourself, you must purchase the polishing and cutting compounds, buffing pads, and a buffing machine.
The initial cost will leave a dent in your pocket, but it will save you money for future detail work.
However, only do DIY repairs on your car if you have experience. Otherwise, practice on older cars before doing it on your favorite vehicle.
On the other hand, a professional detailer will charge you based on the other two factors I’ve mentioned – the severity of the damage and the size of your car.
You will spend more money in an auto shop, but the results will be worth it.
What Is the Best Way to Remove Oxidation From Car Paint?
The best way to remove oxidation from car paint is to buff the finish with a cutting compound, then polish it.
However, this method can be a little too expensive, especially if you hire a professional. And even if you DIY, you still need access to the proper polishing tools and products.
On the bright side, you can use a few home remedies to remove oxidation from car paint.
These remedies only work best on stage one oxidation and should be a temporary solution until you can afford professional detailing.
-
Baking Soda Scrub
Baking soda has many uses, including removing stains and odors. It is like a gentle version of an abrasive compound without chemicals and added preservatives.
So, it is not surprising that it can remove oxidation from car paint.
All you need to do is combine baking soda with water to form a paste and apply it to the affected area.
Allow it to sit for half an hour, then wipe the area with a damp microfiber cloth to expose the shiny finish.
-
Chalk Dust
Chalkdust has mildly abrasive properties that make it ideal for removing oxidation on paint. It is non-toxic and cheap; therefore, it’s an excellent way to save money.
To use this method:
- Mix chalk dust and water to form a paste then spread it on the affected area.
- Rub it in for a few minutes, then let it sit for half an hour. Afterward, rinse the car, and dry it with a microfiber towel.
-
Toothpaste
Toothpaste can remove paint oxidation because it contains mild abrasives and other chemicals.
These ingredients make it a decent product for removing oxidation on a small portion of a car. Here’s how to use it.
- Wash the car and dry it with microfiber towels.
- Press a sizeable chunk of the toothpaste onto a microfiber cloth, ensuring that its enough to cover the damaged portion,
- Rub the toothpaste on the area in small circular motions using gentle pressure.
- Finally, wash off the toothpaste with clean water, and dry it with clean towels.
Note: Ensure that you wax the car after using these home remedies. This will maintain the protection of the paint until you can take your car to the auto shop.
Conclusion
Sun damage is a common problem shared by car owners, requiring meticulous steps to repair.
If you want the repairs done right, I recommend taking the vehicle to an auto shop. You can also save a lot of money if you can do it yourself.
How to Repair Sun Damage Car Paint
The best way to repair sun-damaged car paint is by buffing the finish with a cutting compound, then polishing it.
Afterward, you apply car wax to protect the finish. The correct procedure is as follows:
- Park in a shaded area
- Wash the car from the top going down.
- Dry the surface with microfiber towels.
- Rub the finish with detailing clay to remove microscopic debris.
- Rub with cutting compound to remove the damaged clear coat, and reveal fresh layers underneath.
- Polish the vehicle, then protect it with car wax or sealant.
This is the basic procedure you would follow to repair sun damage in its initial stages. You only need to use a cutting compound once before polishing and waxing.
If the damage is severe and you can see deep scratches, you must use several cutting compounds with different grits.
Using many compounds means there will be more steps to the repair process.
Thank you for reading this far. I hope this article has answered all your questions about repairing sun-damaged car paint.
If you have any questions or need me to clarify some points, please reach out in the comments.