What happens if I paint pressure treated wood too soon? What kind of paints will work with pressure treated wood? As long as a pressure treatment of wood is involved, there will always be endless questions. But what do we know about the painting of treated lumber?
When it comes to painting any type of wood, treated or not treated, soft or hard, there’s always that consensus- allow the wood to dry before painting!
Sometimes, factors such as cost, time, and a busy schedule can lead to you painting pressure treated lumber before it dries, which leads us back to the question of what happens if I paint pressure treated wood too soon.
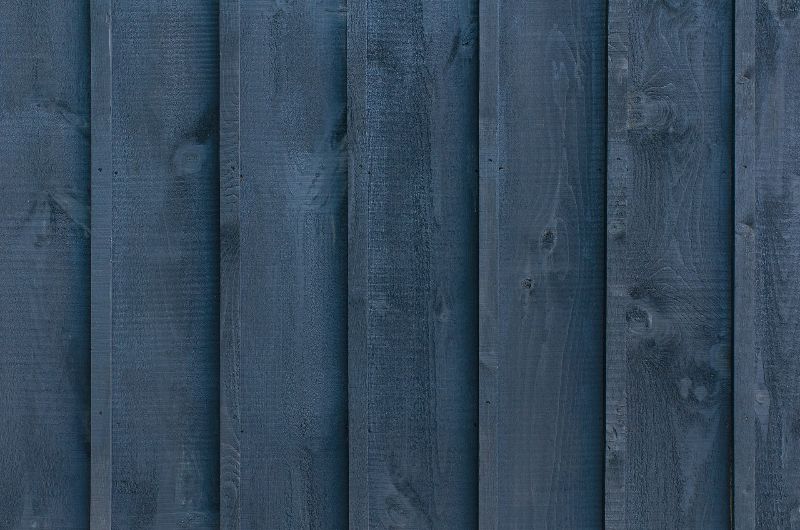
Your Board Will Warp
wood shrinks slightly whenever it dries. The shrinking of the wood leads to warping. The board starts to pull in the side direction that shrinks faster than the other.
So, each time you paint pressure treated wood too soon (before it dries), you will enable the unpainted side to dry before the painted side, and when a side dries faster than the other, it results in warping.
It is therefore important that you allow the whole of the treated wood to dry before you paint so that you avoid cases of warping.
Pressure treated needs handling with care, especially if you want to have it serve you for an extended duration. Proper handling of wood includes all protective measures. Read this post for more insight on the topic of discussion.
What to Know About Pressure Treated Wood
- Pressure treated wood undergoes a unique process to make it less susceptible to mold, insect infestation, and water damage. Even better, the wood becomes fire retardant and guarantees longevity.
- The process requires placing the wood in a pressure chamber with a retort, a horizontal steel cylinder that looks like a rail car. Usually, the retort consists of various treatment chemicals under pressure, driven into the wood at 160 pressure pounds. Then, a vacuum eliminates air from the compartment and the wood’s cell structure.
- Once the treatment is complete, the lumber moves to a drip pad until it is dry enough for use. Also, the duration needed to dry the wood depends on the climate and sunlight exposure. Thus, it may take a long or short time.
- Pressure treated wood has tags or marks indicating the applications suitable for its use. In addition, it is graded depending on its appearance, whether it has fewer knots and other cosmetic blemishes.
- Wood treated with water-borne preservatives like CCA-treated lumber is perfect for general residential outdoor and indoor use. You can also use it for fences, docks, decks, and building structures.
- Pressure treated lumber comes in handy in heavy construction projects, such as guardrails, bridges, and docks, thanks to its creosote preservatives. Even better, the wood may have oil-based preservatives, making it perfect for cross arms, utility poles, and indoor pools.
Nonetheless, ensure that you pick the most suitable wood for your project. Consider whether it will be in contact with the ground or above it.
For instance, position the lumber at least six inches from the floor for above-ground applications. It would also be best to work when the wood has proper ventilation and drainage to avoid water damage.
Lumber with ground contact needs to withstand the ground’s moisture content. So, such wood needs twice the protection and chemical retention levels compared to above-ground treated timber.
Finally, please avoid using less treated wood for projects with poor ventilation and will be less than six inches from the ground or where the lumber is difficult to replace or maintain. Otherwise, you’ll compromise the structure’s integrity, and it may collapse.
What Is the Importance of Painting Pressure Treated Wood
 Painting of pressure treated wood comes with so many advantages that any homeowner would not turn down. Among the benefits of painting treated lumber includes:
Protection: As much as pressure treated wood can repel insects and other rodents, it is vulnerable to elements such as UV rays, moisture, and more.
Painting your pressure-treated wood with paints with UV inhibitors helps protect the lumber against the adverse effects of ultraviolet rays, which causes discoloring of the wood after prolonged exposure.
Additionally, pressure treated wood is not resistant to moisture, so it is essential to protect it against moisture with the help of waterproofing paints.
Decoration: Wood paints come in different which will add an appealing look to your pressure treated wood structures. All you need to do is make the right paint selection that will bring about the very best of your structure.
Value Addition: Painting is one of the ways that you can use to attract higher prices if you are looking to sell structures created using pressure treated wood. Those structures could be homes, boats, furniture, and more.
How Long Should You Wait to Paint New Pressure Treated Wood?
The recommended waiting time for new pressure treated wood is between 3-4 months following the pressure treatment. You risk having warping wood due to one side drying faster than the other if you paint soon.
The drying time will lengthen or shorten depending on the climate. For example, the wood may need up to 18 months before it is ready for painting. So how do you know your wood is ready for painting? There are two methods:
The Sprinkler Test: In the sprinkler test, you need to sprinkle water over the surface of your pressure treated wood and observe the behavior of the water sprinkles. If water seeps through the wood immediately, it means that the wood is dry, and you can go ahead snd paint it.
If you notice bubbles and beads from the water sprinkled on the wood, it means that the wood is not dry, so you will need to allow it more days to dry.
Moisture Meter: These tools are handy when you want to quantify the water content in wood. Place your wood moisture meter on wood and ensure that moisture content is not more than 12% before considering painting.
Should You Paint Or Stain Pressure Treated Wood?
I recommend that you stain pressure treated lumber instead of painting it. The main reason is that paint formulas rarely adhere to the wood because of the pressure treatment procedure.
However, it does not mean that you cannot paint treated wood to deliver a durable finish. All you need to do is follow the right, recommended application steps. The key is understanding that pressure treated wood is unique and learning how to work with it effectively.
The wood undergoes a high pressure process that injects water and preservative chemicals deep into its grain. Hence, the surface becomes resistant to rot and moisture damage and features a longer life span.
As a result, pressure treated lumber is excellent for outdoor applications like fencing and decks. It is strong enough to withstand harsh weather conditions or constant exposure to moisture.
On the flip side, this pressure treatment job is why a paint or stain job fails most of the time. Treated wood is always wet soon after the process and remains damp for weeks in most environments. Thus, the wood will not absorb the paint or stain properly.
The treatment hinders paint adhesion, causing the finish to peel sooner or later. Since painting needs additional preparation to deliver a sophisticated finish, it is much better to stain treated lumber.
Also, although paint delivers a color pop to the surface, it does not allow the lumber to breathe. Instead, the finish facilitates mold, rot, and mildew development and compromises the structure’s longevity.
On top of that, you’ll need at least three layers for a paint job to last longer; a wood primer and two paint coats. Ensure that you clean the mold often and apply mildewcide to the wood even if mold and mildew are not a threat to treated lumber.
Staining wood is the better option because it requires less preparation time and effort. Also, soap and water are enough for delivering a spotless finish, unlike painting, where you must sand the wood and apply a primer.
Wood stain protects the surface from cracking, sunlight, moisture, and elements. Even better, although pressure treated wood is resistant to damage, insect attacks, and water, the formula increases its life span.
Finally, the formula takes advantage of treated wood’s natural beauty and attributes, allowing you to add more character to your work. So, evaluate your project requirements and expectations and determine the best strategy.
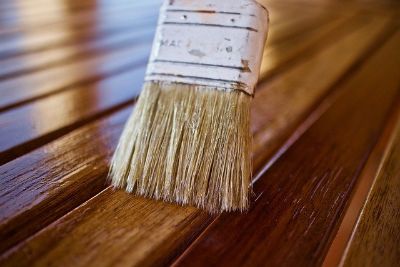
How to Paint Pressure Treated Wood
Remember to check whether the pressure treated wood is dry. This way, you are sure that the paint will adhere to the surface, and the lumber will not warp later. Also, treat the wood with a primer to enhance adhesion and facilitate a smooth finish.
However, pressure treated wood is resistant to liquids and picky about the paint and primer it accepts. Therefore, choose a primer suitable for the application. For instance, always use an outdoor formula for exterior projects, or else the paintwork will not last very long.
Apply the paint and primer to the treated lumber according to the manufacturer’s instructions and use thin coats. They dry more quickly and give a more uniform finish than thick layers.
Allow the paint and primer enough time to dry after application. The products may not need above two days to cure in fair weather conditions, but checking the manufacturer’s recommended drying duration is advisable. Even more, treated wood may need extra drying time to give the best result.
Then, get to work. Finally, have the correct tools to save time and energy. They include a paintbrush with nylon bristles, mild detergent, latex paint, primer, roller, roller cover with ⅜ inch nap, moisture meter, roller screen, putty knife, and two-part moldable epoxy resin.
Here’s More On Painting Pressure Treated Wood:
Clean the Treated Wood.
It is essential to clean the lumber before painting as dirt may compromise adhesion, leading to peeling and an early product failure. So, use a nylon brush and a deck brightener or an oxygenated cleaner for a spotless surface.
Also, please note that areas closer to the ground are more susceptible to dirt due to splashing, while wood sections facing away from the sun are more vulnerable to mold and moss growth. Therefore, put more emphasis on them for a better result.
You can use a stiff-bristled brush and soapy water for the cleaning process when improvising at home. Then, rinse off the lumber and allow it to dry to the touch once you deliver a spotless surface.
Lastly, don’t forget to patch large cracks in the pressure treated lumber with epoxy resin. Also, before applying the paste, use a two-part ‘epoxy wood consolidant’ for a perfect outcome.
-
Let the Wood Dry
Depending on existing weather conditions, the chemicals used to treat the wood and the cleaning water may protract the drying time to a few weeks or even months. Fortunately, you can easily do a moisture test and determine the best time to paint the wood.
First, check whether the lumber feels dry to the touch and sprinkle some water on it. If the water soaks in, then the surface is ready for painting. And if it beads up, please wait some more.
In addition, you can utilize a moisture meter to assess the treated lumber’s internal dryness. This way, you won’t risk working with wood that appears externally dry but internally damp.
Alternatively, it would be prudent to choose pressure treated wood marked as kiln-dried after treatment (KDAT). Thanks to a shorter painting timeline, it will serve you better for time-sensitive projects.
-
Apply the Primer
Once you confirm that the lumber is dry, proceed to paint. Start with a primer suitable for exteriors and ensure the manufacturer recommends it for pressure treated wood. Then, get a brush, roller, or spray to apply the formula.
Working with a paint sprayer is the easiest, but it is advisable to use a brush when the project entails detailed work. So, use the brush to prime recessed, narrow, or high areas that a roller cannot reach. Then, switch to a roller for flat and large sections,
In addition, remember to dip the roller cover in the primer before rolling it out on the screen. Then, move it to the treated lumber. Also, consider rolling in small sections to deliver full coverage.
-
Apply the Paint
Fortunately, the primer should not take more than a day to dry. Even better, some products dry in less than 60 minutes. Therefore, you should begin painting in a short while after priming the surface.
However, it is always advisable to confirm that the surface is dry before painting. In addition, please avoid applying oil-based formulas on pressure treated lumber. Use Latex ones.
Clean out the paint bucket and screen, add paint, and stir thoroughly. It is okay to use a sprayer as it is easier and faster. But consider utilizing the brush to cover areas you did not reach.
Alternatively, get a paint roller cover with a new roller cover. Apply one coat and allow it dry before adding the next. In addition, use multiple thin layers to reduce the drying time and deliver perfect coverage.
-
Apply a Water Repellant Finish
Get a water-repellant formula with a UV rays stabilizer as it will keep the finish safe from water damage and ensure that the surface does not fade or discolor. Even better, the added protection guarantees that the deck will remain new and inviting for a long, long time.
It is worth mentioning that horizontal surfaces like decks get more exposure than vertical ones like fences. Hence, they have a shorter life span, prompting you to consider staining the wood if you do not like the idea of repainting annually.
Conversely, you can allow the lumber to weather and become gray. Then, coat it with a protective sealant. Although the formula requires frequent application, the job is less demanding than painting.
Finally, small-scale projects are manageable, and it is easy for DIYers to get a perfect finish. However, it is better to get a professional painting company to help in large-scale projects, such as painting a fence or a deck.
How to Stain Pressure Treated Wood
It is best to prepare the treated lumber before staining. This way, you remove dirt, grime, oil, and debris that may hinder adhesion. So, check out the preparation steps below.
-
Check the Weather
Remember that despite the improvements in modern pressure treated lumber, the wood is still susceptible to humidity and direct sunlight. Hence, please wait for two to three days of fair weather before beginning the staining process.
In addition, humidity dries the finish faster, whereas excess heat from the sun causes the stain to evaporate the lumber’s absorption rate more quickly. Therefore, consider beginning the staining project on the third day of sunny weather.
-
Ensure the Wood Is Dry
It is essential to check whether the treated lumber is dry before staining. Most manufacturers advise you to wait for two to three weeks after picking up the wood. But you can check the moisture content periodically to avoid over-drying it.
Besides, the lumber may become too dry and lose its natural ability to hold the stain. So, perform the sprinkle test once you feel the surface is dry to the touch. Better still, you can use a moisture meter to tell whether the wood is internally dry.
The device is a sure way to evaluate whether the wood is dry. The ideal moisture content is below 12%, and anything above it is critical.
Also, experts believe that rot and mold start developing at this level. So, only stain the surface after establishing a less than 12 percent water content.
Sprinkle some water droplets on the surface and check if they bead up or soak into the wood fibers for the sprinkle test. Remember, beading up shows that the lumber is still wet, while soaking up is a cue to begin staining.
Conversely, press a nail into the wood and check if moisture comes out. The water shows that the lumber needs more drying time. Interesting, right? You can try it out the next time you stain or paint the wood.
Lastly, stack the treated lumber in a crisscross pattern to allow air circulation. This way, the wood will dry in two to three days, especially if the weather is warm with low humidity.
-
Choose the Correct Stain
There are two types of stain formulas: latex-based and oil-based. Interestingly, no product is better than the other as they have different benefits and drawbacks. So, the best stain varies per application.
For instance, it is best to use oil-based formulas for new decks as the lumber absorbs them completely, sealing the wood fibers from water. In addition, the stain protects the wood from UV rays, keeping it from fading.
An oil-based stain enhances the treated wood’s natural appearance. Moreover, it comes in multiple wood tones, including oak, cedar, and redwood, and you can opt for a transparent or semi-transparent look.
On top of that, the exposed wood and the transparent or semi-transparent wood finish eventually bring more character to the wood and highlight its original shade. But there is a caveat.
Oil-based exterior stain does not last long and needs reapplication every year. And worse still, the oil is food for algae, mold, and mildew.
Oppositely, latex or water-based stains dry quickly and adhere to the wood regardless of being damp. Even better, they are easier to clean, with dirt coming off with water and soap. Therefore, you won’t spend much time or money on maintenance and regular cleaning.
However, please note that water-based formulas give the wood a paint-like appearance. They also hide the lumber’s natural wood grain patterns. So, you may not enjoy the wood’s natural look.
-
Clean the Wood
Use a mild detergent, a stiff brush, and water to remove the debris and grime. Also, remember that soapy water is better than a pressure washer as the latter may wash away the chemical preservatives in the lumber.
-
Allow the Wood to Dry
Wait until the lumber is dry enough before beginning the staining process. Further, the drying duration allows the stain’s chemicals to soak into the wood for a better outcome.
Perform water tests to ensure that the wood is dry and ready to stain. For example, when there are water beads on the sprinkles in the sprinkler test, you will have to wait a little longer for the wood to dry.
-
Prepare the Stain
Ensure that you have the paint tray clean and ready for stain preparation. Carefully open the lid and stir the paint before pouring it into the tray.
Follow the above step by mixing the formulas if there’s any mixing to be done. Continue to string your paint to make it even and eliminate possible air bubbles from the formula.
-
Test the Stain
Apply some stain on a section of the treated lumber using a paint pad applicator and allow it to adhere. Then, assess whether the finish is the right shade for your project before using it on the whole surface.
Stain testing is important as it allows you to rectify your job before it is too late in terms of time and financial resources. It can be devastating to go through an entire staining process only to have the wrong shade in the end. So ensure you do stain testing and do it the right way.
-
Apply the Stain
Please wear gloves when working with treated lumber. Also, avoid repeated brushstrokes on a specific area when using the stain. Otherwise, you’ll need additional stain layers and interfere with the final output.
Do not apply the formula under the sun, as the heat will dry the finish too fast before the lumber can absorb it. Work under a shade or choose a conveniently fair day to do the work.
Lastly, follow the above instructions in preparing and staining the wood, and you’ll guarantee a perfect outcome; an appropriately applied stain, protected lumber, and a uniform, professional finish.
Here’s How to Stain Pressure Treated Wood:
How Do You Know Pressure Treated Wood Is Dry Enough to Paint?
You can tell whether pressure treated wood is dry using the following strategies.
-
Feel Test
Wet wood will ooze out moisture. So, look over the lumber and use your sight and feel to determine if it’s dry. Then, use a paper towel or hand to press into the wood and see if you can detect some water.
However, please note that this technique only determines if the lumber is still wet. It does not prove that the surface is dry and ready for staining or painting. In addition, you do not need to waste your time with the other tests if the wood fails this test.
-
Water Test
Take a cup of water and spread several drops on the wood’s surface. If the lumber soaks up the water, you can proceed with the painting job, while if the moisture beads up on the wood, it would be best to give it more time.
-
Digital Moisture Tester
The digital moisture meter features two prongs that you press into the lumber, testing the moisture level. However, it is prudent to calibrate the device correctly and test multiple spots on the surface. Then, average the various readings.
Frequently Asked Questions
The frequently asked question around this topic includes:
-
How Do I Maintain My Painted Lumber
Of course, your deck or fence will have more exposure to elements and direct sunlight, requiring more intentional maintenance techniques. The most common strategies include using mildewcide to curb mold and mildew growth and UV protection products.
Water and organic matter encourage mold and mildew. Therefore, ensure that you drain any trapped water on the wood. In addition, have adequate ventilation underneath the surface and between boards.
-
What Type of Paints Can I Apply to Pressure Treated Wood?
You must use the right paint and primer on pressure treated wood. Having experimented and painted pressure treated wood on countless occasions, I recommend that you prime with a latex primer and then paint over your treated wood with a compatible exterior latex paint, otherwise known as water-based paint. You should avoid oil-based paint.
These paints soak deep into the wood pores and deliver more aggressive drying times. Therefore, you won’t get blisters from working too quickly during spraying.
-
Which Is the Best Primer for Pressure Treated Wood?
There is really not one recommended primer for pressure treated wood as every painter has their preference. So, the best formula is what makes your fence or deck look brand new and protects it from future rot and decay.
Conclusion
Pressure treated lumber contains a high moisture level after the treatment. Hence, unless the lumber yard kiln-dries the wood, it will still be wet after purchase. Unfortunately, this attribute hinders a perfect paint job, so that should wait for the wood to dry before adding the finish.
Back to our question…
What Happens If I paint Pressure Treated Wood too Soon
The wood will warp because it shrinks and bends towards the side that dries faster, forming a curve-like shape. Warping makes the paint on the surface of the treated wood peel, crack and fall off.
Also when you paint wet treated wood, the paint will not soak into the wood fibers and will remain unabsorbed, leading to ugly patches, splinters, splits, and cracks.
Luckily, applying paint to pressure treated wood is not complicated. You can deliver a more durable and beautiful project with enough time, patience, and following the right procedures as highlighted in this post.
I hope you have had so much to take from this post and that the information places you at a vantage point to get the very best out of painting your pressure treated wood.
Should you have any concerns regarding the subject of discussion, please don’t hesitate to share it with me in the comment section below!