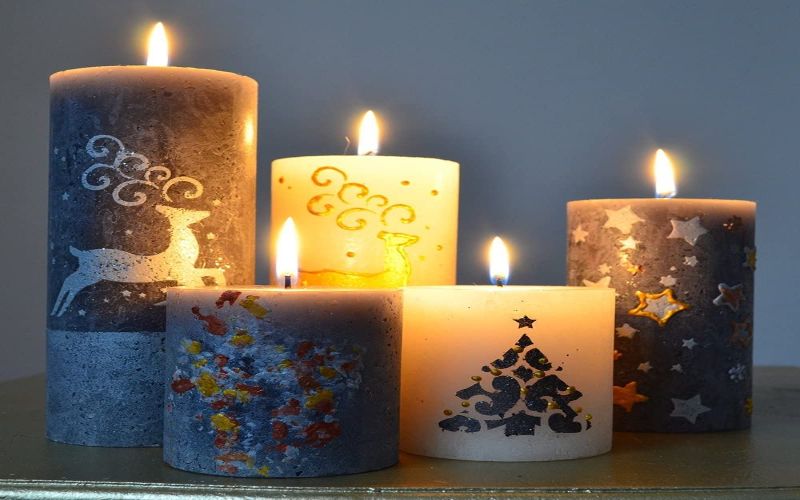
If you’re using candles as decorative pieces, their appearance is one thing that matters.
You must purchase candles that complement your existing decor to ensure your space looks put together.
Most candle manufacturers try as much as possible to make their designs unique.
However, a majority of candles on the market today come in only one color with no designs on their surface.
Therefore, it is up to you to customize them to match your decor, with spray painting normally one of the ways out. It begs the question, can you spray paint candles?
The answer is yes! You can spray paint any design onto your candles.
However, the spray paint you use will depend on whether you will burn the candles or put them up solely for decoration.
If you will burn candles, the best products to use are water-based, non-toxic spray paints.
These have very little to no chemicals; therefore, there is no risk of inhaling toxic burnt fumes.
If the candles are purely decorative, you can use non-toxic spray paints or any other regular spray paint to create your designs.
Before spray painting the candles, you must use isopropyl alcohol to remove the sheen on the wax surface. This action will allow the paint to adhere more firmly.
Additionally, you must ensure that the paint only touches the outer side of the candle, away from the wick.
This way, you won’t risk burning the paint and causing a fire hazard.
What Is Spray Painting?
Spray painting is a coloring technique in which a device disperses coating materials through the air onto a surface.
A few good examples of these materials are paint, stains, varnish, and sometimes ink.
The most common spray painting devices use compressed air to atomize and direct the paint particles where you want them.
They include airbrushes, spray guns, and the most convenient ones, aerosol spray cans.
All these spray painting mediums have a similar working mechanism, but they vary slightly in terms of usage and convenience.
Let’s look at each of them individually.
- Airbrushes are small hand-held devices that use compressed air to focus the coating material on a precise area.
This precision makes them ideal for detail-oriented works such as retouching photographs, fine art, or painting nails.
They are also the perfect substitute for paintbrushes whenever you need to work fast on a detail.
- Air spray guns are hand-held, like airbrushes, but they are much larger and heavier.
They are ideal for coating larger surfaces and come with interchangeable nozzle heads that produce different spray patterns.
These spray painting devices are often used for industrial applications such as the mass production of vehicles and the painting of massive buildings and houses.
- Aerosol spray cans are the most versatile and convenient spray painting devices.
They are small and light; hence you can easily transport them during projects. Moreover, they don’t take up a lot of storage space.
Spray painting gives painters a lot of room to get creative. However, it also poses potential health risks if you do not take the necessary precautions.
As the spray painting devices release the paint particles onto the surface, some particles get lost in the surrounding air.
These stray particles are what we commonly refer to as “overspray.”
When you accidentally inhale overspray, it can damage your lungs, causing long-term health problems.
For this reason, you must always wear protective gear to avoid overspray.
Safety goggles will keep the mist from your eyes, and respirators will prevent you from inhaling the paint fumes.
You must also work in well-ventilated spaces whenever you spray paint.
Good air circulation will prevent the atmosphere in your work area from getting saturated with paint fumes.
As a result, the health risks posed by overspray reduces significantly.
What Kind of Paint Do You Use On Candles?
The best paints to use on candles are acrylic and milk paint. These two products are ideal for either large-scale or hobbyist candle painting.
They are ideal because they are non-toxic and won’t endanger your health when you burn them.
They are also water-based, making them less likely to become a fire hazard.
Even though acrylic paint and milk paint are the best choices, they won’t adhere properly to the candle’s surface.
As we know, candle wax is non-porous and very smooth; therefore, coating products won’t stick to it readily.
If you want these paints to adhere correctly, you must mix them with a candle-painting medium.
A candle-painting medium is a product that gives acrylic paint, milk paint, and any other craft paint the ability to stick on sleek surfaces.
You can use it when customizing items like candles, soaps, metal, and glass.
All you need to do is mix the medium and the paint in equal parts before applying the mixture to the surface.
The one great thing about a candle medium is that it is colorless.
It will not alter the tone or shade of your paint, thus allowing you to create art precisely as visualized.
If you do not mix the candle medium with paint, drawing successfully on candles will be very challenging.
Your brushstrokes will be evident, and the paint will peel off easily after it dries.
The other kind of paint you can use on candles is a candle wax pen. It is ideal if you are just trying out candle painting or brushing up on your painting skills.
Candle wax pens are easy to use and are perfect for drawing intricate details.
They stick easily to the wax surface and will burn down with the candle without leaving residue.
Furthermore, wax pens are kid-friendly hence perfect for children who want to brush up on their creativity.
You do not need a candle medium when using candle wax pens, which is a bonus. Once you have your pens and candles in hand, you’re ready to create.
You can also use spray paints to customize candles. However, I recommend sticking to the water-based, non-toxic versions instead of regular spray paints.
Here’s why.
Regular spray paints have components that release fumes as they dry. If you burn these fumes, they smell worse than usual and may be a health risk.
In some instances, the candle wax burns, leaving a shell of paint around the candle. If this shell collapses onto the candle flame, it will ignite and cause a fire.
Some regular spray paints even have flecks of metals in their formula.
This is especially common in metallic-colored spray paints such as gold, copper, silver, or aluminum.
When these metal flecks catch fire, they will spark and float upwards.
If the sparks land on a flammable object before they fade, they become an instant fire hazard.
If you must use regular spray paints, I recommend only using them in candles which you won’t burn.
This way, you will avoid causing accidental fires or respiratory discomfort.
Can You Use Crayons to Color Candles?
You shouldn’t use crayons to color your candles unless the candles are purely decorative. Here’s why:
Crayons, like any other coloring item, contains pigments. Moreover, they contain pigments in a very high concentration.
Unfortunately, pigments are insoluble and disintegrate when you expose them to heat. This is where the problem starts.
When you look at a candle’s working mechanism, you will notice that there must always be a pool of melted wax at the top to keep the flame burning.
As the candle wick burns, it continuously draws more wax from the melted pool. This wax fuels the flame until the candle burns out or you snuff out the flame.
If you use crayons to color your candles, the flame will cause pigments in the crayons to disintegrate.
As a result, the pigment particles will remain suspended in the melted wax pool.
As the wick draws up more wax, it will simultaneously draw up some of the pigment particles from the crayons.
These pigments will not pass through the wick as easily as melted wax. Eventually, they will clog the wick, preventing your candle from lighting up adequately.
They will make your candle produce a dimmer light with a lot of smoke.
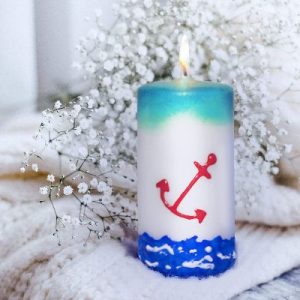
Can I Spray Paint a Glass Candle?
Yes, you can spray paint your glass candles for a more customized look.
To be clear, “glass candles” are not made from glass. They are small, short candles that can stand on their own.
They are usually sold in clear glass holders, which is why people refer to them as “glass candles” However, they are more commonly referred to as Votive candles.
The best way to customize a votive candle is to paint its glass holder. If the candle you bought came in a holder, the best thing to do is paint the glass’s outer side.
You can also purchase the votive candle and glass holder separately, giving you more customization options.
When they are separate, you can choose to paint the candle before placing it in the holder.
You can also customize the glass holder and erase the need to customize it every time you buy a new candle.
Even though you can paint the candle, I recommend you paint the glass holder instead.
Painting the holder is much safer because it reduces the risk of your lit flame coming into contact with the paint. Furthermore, it increases your choices of paint products.
You will have a wider selection of paints apart from the standard acrylic or milk paints that are common for customizing candles.
When purchasing spray paints to customize your glass candles, you must look for paints formulated for use on glass.
Check the product’s instructional manual to determine whether glass is one of the recommended substrates.
Once you do that, follow the simple guide below to apply the spray paint:
- Before doing anything, make sure that you prepare your workspace adequately. Ensure good air circulation and lay down some old clothes to catch overspray.
- Next, clean the glass thoroughly to remove oils and other dirt that may make it even harder for the paint to adhere. Use regular soap and water, then dry the glass with a microfiber cloth.
- Afterward, prop up the glass on something to make it easy for you to access its bottom edge. You can use a little block of wood or a container that you do not use.
- Finally, spray your design onto the glass in thin coats. Ensure that each coat dries appropriately before applying the next one for the best results.
How to Spray Paint Candles
Here are the steps involved in spray painting candles:
Step 1: Prepare Your Workspace
Before starting any painting project, you must ensure that everything you need is in one place.
- Have your paints and candles near the workbench so you won’t have to walk around whenever you need something.
Also, ensure that your workspace has good air circulation to prevent spray paint fumes from building up.
- If you’re working indoors, open all doors and windows to ventilate the room.
- If you’re working outside, you won’t have a problem with ventilation. However, wind could cause problems by dispersing paint to places you don’t intend to paint. To avoid the wind problem, you can build a temporary work shed.
Finally, wear some protective gear to keep off the spray paint fumes.
- Wear safety goggles to prevent overspray from hurting your eyes and a respirator to keep away the paint fumes.
- Also, wear gloves and coveralls to prevent the paint from staining your skin and clothes.
Step 2: Prepare the Candles
Start by removing any labels or stickers on the candle surface.
If you have already burnt the candle a little, remove any dried wax on its sides because they will look ugly if you paint over them directly.
Next, pour some rubbing alcohol onto a lint-free cloth, then use the damp cloth to wipe the candle’s surface.
The alcohol will remove some of the candle’s sheen and remove any dirt and debris.
- If you’re painting scented candles, you must use more rubbing alcohol to dull the sleek candle surface.
The reason is that most scented candles contain essential oils that make their surface a little oilier and shinier.
As a result, they’re less receptive to paint hence the need for more rubbing alcohol.
Once the candles dry, tape off the top 1/3 of the candle, including the wick.
It is crucial to keep the paint away from the wick to avoid causing a fire when you light the candle.
Step 3: Spray Paint the Candles.
Shake your spray paint vigorously to mix the paint components properly.
Afterward, do a test spray on a cardboard or a test candle to see if the paint comes out of the nozzle consistently.
Once satisfied, hold the spray can about 10 inches away from the candle and begin spraying.
- Spray in even strokes going up and down the length of the candle.
If you want to create more intricate designs on the candle, you can switch to an airbrush.
Alternatively, you can spray a little bit of paint onto a paintbrush and draw whatever you like.
Allow the first coat to dry as indicated on the product’s label, then apply a second one. For this project, two coats of paint are enough to achieve full coverage.
Once you’re done, allow the candles to dry for up to 48 hours before lighting them up. Two days is enough time to ensure that the paint dries and cures as required.
Here’s a DIY Fun Video On Spray Painting Candles:
Is It Safe to Burn Painted Candles?
It is only safe to burn painted candles if you follow two simple rules while painting:
- First, if you use non-toxic, water-based paint for the project, burning the candle will not cause problems.
Even if the candle flame burns the paint, there is no health risk from fumes and other toxic components in the paint.
- Second, it is safe to burn them if you apply the paint only to the sides of the candle away from the wick.
Note: If you want to be completely safe when burning a painted candle, ensure that you use very little paint.
If you slather on thick coats of paint, it may hinder the candle from burning properly.
So, I recommend that you stick to small designs instead of covering the whole candle with paint.
If coloring candles using paint seems a little unsafe, you can opt for more natural coloring options.
However, these alternatives will require you to melt down the candle, infuse the colorants in the wax then remold it.
You can use natural coloring agents, including spices, herbs, flowers, and vegetables.
-
Spices
For two reasons, spices are the oldest and most popular coloring agents for candles. First, they alter the color, producing a distinctive smell you can use for aromatherapy.
It is best to use ground spices because they work better in powder form.
-
Herbs
Many dyes today are manufactured synthetically, but originally, all dyes were made from herbs.
A few herbs that produce excellent dyes include wild celery, sunflower seeds, ground lichen, and dandelions.
You must heat the herbs in oil to extract the color before adding it to the wax.
-
Flowers
Flowers are the most colorful plants in the world, so it is no wonder they make great colorants.
Moreover, the color selection is easy because what you see on the petals is the color you will infuse in the candles.
-
Fruits and Vegetables
Mashed fruits and vegetables also make great dyes for candles. For instance, fruits like blackberries stain your fingers because they contain natural dyes.
Note: When using these natural methods, place the dyeing material in a cheesecloth or coffee filter to make a “tea bag” for the dye.
This will make infusing the color in the melted wax easy without leaving solid materials in it.
Is It Safe to Paint Birthday Candles?
It is very safe to paint birthday candles if you follow the necessary painting precautions.
Furthermore, you must only use non-toxic, water-based paint to prevent fire hazards.
You must keep away from regular spray paints when painting birthday candles.
The reason is that birthday candles must be burnt; therefore, it is safer to stick to paints without fumes.
Painting a birthday candle is easy. However, people make a few common mistakes, causing the project to fail. If you are a painting novice, worry not.
The following are some tips to help guide your project to success.
Tips for Painting Birthday Candles Safely
They are as follows:
- Warm the Candle
Sometimes, candles can become too stiff, especially when it is cold. If the candle wax gets too stiff, the paint will not adhere properly to its surface.
So, before applying the paint, warm up the candle a little by holding up a lighter close to its surface for a few seconds.
Remember, candle wax will melt if exposed to direct heat for a long time.
Therefore, only warm the candle for a few seconds and not let the lighter flame touch its surface.
- Cover the Candlewick
The leading cause of fire hazards is paint on the candle wick. Even tiny flecks of paint can be dangerous, especially if they catch the spark of a flame.
To avoid this, always cover the candle’s wick with some tape before you start painting.
- Use the Correct Paint Type
Painting candles is easy, but only if you use acrylic or milk paint. These paints are non-toxic and will be safe even if you burn the candles.
Other types of paint won’t adhere properly. Moreover, they are sure to cause fire hazards when their volatile components come into contact with the candle flame.
- Apply Thin Layers Of Paint
When applying paint on candles, you will notice that the first coat often appears more sheer than opaque.
The sheerness usually occurs when some of the paint slides off the sleek wax surface as you apply it.
Some painters try to remedy this problem by applying a lot of paint to make it look more opaque.
However, this action only ends up causing more trouble. The more paint you apply, the longer it takes to dry.
Furthermore, too much paint increases the risk of it catching fire and burning the things around it.
So, stick to painting small designs on your candles to be safe. If you must paint the whole surface, only apply two thin layers.
- Allow the Paint to Dry Properly
The biggest thing that can compromise a candle painting project is paint drips.
Since we paint candles upright, they are more prone to paint drips than other surfaces painted while laid flat.
To avoid paint drips, you must allow each coat to dry before applying the next. A dry paint coat cannot drip because it has already turned solid.
However, if you slather on one coat after the next without enough drying time, the paint below will remain wet, causing drips.
Allowing the paint to dry properly also makes it safer to burn the candles.
- Consider the Type of Candle
All candles are made with wax; however, different types of candle waxes make every candle different.
For instance, paraffin wax candles are the most common; hence you can find them everywhere.
They are often white, providing the most neutral surface for customization. Furthermore, they accept paint more readily because they lack oils.
On the other hand, we use scented candles for aromatherapy. Manufacturers create them by infusing some natural essential oils to produce a distinctive smell.
These candle types are harder to paint because the added oils prevent the paint from adhering and drying properly.
Therefore, I recommend you stick to customizing unscented candles for your projects to be flawless.
Conclusion
Candles are a popular lighting source and have been around for a long time.
Initially, their primary purpose was lighting up a room at night, but now, they are the perfect accessories to enhance a home’s aesthetic.
As with many items, candles come in various sizes and colors. However, finding something that complements your decor may still be hard.
This problem always leads people to try and customize their candles using spray paint. But the question remains…
Can You Spray Paint Candles?
Yes, you can spray paint your candles using acrylic or milk paint. They are the safest paints because they won’t produce toxic fumes when you burn them.
However, you must remember to mix the paint with a candle medium to get it to stick to the sleek wax surface.
You can also use regular spray paint to customize your candles. However, I do not recommend burning the candles.
Instead, leave them as standing decors as you do with your wall hangings.
Before applying the spray paint, ensure that you wipe the candle with some rubbing alcohol to dull its sheen.
The alcohol will also double as a cleaner, removing dirt and hanging wax on the candle.
Thank you for reading this article. I hope it has given you all the insights into spray painting candles.
If you have any queries, please feel free to reach out in the comments below.