How Long Can Primer Sit Before Painting? This question is not new to painters, homeowners, and other DIYers who might be looking to paint their structures following the application of primer. Here’s what you need to know.
Priming is an essential preparation step before painting – get it right, and you have better chances of achieving a flawless and long-lasting finish.
One of the most important things you must understand regarding primers is the drying time. It is a factor that determines the overall condition of the primer coat, which will influence the look and lifespan of the paint finish.
Painting over primer before it dries properly causes adhesion failures such as bubbling and peeling paint. On the other hand, if you wait for too long, the primer will lose its effects, and you will have to re-prime the surface.
So when exactly should you paint over primer? How Long Can Primer Sit Before Painting?
Most primers can sit on the surface for up to 30 days without painting. But you should know that as time passes by, the coat deteriorates, thus losing its strength. You will attain a longer-lasting finish if you paint over the primer within the first seven days of application. Any time after that, you’re likely to end up with a finish that will peel off in less than two years.
To be more precise:
- Metal primers work best if you paint over them immediately they dry; however, if you cannot do that, you can leave it bare for up to two weeks. After two weeks, most metal primers will start to deteriorate except epoxies.
- Most wood primers can sit without paint for up to 30 days. However, I recommend painting after 24 hours to one week for the best results.
- If you keep using the car after priming, car primers will start to degenerate within a week or two. However, epoxy car primers are so strong that they can sit for up to 1 year without painting – provided you don’t use the car, and you cover it to keep out moisture and dirt.
- Concrete primers are ready for painting after 8 hours, but you have a window of 7 days before it starts chalking a little. Some manufacturers have products that brag about sitting bare for up to 30 days without problems; however, I don’t recommend allowing your concrete primer to remain unpainted past the 7-day mark.
Can You Paint Without Primer?
 I don’t recommend skipping primer because it plays a significant role in the overall look and longevity of a paint finish. It prevents problems with paint adhesion and levels out the surface to make the finish flawless.
It also provides additional protection for the surface you’re painting and covers stains, preventing them from showing through the paint.
Nevertheless, there are some situations where you can paint without priming and not end up with dire consequences. These include:
Painting Over Old Paint With the Same Color
You can skip priming if you are retouching an already painted surface with the same color in the same shade. Because the colors are similar, there is no need for setting a neutral-colored base with primer before painting.
The colors will seamlessly blend into each other; therefore, there are zero chances of the old color showing through the new paint.
This, however, only works if the old paint is still in good condition. If it has cracks or chips, it is best to strip the surface, prime again then paint.
Painting Over Old Paint In a Darker Color/ Shade
You can skip the primer if you are retouching a painted surface with a much darker color than the previous one. It can be a different dark color or the same color as the old paint but in a darker shade.
Because the new color is darker, the old color can’t show through even when you don’t use a primer.
When Using Paint And Primer In One/Self-Priming Paint
Paint-and-primer-in-one products are all the rage when it comes to DIY painting. Manufacturers combined the benefits of paint and primer in a single product to give painters the option of skipping the priming step.
Self-priming products do not have the standard primer formula, but they contain a higher solids concentration than other paint types. As a result, they are thicker and provide ample coverage with as little as one coat.
Nevertheless, you cannot use self-priming paint for all your projects because they lack the primer formula. The following are situations where you must apply a separate primer even if you use self-priming paint.
Painting Porous Surfaces
Porous surfaces like wood, drywall, and concrete absorb water and sometimes odors. Therefore, if you paint them without priming first, they will absorb the moisture in the paint, which will cause damage to the surface.
Unprimed drywall will take in moisture from the paint fast, but you won’t be able to tell immediately. Eventually, it will lose its structural integrity and may develop mold spores in a short while.
Similarly, wood will absorb moisture from the paint, causing it to swell and warp. As a result, the paint coat you just applied will crack.
Painting Glossy Surfaces
If you want to upgrade the appearance of glass, plastic, tile, or any other smooth and glossy surface, you must start with a quality bonding primer.
Bonding primers will act as a magnet between your shiny surfaces and the paint, making the color more durable. If you want the finish to last even longer, lightly sand the glossy surface to reduce its shine and make it rough for the primer to grip.
Painting Metal Surfaces
Metals are the most difficult surfaces to paint, and the job becomes more challenging if you don’t use a primer. Unlike most substrates, metals require special primers that prevent the surface from rusting while ensuring that the paint does not peel off.
I recommend using a galvanized metal primer or a rust converter to prepare all your metals before painting. The rust converters will prevent the corrosion from recurring while making the metal easier to paint.
On the other hand, galvanized primers are best for surfaces like aluminum which never hold paint well.
Painting Latex Paint Over Oil-based Paint
Latex paint is water-based; therefore, it doesn’t mix well with oil-based paint. If you apply water-based paint over oil-based paint without priming, the color will roll off the surface in a few days because it didn’t adhere properly.
The best way to avoid it is by applying a bonding primer over the oil paint coat before applying the latex paint.
Painting Over Wallpaper
Wallpaper is easy to install, and it will brighten up your space for a long time. However, it is hard to get rid of it once you get fed up with the look; therefore, the best option is to color it.
Painting over wallpaper is easy; however, you should never try it without applying a primer first.
Always start with an oil-based primer when painting wallpaper, then topcoat it with an oil-based paint. I recommend sticking to oil-based products because their water-based counterparts do not mix well with paper.
They will loosen the glue beneath your wall cover, which will cause it to start lifting together with the paint.
How Long Does Primer Take to Dry?
Some primers take between 1-4 hours to dry, while others take up to 24 hours to be ready for painting. Therefore you must always check the label of your product to know its precise drying time.
Below is an in-depth look into the drying times of specific primer types on the market.
 Latex Primers-Best Used on Drywall, Wood, Masonry, Plaster.
Latex primers dry to the touch in 30 minutes or one hour, but you have to wait up to 4 hours before painting over them. They are super flexible, which allows them to last on a surface for up to 30 days without painting.
After the month passes, you’ll have to re-apply the primer before proceeding.
Due to their fast drying times, latex primers are the ideal choice when you want to finish a project in a short time. They are compatible with acrylic paints and other water-based paints and are easy to clean with just water and some soap.
Shellac Primers-Best Used On Wood, Plastic, Metal, and Plaster.
Shellac primers dry to the touch in as little as 20 minutes and will be ready for a recoat in about one hour. They are highly adhesive and perfect for preparing interior surfaces and small outdoor spots for painting. Moreover, they are compatible with both oil and latex paints.
Shellac primers are also the best stain-blocking primers on the market. They are excellent at preventing smoke, water, and paint stains from showing through the paint. They also block the foul odors clinging to surfaces from seeping through the paint.
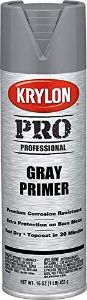
Oil-based Primers-Best Used On Wood and Metal.
Oil-based primers will dry adequately in 8 hours, but I recommend waiting 24 hours before painting. If you cannot paint immediately, you can wait a few days, provided you don’t let the primer sit for more than 14 days.
Oil-based primers are compatible with oil and latex paints, and you can use them indoors and outdoors. Furthermore, they have a stain-blocking property like shellac, which keeps stains from showing through the paint.
Epoxy Primer-Best Used On Steel, Fiberglass, Concrete, and Plastic
Epoxy primers dry within one hour, and you can apply a second coat as soon as it dries. However, I recommend giving the final coat 3 hours to dry thoroughly before painting.
Epoxy primer can sit on the surface for 30 days without painting, and it resists weathering for longer than most products on this list.
Epoxy primers lay the foundation for most durable finishes because of their superior adhesion. They are also chemical resistant and are effective at keeping moisture off surfaces.
Urethane Primer-Best Used On Metals, Previously Painted Surfaces, Wood, Concrete, and Automotive Applications.
Urethane primers dry to the touch within 30 minutes, and you can apply subsequent coats after that time passes. However, I recommend waiting 24 hours after applying the final primer coat before painting.
This primer is best used as a filler primer when painting vehicles after completing your bodywork. On the downside, it lacks chemicals that prevent rust; therefore, you’ll need to apply an epoxy primer before it to ward off rust.
Acrylic Laquer Primer-Best Used for Automotive Applications.
Acrylic lacquer primers dry to the touch in 20 minuter but require up to 24 hours to dry thoroughly; therefore, you must wait a full day before painting.
They are highly adhesive and have a high gloss sheen appearance. This primer type is also easy to apply, making it ideal for painters with little car painting experience.
Factors Influencing the Drying Time Of Primer?
Some of these factors that determine how fast or slow a primer dries are as discussed below:
-
The Thickness of the Coat
Thin primer coats dry faster than thick ones because the solvent in them evaporates more quickly. Since the layer is thin, the solvent at the bottom has to travel a short distance through the primer to reach the air, causing it to dry faster.
On the other hand, the solvents in thick coats take more time to reach the surface, thus slowing down the drying time.
The same thing happens when you apply too many coats of primer. Even if you’re using thin coats, too many of them can slow down the drying process. Why is that?
When applying primer, we often recoat it as soon as it is dry to the touch, and you can safely sand it. The primer at that stage isn’t fully dry; therefore, I always recommend giving it 24 hours to dry after applying the final coat before painting. That amount of time is enough for the solvent in all the layers of primer to evaporate properly.
When you apply several coats of primer, they will lose moisture much slower, and you will have to wait more hours before painting. You will paint a surface with two primer coats quicker than one with four coats. When you apply several thick layers, they will fail to dry, leaving the primer tacky.
-
Humidity
Humidity is the volume of moisture in the atmosphere, and it plays a significant role in the drying of primers. When there’s too much moisture, it will fuse with the freshly applied primer – if it is water-based. As a result, the primer will thin out and won’t dry within the expected timelines.
Priming porous surfaces such as wood in high humidity will also cause problems with the finish. Since wood is porous, it will absorb all the excess moisture from the air. The added water will cause adhesion troubles with the primer, and it will bubble and peel as it dries.
On average, the perfect humidity for priming surfaces is 50%. However, always check the specifications of your product to get the precise percentage recommended by the manufacturer.
-
Temperature
Manufacturers specify temperature recommendations for applying their products because temperature affects different products differently. High temperatures will cause most primers to dry too rapidly.
As a result, the finish will have bumps and wrinkles and remain wet beneath the surface. On the other hand, very low temperatures will cause adhesion problems leaving the primer coat uneven.
It is essential always to follow the recommendation on your product’s label to be safe. Otherwise, you will be stuck repairing your finish as soon as it dries.
What Happens If You Paint Over Primer too Soon?
Painting over primer before it dries 100% is often risky and causes problems that are difficult to repair. For example, the primer may peel off the surface as you paint, leaving a streaky mess behind. Furthermore, the finish will look flaky and uneven, which is not the look you want.
Applying paint too soon may also cause the primer to mix with your color – especially if they have the same base. Consequently, the primer will take too long to dry or dry and leave bubbles in the finish.
Always allow the primer to dry before painting. If the label states that you should wait for 1 hour, wait a few hours longer to be safe. Pressing a finger into an inconspicuous area on the primed surface when you feel ready to paint.
If you leave a dent in the primer, it needs more time to dry. If the primer doesn’t move, then it is ready to paint.
How Do You Make Primer Dry Faster?
I always recommend letting primers dry for the specified amount of time for great finish results. However, I also understand that you need to finish projects quickly at times, which means getting the product to dry faster.
The primary method painters commonly use to dry primers is applying direct heat. Some use radiators, blow driers, heat guns, and other heating tools, depending on what they have on hand.
These methods work, but they also increase the possibility of ruining the finish before starting. Let me explain.
When you apply heat on a freshly primed surface, the top part of the primer will harden fast, leaving the bottom part wet. When the bottom layer finally starts drying, it pulls at the hardened layer on top. Consequently, the force will be too much, and the primer coat will crack.
Your home heating system is the safest method of using heat to dry your primer faster. I recommend using this method only if the temperature is way below what’s appropriate for the proper drying of your primer.
Increase the heat in your workspace to match the specs on the product label, and you’re good to go. If the temperature is already optimum, allow the primer to dry naturally.
The following is a list of safer techniques to dry your primer faster. They are better than applying heat because you employ them during application; therefore, they don’t affect the primer’s uniformity as it dries.
-
Lower the Humidity Of Your Space
If your workspace is too humid, you can use a dehumidifier to lower the moisture content around your piece and accelerate drying time. If you do not have a dehumidifier, it is best to wait for a less humid day to begin your project.
-
Buy a Fast-Drying Primer
The other solution is to buy primers specified as “fast-drying.” They come in handy when you don’t have enough time to finish a project or when the conditions aren’t favorable for standard primers to dry fast.
If you already have the standard primers, you can purchase a fast-drying additive and add it to your product to make it dry quicker. Ensure that the additive is compatible with your primer to avoid problems when you do that.
-
Increase Air Circulation
Increasing the air circulation in your workspace will also promote primer drying. You can use fans or open doors and windows to push out saturated air and allow dry air to encourage drying.
How to Apply Primer
As mentioned before, the various types of primer on the market work best on different surfaces. Moreover, those surfaces have distinct requirements for preparing them for paint.
You must understand the needs of each material and use the correct techniques when applying primer for best results. Below is a breakdown of applying primer to the different substrates available.
How to Apply Primer On Wood
Here are the steps involved in applying primer on wood:
Step 1: Clean the Wood
Cleaning the surface must always be the first step before applying any product to wood. Otherwise, dust particles will interfere with the primer’s grip, which will turn into paint peeling problems.
If your wood has an old paint finish, ensure that it is in good condition, then proceed with cleaning. However, if the paint is peeling or has wrinkles, use a paint scraper to remove it.
The scraper may not get all the color off, but don’t worry; you can remove the remaining specks with sandpaper later. If the paint scraper doesn’t work, you will have to use a chemical paint stripper to remove the paint.
Use a solution of warm water and Trisodium Phosphate (TSP) to clean the wood. Ensure that you scrub the wood gently to remove any stuck stains.
Rinse the wood thoroughly, then leave it to dry for 24 hours. The dry time may be long, but it is also necessary for your finish to be perfect.
Step 2: Sand the Surface
Sanding will make the wood surface rough and raise the wood grain to give your primer something to grip. Ensure that you sand along the wood grain to maintain the evenness of the surface.
Start with 100-grit sandpaper to raise the grain and remove any remaining old paint (if any). The coarse sandpaper will leave deep scratches in the wood; therefore, you must sand again with fine 180 or 220-grit sandpaper to level it again.
Next, use a soft brush to sweep off the sanding dust. After sweeping the dust, wipe the surface with a damp tack cloth to clean it further. You can also use a small vacuum cleaner to remove the dust if you want to be more thorough.
Step 3: Apply Primer
Stir your primer with a wooden stick until it reaches a uniform thickness, then pour some of it into a separate container.
Dip your paintbrush in the primer, then tap it lightly on the inside of the container to remove excess product. It is essential to load the paintbrush with a little primer to allow you to apply thinner coats that will dry faster.
Allow the primer to dry thoroughly, then apply a second coat. You could skip the second coat if you got full coverage with the first one.
Sand the dry coat with fine 220-grit sandpaper to give the next layer some “tooth” to grip. Allow the second coat to dry for 24 hours, and your wood will be ready to paint.
Here’s a Video On Priming Wood:
How to Apply Primer On Concrete
The steps involved in priming concrete are:
Step 1: Clean and Repair the Concrete
Start by sweeping away the leaves and dirt on the wood. If you are working outside, choose a less windy day to start working; otherwise, the wind will keep blowing dirt back onto the concrete.
If there’s any old paint on the concrete, use a power washer to remove it before etching the surface. You can also use a wire brush to scrape off some of the paint. If there’s no paint, you can jump straight to etching.
Step 2: Etch the Surface
Etching concrete is similar to sanding wood before painting using chemicals instead of sandpaper. It makes the surface rough enough to hold paint and removes oil traces and other contaminants from the concrete.
Hydrochloric acid is the most common solvent used to etch concrete. However, it is a strong chemical that produces harmful fumes and can burn skin.
I recommend using a powdered concrete etcher for this step because it is safer than the acid requiring only water to make the etching solution.
- Fill a large bucket with water, then empty ½ KG of concrete etching powder in the liquid.
- Stir the mixture with a wooden rod until the powder dissolves completely.
- Next, pour the solution all over the concrete. Once you see it start to bubble, scrub the floor with a broom to ensure that the mixture reaches all parts of the surface.
- Continue scrubbing the concrete until the bubbling stops, then rinse it with running water.
- Allow the concrete to dry for 48 hours before proceeding.
Step 3: Apply Concrete Sealer.
Concrete is very porous and often traps moisture within its structure. Therefore, it is essential to seal the concrete before priming to prevent the water from rising and ruining your coatings.
Sealants are only necessary if you’re painting indoor concrete. You can skip this step if you’re working outdoors.
Step 4: Apply Primer.
Epoxy primers are the best products to use on concrete. They are durable; therefore, they will maintain a strong bond between the paint and the concrete for a long time.
- Mix your epoxy primer and hardener in a separate container. Ensure that you mix just enough for your project to avoid wasting product.
- Cut in the areas of your concrete surface that touch other surfaces with a paintbrush. Do this all around the surface, then use a thick-napped roller to fill in the center of the surface.
- Allow the first layer to dry as instructed on the product label, then apply a second one if required. Allow the primer coat to dry thoroughly then it will be ready to paint.
How to Apply Primer On Metal
The steps are:
Step 1: Remove Rust and Old Paint.
- Remove flaking paint with a wire brush, ensuring that you get rid of as much surface rust simultaneously. If a handheld wire brush doesn’t get the job done, use a wire brush attachment for your drill instead.
- If rust has penetrated too deep into the surface, soak the metal in rust remover to remove it. Follow all the steps provided by the manufacturer of your product to keep you from ruining the metal.
- Finish by wiping the metal with a rag dipped in acetone to remove remnant rust, grease, and other stubborn dirt.
Step 2: Scuff the Metal
- If the metal appears too smooth, use a scuffing pad to etch the surface a little to allow the primer to stick. Afterward, wipe off residual debris with a cloth dipped in mineral spirits.
Step 3: Apply zinc Chromate (if the surface had rust)
Zinc chromate is a substance that resists corrosion; therefore, it is best to apply it first. This way, it remains in contact with the metal, protecting it from rust even after painting. It will keep shielding the metal for a long while, even if the paint finish gets old.
After applying this product, follow it up with a “full-bodied” metal primer so that it remains the first layer. Zinc chromate needs coating immediately, so do not use it before you’re ready to prime.
If your surface does not have rust, you can skip this step and head straight to priming.
Step 4: Apply Primer
The primer you use should be specifically for metals. Also, ensure that you follow instructions on the label to avoid making mistakes.
- Spray on the first primer coat until you cover the surface evenly. You can also use brush-on primers if you want products with a better build. Avoid spray primers altogether if you’re working outside on a windy day.
- Allow the first coat to dry, then put on a subsequent coat to protect the metal further. Metal is prone to rust at the slightest encounter with moisture and oxygen; therefore, double-coat protection is necessary.
- After the second coat cures, your metal is ready to paint.
How to Apply Primer on A Car
Here are the steps that you should follow to get the very best when applying primer over a car:
Step 1: Preparation and Cleaning
Cars take up a lot of space; therefore, you must find a suitable location to carry out your project. Ensure that your workspace has enough room to move around the vehicle as you work. Moreover, make sure that the area is well ventilated and lit correctly.
- Once you’re set up, clean the whole vehicle to remove dust and grease that would interfere with the primer’s adhesion. You can use a general home detergent and some water for this task.
After the car dries, use a filler to repair dents in its body; otherwise, they will show through your finish.
- Mix your filler until it gains a creamy consistency, then spread it all over the irregular areas of your vehicle. For more minor flaws like pinholes, use a glazing putty instead. This product is thinner than standard car body fillers, which allows it to penetrate small spaces that the thick filler can’t.
- Give the filler about 30 minutes to one hour to harden, then level it with 180-grit sandpaper. Sand around the edges of the filler going in all directions until you achieve a seamless finish – the filler should look like part of the car body.
Step 2: Cover Parts You Want to Remain Unpainted
- Cover all the areas surrounding the part you want to paint with plastic sheeting or newspaper. Ensure that you use low-adhesive masking tape to secure the edges. You can remove the part of the car you want to paint if it is small and only if you have experience working with cars.
Step 3: Apply primer
The best method of applying primer on cars is using a paint sprayer. This method speeds up the project duration and distributes the product on the surface better than brushes.
Ensure that you thin and mix your primer property before loading it into the paint sparer. Failure to do that may lead to blockage of the sprayer, and the primer distribution will be uneven.
- Hold the sprayer 6 inches from the vehicle’s surface and pull the trigger to release the primer.
- Move it up and down over the area you’re priming to ensure uniform distribution.
- Give the first coat about 6o minutes to dry and make it easy to sand. Check the label of your primer to find the precise drying time it requires.
- Next, use a 1,200-grit sanding block to level all the uneven spots on the primer coat. Use light pressure and swirling motions to wear down the high areas without leaving deep scratches in the primer.
- Finally, apply the final coat of primer, allow it to dry, and your vehicle is ready to paint.
Below Is a Video On Priming a Car:
Can You Paint Over Tacky Primer?
No. You cannot paint over tacky primer because the finish will become wrinkly or peel off the surface.
Sometimes, you may notice that your primer remains sticky even after giving it several hours or days to dry. This sometimes happens to surface coating products, especially latex-based products.
Usually, the problem stems from too much humidity in the atmosphere or extreme temperatures(hot or cold) around the primed surface. Tackiness can also occur if you do not wait for each primer coat to dry properly before applying a subsequent one.
The best way to deal with tacky primer is to give it more time to dry before you paint it. If you must finish your project faster, you can use the methods mentioned in this article to dry the primer more quickly.
Can You Leave Primers Unpainted?
I do not recommend leaving primers unpainted because primers are not as strong as paints. Therefore, they can’t fend off damaging elements for a long time. If you don’t paint over your primer, the surface will incur stains and damages that will be impossible or hard to remove.
For instance, the smell of smoke can cling to the surface, especially if it is in a smoking zone or near your kitchen. Pet odors can also stick on the primer surface, causing your home to smell terrible.
Furthermore, primer is stickier than paint, attracting dust particles and other debris. Consequently, the primer coat will look dated, and the particles will interfere with paint adhesion when you apply it.
If you want to leave your primer unpainted, I recommend applying a protective clear coat over it. Clear finishing coats are as strong as paint and will keep the primer from damage for a long time. However, when you’re ready to paint, you will have to strip all the finishes and start afresh.
Conclusion
Painting over primer before it dries can be the downfall of your finish. It will cause adhesion problems; therefore, the paint will not protect your surface for long.
It is crucial to give your primer enough time to dry thoroughly but not leave it unpainted for too long, or it will lose its essential properties. Therefore, the burning question is…
How Long Can Primer Sit Before Painting?
Most primers can sit unpainted for up to 30 days. However, each type of primer degenerates at its own pace; hence, you must check your product’s label to get precise time estimations.
Always give your primer 24 hours to dry before painting to avoid guessing. However, if you cannot paint that fast, you can let the primer sit bare for one week without serious complications.
I hope this discussion answers all your questions about primer and the techniques of priming all types of surfaces. Feel free to reach out to us if you have any questions or new information to share.