How much does it cost to paint a bumper on a car? Keep reading to find out.
There are many reasons to want to paint a bumper on a car. It may be to repair a scratched-up paint finish on the bumper or to color-match a new bumper to your vehicle’s color. You may also want to add customized colors to the bumper to personalize your car.
Whatever the reason, the first thing that comes to mind is how much you will spend on the task. So I wrote this article to answer the question, How Much Does It Cost to Paint a Bumper On A Car?
It will cost about $200 to paint a car bumper if you DIY the task and up to $1000 if you take the car to an auto repair shop. If your bumper is entirely out of shape and needs replacement, be prepared to spend more than $1000.
The costs above are determined by the labor choice, the type of paint used, and the extent of the damage to the bumper or its finish.
In this article, I’ll explain how these simple factors cause a substantial gap in the cost of painting a car bumper.
I’ll also discuss how long it takes to paint a car bumper and then give you a detailed guide on how to paint a car bumper if you love DIY.
But first, let me tell you a little about car bumpers.
What Is a Car Bumper?
A car bumper is a metal attachment in a vehicle’s front and rear end, designed to absorb some impact shock from a collision. It is a barrier between your vehicle and the other vehicle or object involved in the collision, ensuring the passengers remain unharmed.
The bumper also ensures that the more important components under your car’s hood get little to no damage from the accident. Consequently, it mitigates repair costs.
Types of Car Bumpers
Vehicle bumpers come in many shapes and sizes, but the most common are standard/factory bumpers, step bumpers, and cowboy bumpers.
-
Standard Bumper
A standard bumper, aka factory bumper, is usually found in passenger vehicles and consists of an impact bar and a bumper cover. The impact bar is a sturdy metal connected to the car’s frame, which absorbs the bulk of shock from a collision.
Its purpose is more functional as it adds no aesthetic appeal to the vehicle. For this reason, manufacturers always put a bumper cover on it.
The bumper cover is usually made of plastic or fiberglass, painted to match the car’s body. Many misidentify it as the bumper itself, which is confusing, especially to new auto enthusiasts. So let me clarify in simple terms.
A bumper cover’s function is aesthetic but enhances the vehicle’s aerodynamics, improving fuel efficiency. It can withstand minor impacts and damages from road debris.
However, it cannot protect the rest of the vehicle components or passengers in the event of a crash – that’s the purpose of the impact bar.
Standard bumpers are usually lightweight; hence they cause very little stress to the car’s engine. In addition, they cost less to replace.
-
Step Bumper
A step bumper is usually made of rubber, plastic, aluminum, or light metals. The plastic types may seem weak, but car manufacturers use additional polymers to strengthen the material, making the plastic as strong as metal.
This bumper type is mainly found on trucks, SUVs, and vans, looking like a cut-out in the shape of a step. It provides protection against low-speed impacts and allows the vehicle owner to add accessories like tow balls.
On the downside, step bumpers are sometimes too heavy; hence difficult for the vehicle’s suspension to bear.
-
Cowboy Bumper
A cowboy bumper, or a Bull Bar, protects the front bumper on trucks, especially towing trucks. It attaches beneath the bumper and rises in a carved manner to meet the vehicle’s grille.
This bumper type is usually made of heavy steel, coated with a matte powder finish. It also has space for foglight attachments and other necessary heavy truck accessories.
Pros and Cons of Painting a Car Bumper
Here are some pros and cons of painting a car bumper.
Pros
- Painting a bumper restores the vehicle’s pristine appearance, especially if done correctly. It makes the vehicle look whole again, provided you color-match the bumper paint correctly to the rest of the vehicle’s finish.
- Bumper painting increases the resale value of your vehicle by a large margin. It shows that you took great care of the vehicle, thus encouraging people to buy your used vehicle – no one wants to spend money on a car with a busted bumper.
- Auto paint comes in many colors, including specialty hues, for unique customization. For this reason, nothing stops you from adding a bit of your personality to your vehicle.
Cons
- Painting a car bumper is quite expensive compared to other methods like wrapping. If you take your car to an auto repair shop, you’ll spend much on labor and repairs. And, even if you DIY, you will still need to purchase paint, primer, clear coat, and painting tools like a spray gun, tack cloths, etc.
- Bumper painting is a permanent transformation. So, if you change your mind later, you must strip the bumper bare before applying new paint. This permanence can be a significant inconvenience, especially if you like changing things up constantly.
- It is hard to correct mistakes when painting a bumper. An accidental paint spill or overspray can cause you to restart the job again.
- Painting a car bumper takes time, especially if there’s physical damage to the bumper itself. Repairs can take up to 6 hours, depending on the extent of the damage. And, if you factor in the time needed for the finish to dry between coats, it adds up to a total of 24 hours or even more.
How to Paint Car Bumper
Note: To clarify, I’m showing you how to paint the bumper cover of a standard factory bumper, not the impact bar itself.
You Will Need the following:
- 1-quart auto paint precisely color-matched to the rest of your car’s finish.
- 1-quart auto primer to help the paint stick to the bumper.
- 1-quart automotive clear coat as added protection for the finish.
- Paint sprayer to dispense the paint.
- Car tools for removing and reattaching the bumpers.
- Sandpaper for smoothening the surface (600-grit and 1500-grit)
- Spray bottle for dispensing water during wet sanding
- Several tack cloths for general wiping and cleaning.
- Protective gear includes coveralls, nitrile gloves, safety goggles, and a respirator mask.
- Mineral spirits for general cleaning purposes.
Step 1: Remove the Bumper Cover
Painting a car bumper is much easier when off the vehicle, as it allows you to reach all corners and prevent overspray from ruining the rest of your car’s finish. Removing the bumper also makes it easier to repair any minor dents and cracks that need fixing before painting.
- Every car manufacturer uses either screws, tabs, or bolts to attach the bumper cover. So, examine your bumper to find the connection points. Check near the trunk latch, tail lights, wheel wells, and bumper fascia.
- Afterward, remove the fasteners using the appropriate tools and slide the bumper free.
Step 2: Clean the Bumper Cover
You must clean the bumper cover before applying any product to prevent dirt from interfering with paint adhesion. If you skip this step, your bumper finish will peel off even without hitting or bumping into a hard object.
Car soap and water are the best combinations for this task. However, you can also substitute the car soap with a degreaser like a kitchen soap and still achieve great results
- Dip a tack cloth into the soapy water and scrub the bumper cover until all the dirt and grease come off.
- Afterward, rinse the bumper cover thoroughly and wipe it with another clean and dry tack cloth.
Step 3: Wet Sand The Bumper Cover
Wet sanding is essential to level any slightly rough areas on the bumper cover and remove debris embedded in the old finish.
For the newbies, wet sanding is just like regular sanding, but you must maintain a wet surface for lubrication. If you paint your bumper without wet sanding, the flaws will be magnified, causing the new finish to look ugly.
Use 600-grit sandpaper because it is rough enough to level the surface but won’t leave deep scratches.
- Spray some water onto the bumper and then begin sanding. Ensure you sand in all directions (top-bottom and side-side) to achieve a flawless finish.
- Maintain a wet surface throughout the process by spraying more water when you feel friction.
- Afterward, wipe the bumper cover with a damp tack cloth to remove sanding debris and other dirt remnants.
Step 4: Apply Auto Primer
Set up your paint sprayer and add auto primer following the manufacturer’s instructions. Before you begin, test the sprayer on scrap metal or any unimportant material to ensure no blockage in the nozzle.
During the test, adjust pressure and other equipment settings so you won’t have to stop in the middle of the job.
- Hold the sprayer about 8-10 inches from the bumper, then spray on the first primer coat. Apply a thin, even coat using sweeping, side-to-side motions.
- Let the primer dry for the recommended duration, and then add one coat or more as the manufacturer recommends. Afterward, use the 1500-grit sandpaper to smoothen the primer coat, and then wipe the bumper with mineral spirits to remove the dust.
Note:
- As the primer dries, clean the sprayer thoroughly to remove all product traces before adding the paint.
- If you’re painting a new, pre-primed bumper, you can skip the priming. Simply sand the bumper and move on to painting.
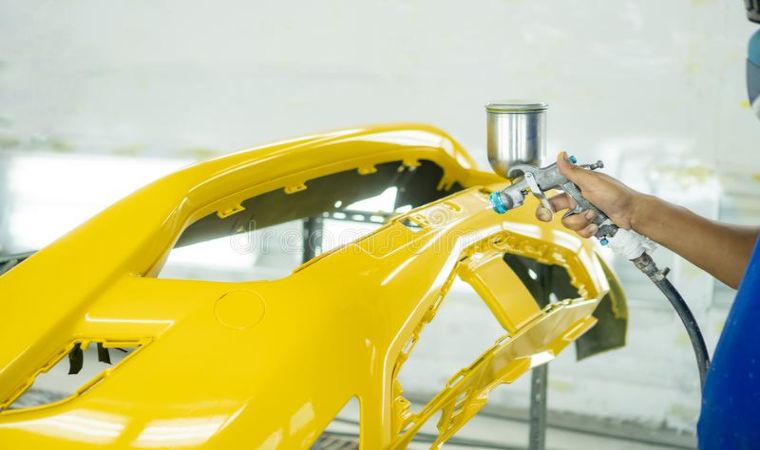
Step 5: Apply Paint
Prepare the auto paint as instructed on the product and load it into the sprayer. The preparation usually involves thinning the paint, so ensure that you follow instructions to the letter.
Also, re-test the sprayer on scrap material and make any necessary adjustments. Once satisfied with the settings, you can begin painting the bumper.
- Hold the sprayer 8-10 inches from the bumper and apply the paint in sweeping, side-to-side motions. Ensure you apply the finish thinly to avoid issues with drying or wrinkling.
- Allow the first coat to dry as instructed by the manufacturer, and then apply 3-4 more coats using the same technique. Afterward, allow the paint to dry as instructed on the label.
Note
- As the paint dries, clean the sprayer to prepare it for holding the clear coat.
- After the final paint coat dries, use 1500-grit sandpaper to wet sand the surface and make it smooth. Afterward, wipe the bumper with mineral spirits before proceeding.
Step 6: Finishing
Load the sprayer with the clear lacquer and spray it onto the bumper using the same techniques you used while painting and priming. Allow the first layer of clear coat to dry, sand it lightly and then apply 2-3 more coats.
After the final coat, allow the bumper finish to dry for at least 24 hours.
Step 7: Reattach the Bumper Cover
After 24 hours, the bumper finish will be dry and hardened enough to allow you to reattach the bumper to the vehicle without problems.
- Select the correct fasteners and carefully fix the bumper cover onto the vehicle. Don’t miss any fastening points; the bumper won’t stay put. Also, avoid driving the car for about one week to allow the paint to harden correctly.
Here’s How to Paint Car Bumper:
What Is the Average Cost of Repainting a Bumper
The average cost of painting a car bumper primarily depends on whether you will acquire professional services or do the work yourself.
However, the size of the bumper and the damage extent also cause slight variations in the average cost regardless of the choice of labor.
So let me discuss these factors in depth to help you narrow down the numbers.
-
Professional Bumper Paint Job
When you take your car for a professional paint job, you can select either a basic or premium one.
- A basic paint job is the cheapest option costing between $200-$300. This affordable package involves minimal prep work while the bumper is still attached to the car. The prep only involves washing the car, taping off panels around the bumper, and then painting using single-stage automotive paint.
For the newbies, Single-stage auto paint is similar to the standard paint and primer in one. The product contains all the necessary components to accomplish the task without priming or applying a clear coat afterward. Consequently, the task becomes cheaper and quicker to complete.
Unfortunately, single-stage paints do not stand up well to the elements because they are thinner than standard 2-step paints. They chip quickly and are quick to dull and oxidize; therefore, you will frequent trips to the body shop.
If you can only afford a basic paint job, ask the professional to apply a few coats of clear over the single-stage paint to make it last longer.
Remember, a basic paint job does not cover repair costs, so I recommend getting the premium service package if your bumper is badly damaged.
- A premium paint job will cost you about $500 for an average-sized standard bumper. However, the cost could go up to $1000 if you have a large bumper with a lot of physical damage that needs repair.
A premium paint job is more expensive because It involves more extensive preparations, including sanding and rust repair. In addition, the professionals use higher quality paints that are more expensive.
-
DIY Bumper Paint Job
The DIY route is more appropriate if the professional painting costs are too high for you. However, you must possess the necessary equipment and skills to ensure the best results.
Your first DIY attempt will cost you the most because of the first-time purchase of the tools and products you need for the job. You will need to purchase the following:
- Preparation Supplies such as sandpaper, tack cloths, a paint sprayer, Painter’s tape, and mineral spirits will cost you about $200.
- Auto Paint, primer, and clear coat, whose prices vary depending on the quality of the product. Assuming you purchase high-quality products, you may spend as much as $150-$200 for this first purchase. However, you may spend more on the paint if you have a large-sized bumper because you will need more paint for full coverage.
Other essential supplies include
- Sandable body filler to repair dents and other imperfections.
- Power sander or a sanding block
- Sealer to cover exposed metal
- Safety gear like goggles, coveralls, gloves, and a gas mask.
Even though the first purchases seem a little costly, all subsequent jobs will be cheaper because you already have the tools.
I recommend using the DIY option if your bumper only needs a basic paint refresh. If it requires extensive repairs, take it to the professionals for the best results.
How Long Does Painting a Bumper Take?
Painting a standard-sized car bumper will take 12-24 hours. This duration includes the repair and paint, primer, and clear coat drying time.
Even though both factors are important, repairs and other prep work take up most of the time. The more severe the damage, the more time you need to prepare, which means you will take longer to complete the entire task. Let me break it down for you even further.
- Extensive damages, such as large dents and cracks in the bumper, will take the longest to complete. Filling the cracks and pulling out the dents may take 4-6 hours. And, if you include sanding, priming, and painting, your vehicle could be out of commission for more than 24 hours.
- Superficial damages, such as tiny cracks in the paint finish, are much easier to fix. At this stage, the cracks only go as deep as a few top paint layers, meaning the primer layer remains intact. Therefore, all you have to do is sand down the cracks to create a smooth surface for painting. You don’t have to remove the bumper to get the job done, allowing you to have your vehicle back in 24 hours or less.
- If you’re painting a new bumper, the painting duration will only depend on whether the bumper is pre-primed or not. A pre-primed bumper only requires sanding before painting; therefore, you will have your vehicle back in 12-20 hours. If it is unprimed, you must apply primer and then paint. Therefore, you will have to add an hour or two to account for the drying time of the primer.
The times mentioned above are precise waiting periods if you take your car to a professional. However, a few factors could prolong the duration of painting a car bumper. They include:
- If your favorite auto shop is backed up, you must wait longer as they serve the customers who came before you.
- If you need a replacement bumper for an exotic vehicle, you may have to wait longer, especially if the replacement parts must be imported.
- If your vehicle’s paint is uniquely customized, it may take longer to color-match the bumper’s paint to the rest of the car.
Note:
- If you are Painting DIY, these durations also apply to you, but only if you have the necessary skills to work as fast as a professional. If you’re still new to auto painting, allow yourself up to 72 hours to complete the task. This way, you will not rush, thus reducing your chances or ruining the finish.
Should I Repaint or Replace Bumper?
Many think that a damaged bumper is merely a cosmetic issue. However, without proper diagnosis, you may end up endangering your life and the durability of your car by repairing a bumper that needs replacement.
You also don’t want to spend much money replacing a bumper that could be fixed with a bit of repair.
So, which damages can be fixed, and which are too severe for repairs? Let’s find out below.
-
When to Replace Your Car Bumper
You should replace a bumper with large cracks and dents because it won’t protect passengers or other vehicle components from harm during impact.
It may be possible to repair the flaws cosmetically, but the task would be extensive and, therefore, quite expensive. The bumper’s structural integrity will be compromised, even with the repairs.
You should also replace your car bumper if its hooks are damaged or broken during impact. The hooks keep the bumper safely secured to the splash guard, grill, and valance panel.
Without them, the vehicle component is at risk of being loose or completely falling off the vehicle. Unfortunately, replacing bumper hooks without replacing the bumper itself is impossible.
-
When to Repair Your Car Bumper
More minor cracks on a bumper are easy to repair as long as they are not too large or too deep that they’re visible from both sides of the bumper. You can quickly fix these with a bit of auto filler, sand it down and then cover up the mess with some quality paint.
Significant paint damages are also repairable if the bumper does not have physical damage. The work will be extensive because you will have to strip the bumper of the old finish, prime it and then repaint it.
However, if your bumper has extensive paint damage and large cracks and dents, you’re better off replacing it.
Is It Cheaper to Wrap or Paint a Bumper?
It is much cheaper to wrap your car bumper than paint, and it can be the ideal way to customize it without the paint mess. However, there’s a catch!
Your bumper must be pristine, meaning there are no cracks in the original paint, dents, or cracks on the bumper body. Car wraps tend to stick snugly to the car body, so any imperfections in the finish will be highlighted.
For this reason, I recommend that you only consider wrapping your car bumper if its finish is still in good condition but you want to change the appearance temporarily.
Affordability aside, here are a few other reasons that may push you to select wrapping your car bumper over painting it.
-
Better Quality
The quality of auto paint and car wraps vary, but car wraps are often at the top of the table. Car wrap manufacturers make products from long-lasting materials designed to protect your vehicle’s appearance.
They don’t fade or chip as quickly as car paint, which is advantageous because bumpers are exposed to the most damaging elements daily.
-
Numerous Design Options
Car wraps come in several colors and designs, including holographic effects and other details that could be hard to achieve even with specialized paint.
You can get custom wraps that match the exact color palette you want to see on your vehicle or outfit a basic wrap with designs like lettering logos and other business graphics.
-
Increases the Resale Value Of Your Car
When selling a used vehicle, one of the most significant selling points – apart from mileage – is the original paint’s condition.
A scratched-up or faded paint job will make your vehicle look older, and you may even lose potential customers. However, you can protect the original paint job and maintain a high resale value with a quality rap.
-
Quicker to Install
The biggest benefit of wrapping your car bumper is the quick turnaround. It is the perfect option if you cannot afford to have your car sitting in the body shop for days.
There are no extensive preparations and repairs, and you don’t need to wait long hours for anything to dry.
Do I Need to Sand My Bumper Before Painting?
You can skip sanding if the old paint on your bumper is still solid and uncracked. However, if the existing finish is damaged, you must sand it to reveal undamaged layers before priming and painting.
A power sander is the best tool for sanding your car bumper, especially if the old paint is too damaged. This power tool can cut through the old paint to reveal the bumper surface, allowing you to paint on a clean slate.
Nevertheless, you can opt for hand sanding if you don’t know how to use a power sander. It will take much longer, but at least there won’t be a risk of damaging the bumper.
Can a Bumper Be Painted Without Removing It?
Yes, it can!
Sometimes, the damage on a bumper is too superficial to warrant removing it. For instance, if your car bumper only has a few minor scratches on its paint but no physical damage, removing it is pointless.
You will spend much extra time removing and reattaching it on top of the painting duration.
So, how do you paint a car bumper without removing it?
Cover all car components around the bumper using painter’s tape to prevent overspray from ruining the rest of the vehicle’s finish. And be careful to paint even the hidden corners of the bumper to prevent the finish from failing.
Nevertheless, I recommend removing the bumper before painting to ensure that you cover all corners. In addition, you will avoid the risk of overspray ruining your car finish entirely.
Conclusion
The car bumper is one of the smallest vehicle components but is exposed to the harshest driving impacts. It protects you from harm and prevents the other vehicle components from getting too damaged in case of major or minor impacts.
For this reason, it is no wonder that car bumpers are the most repaired vehicle parts and always need a fresh paint coat.
That said, the biggest question that car owners have is,
How Much Does It Cost to Paint A Bumper On A Car?
DIY car painting is much cheaper, costing as little as $200 compared to the $1000 you’d spend in a professional body shop.
Nevertheless, a professional paint job is the best option because the results will be smoother and longer lasting.
DIY painting is only good if your bumper has superficial damage and requires a simple touch-up. If the material has dents and cracks, a professional has the best chance of restoring it to pristine condition.
Even though you can repair a car bumper, not all damages are repairable. For instance, large cracks and dents on the bumper clearly indicate that it has lost its structural integrity, so the best option is to replace it instead of paint it.
Thank you for reading this far, and I hope you now know the costs to expect whenever you want to paint your car bumper. If you need clarification, please reach out in the comments below.